> ## Documentation Index
> Fetch the complete documentation index at: https://docs.plantpredict.com/llms.txt
> Use this file to discover all available pages before exploring further.
# How to Import PVsyst Projects
> Step-by-step workflow for importing a full PVsyst project (ZIP) or a single PVsyst weather file (.MET) into PlantPredict
This workflow guides you through importing a PVsyst project into PlantPredict, so you don't have to re-enter modules, inverters, weather, tracker geometry, and electrical sizing by hand. You upload your PVsyst project as a single ZIP file, review what PlantPredict found, and create the project with one click. Every variant in your PVsyst project becomes a prediction in PlantPredict.
If you only have a single PVsyst weather file, you can upload that on its own—both options are covered below.
PVsyst project import is currently in **Beta**. For a broader overview of how PVsyst concepts map to PlantPredict, see [Transition from PVsyst to PlantPredict](/user-guide/knowledge-base/transition-from-pvsyst).
## Overview
PlantPredict imports a PVsyst project directly from the project ZIP exported by PVsyst. The PVsyst project (PRJ) becomes a PlantPredict project, and each calculation variant (VC#) becomes its own prediction. Modules (PAN), inverters (OND), and weather data (MET) embedded in the project are imported into your libraries automatically.
**Prerequisites:**
* A ZIP export from a current version of PVsyst that includes every variant you want to bring over, along with the referenced module (.PAN), inverter (.OND), and weather (.MET) files
* For a standalone weather import: a PVsyst weather file (.MET) saved by PVsyst v6.40 or later
**Imports go into your own library.** Anything new—a module, inverter, or weather file PlantPredict has not seen before—is added to your library. Anything that already exists is reused, so you will not end up with duplicates. Modules match on manufacturer, model, and electrical specifications; inverters on manufacturer and model; weather on location, source, and data type.
***
## Part 1: Import a Full PVsyst Project (ZIP)
In PVsyst, export the full project to a ZIP file. Confirm that all the variants you want to bring over are included, along with every referenced module (.PAN), inverter (.OND), and weather (.MET) file.
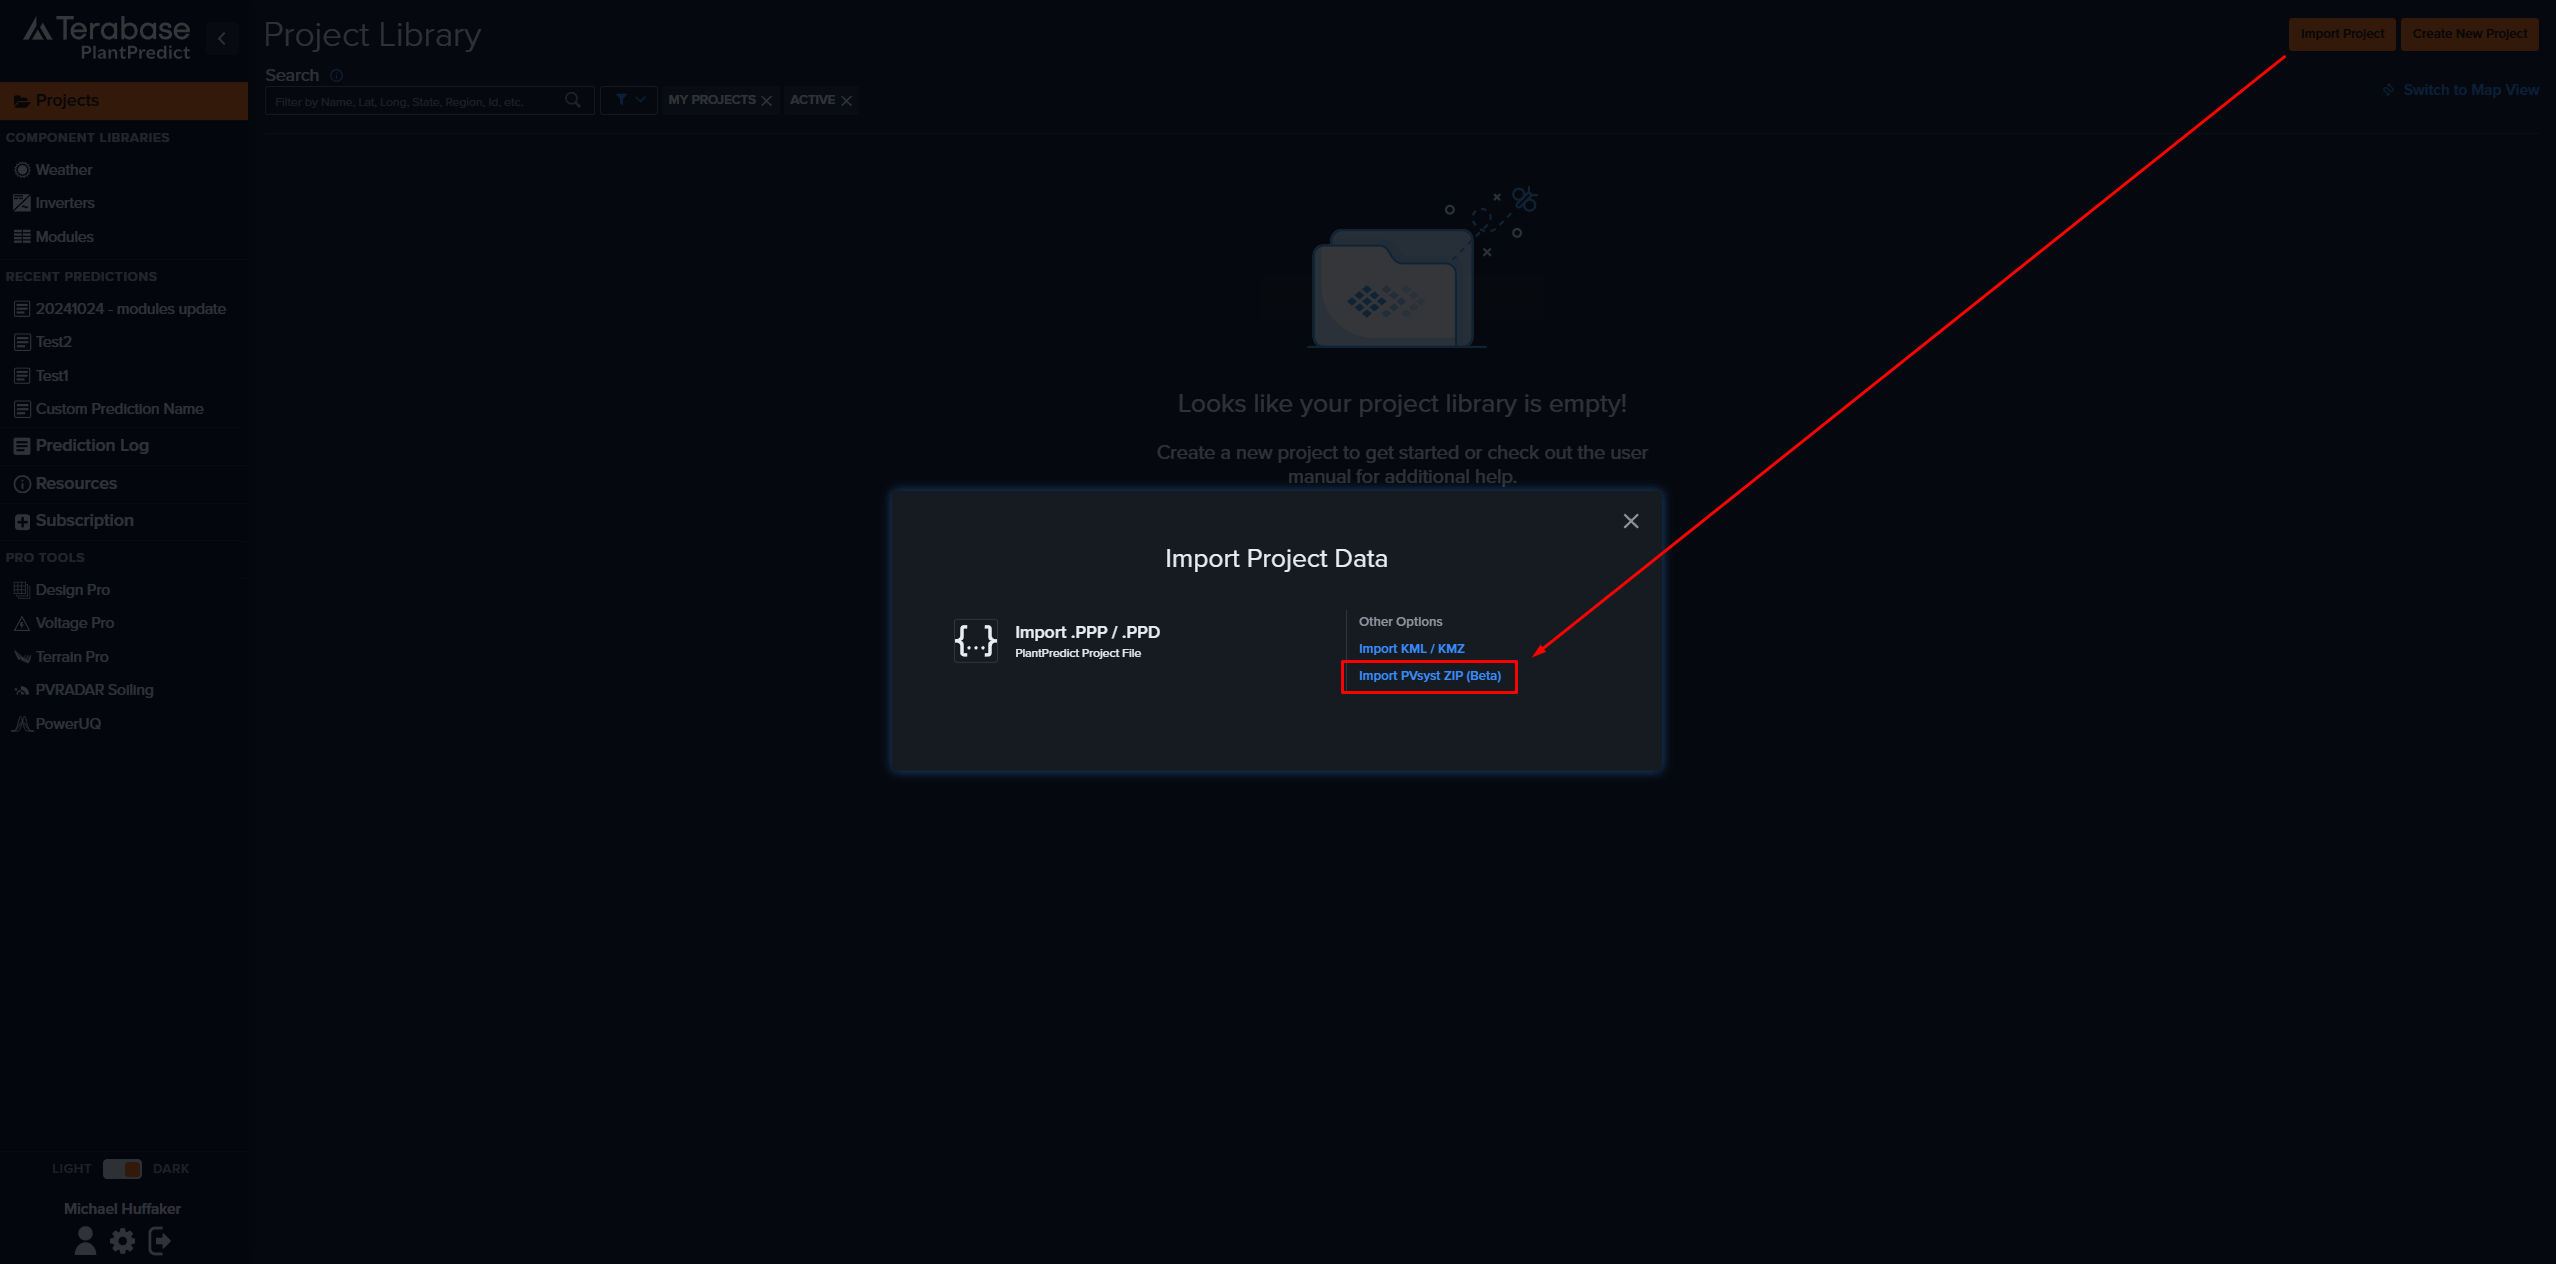
On the [Project Library](/user-guide/ui/project-library), click **Import Project** in the top right. In the **Import Project Data** dialog, under **Other Options**, choose **Import PVsyst ZIP (Beta)**, then select the ZIP file you exported.
Only `.zip` files are accepted for PVsyst project import.
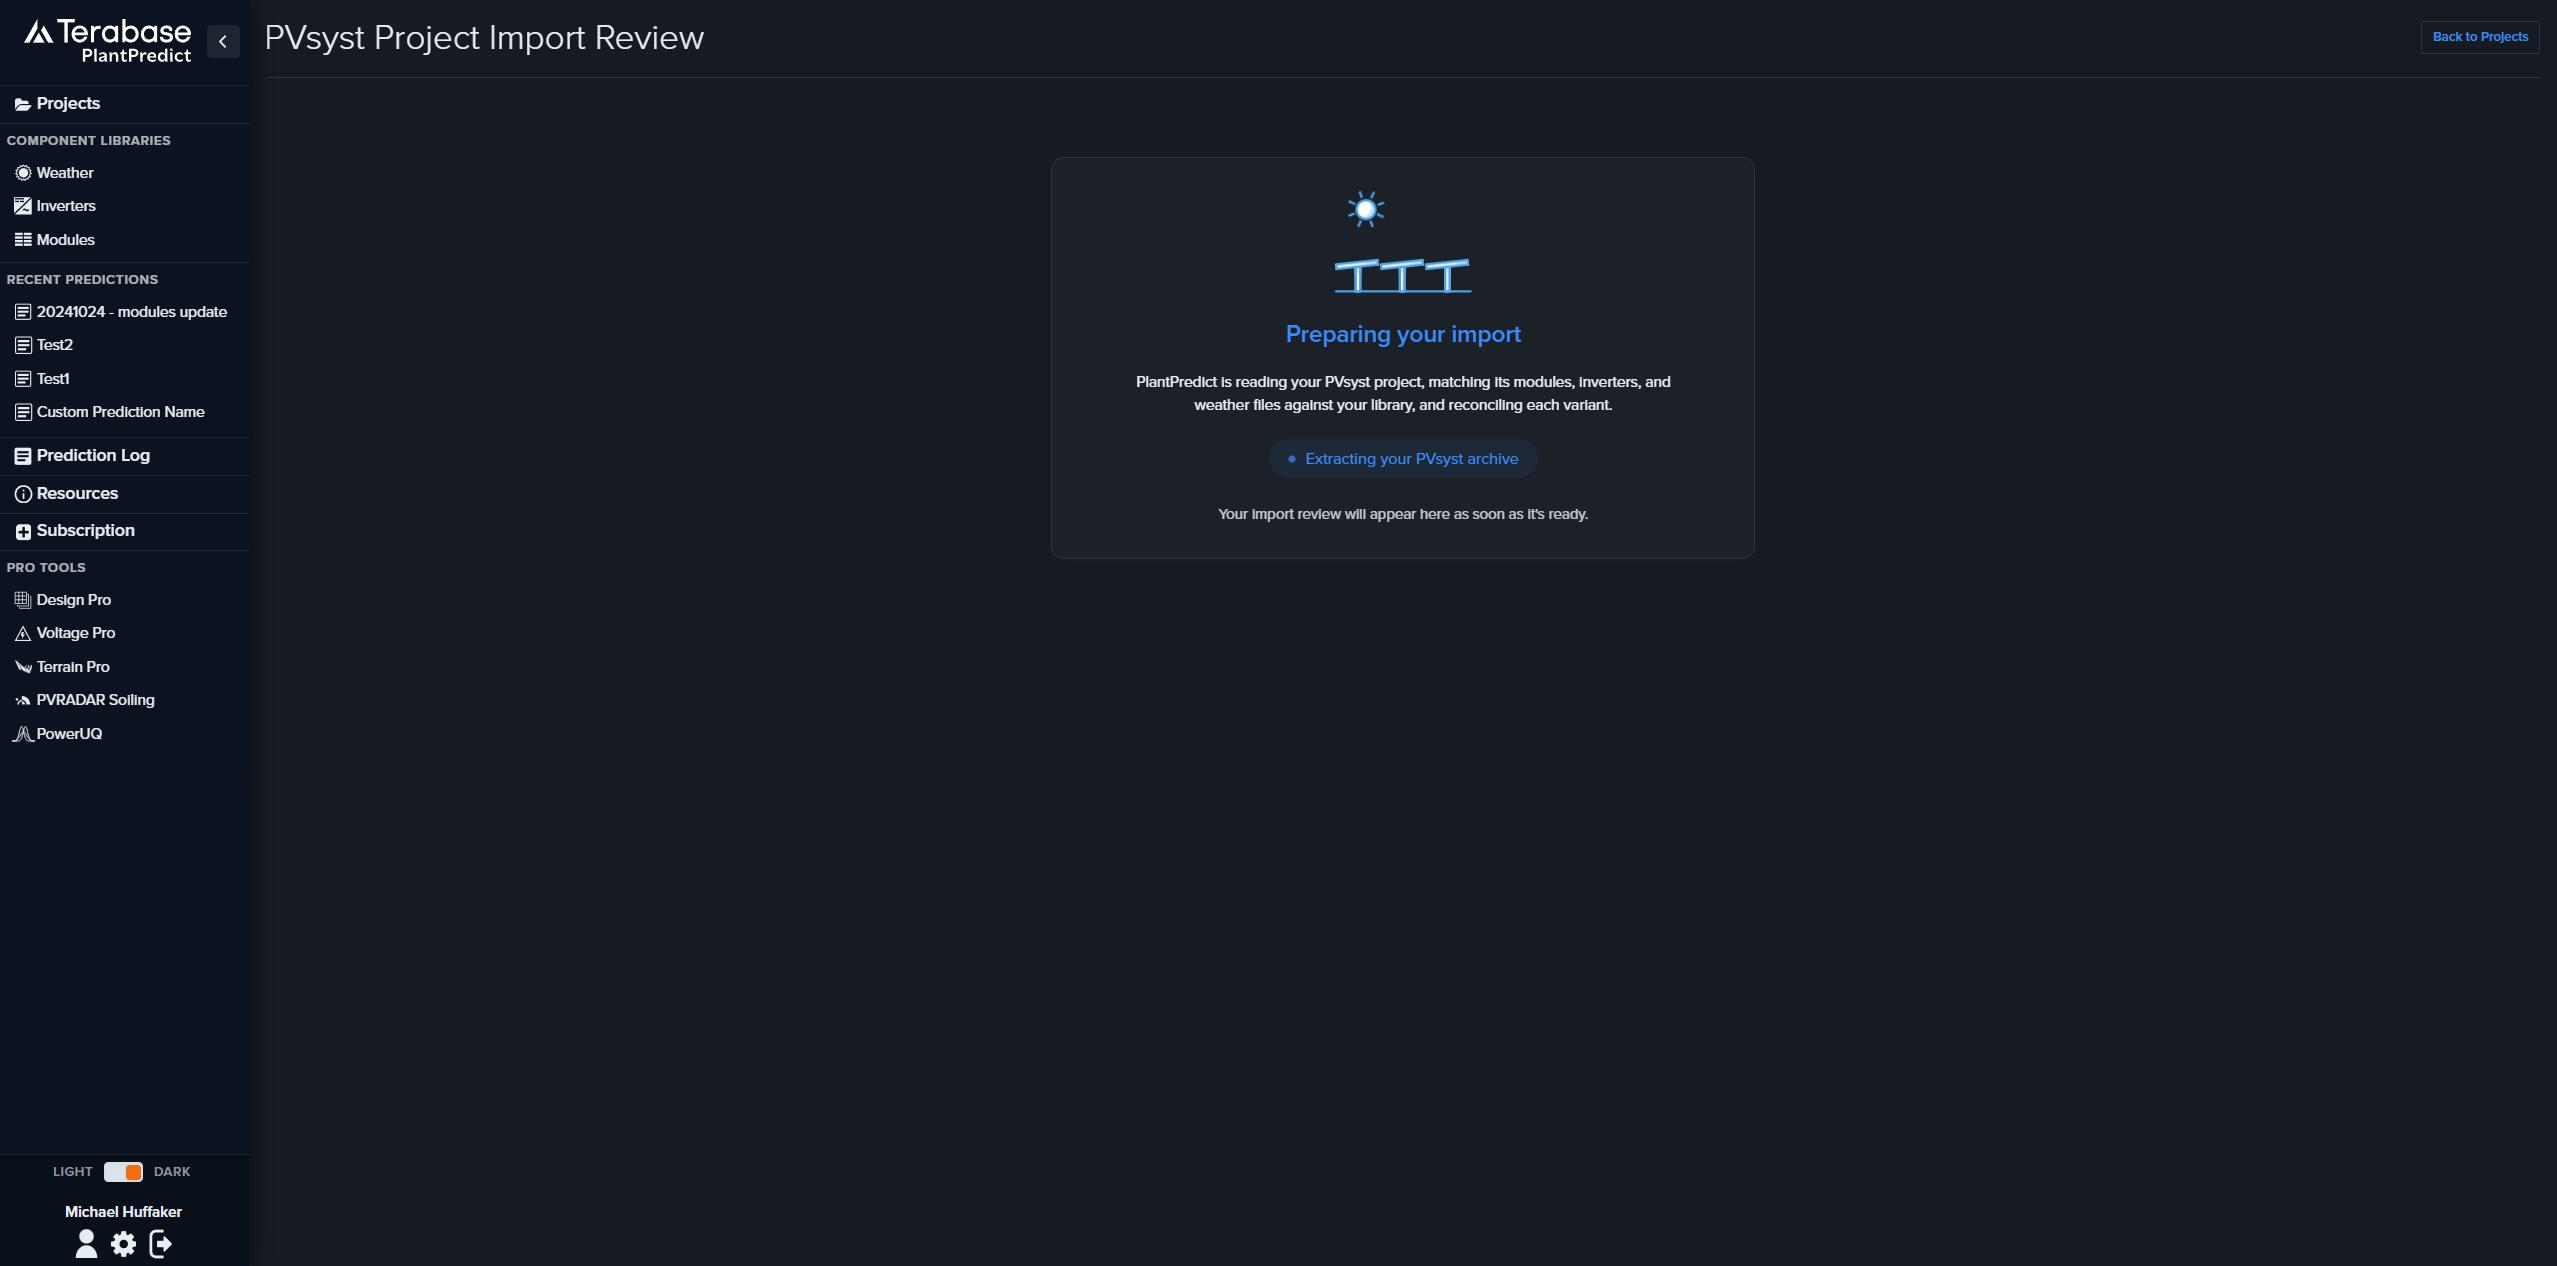
 PlantPredict reads and prepares your import in the background. It extracts the archive, matches the support files to each variant, and reconciles modules, inverters, and weather against your library. This usually takes only a few seconds, and a **Preparing your import** status is shown while it works.
 Once processing finishes, the **PVsyst Project Import Review** page appears so you can confirm everything before you create the project. It shows the project details (name, location, and the assigned weather and temperature station) and one card for each variant.
For every variant you will see the matched equipment laid out as cards:
* **Modules** and **Inverters** show Manufacturer, Model, Rated Power, and the source file
* **Weather** shows Station, Coordinates, Data Type, and the source file
Each card carries a badge indicating whether the item was **Added to library** (new) or **Already exists in library** (reused). If a variant includes a 3D shading scene, the card is tagged **3D Shade Scene**. Click any card to open that library record in a new tab and confirm the details.
Once processing finishes, the **PVsyst Project Import Review** page appears so you can confirm everything before you create the project. It shows the project details (name, location, and the assigned weather and temperature station) and one card for each variant.
For every variant you will see the matched equipment laid out as cards:
* **Modules** and **Inverters** show Manufacturer, Model, Rated Power, and the source file
* **Weather** shows Station, Coordinates, Data Type, and the source file
Each card carries a badge indicating whether the item was **Added to library** (new) or **Already exists in library** (reused). If a variant includes a 3D shading scene, the card is tagged **3D Shade Scene**. Click any card to open that library record in a new tab and confirm the details.
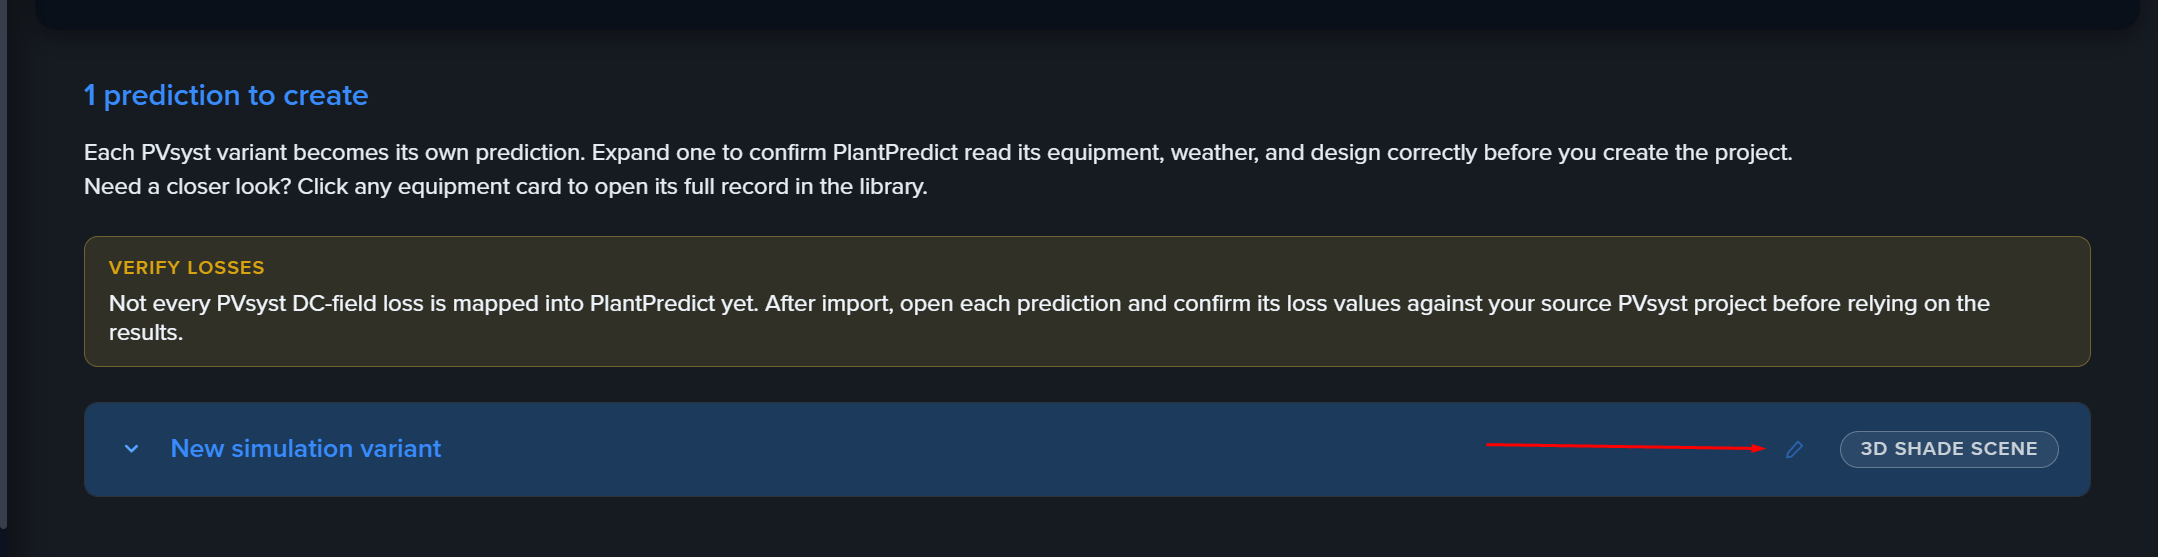
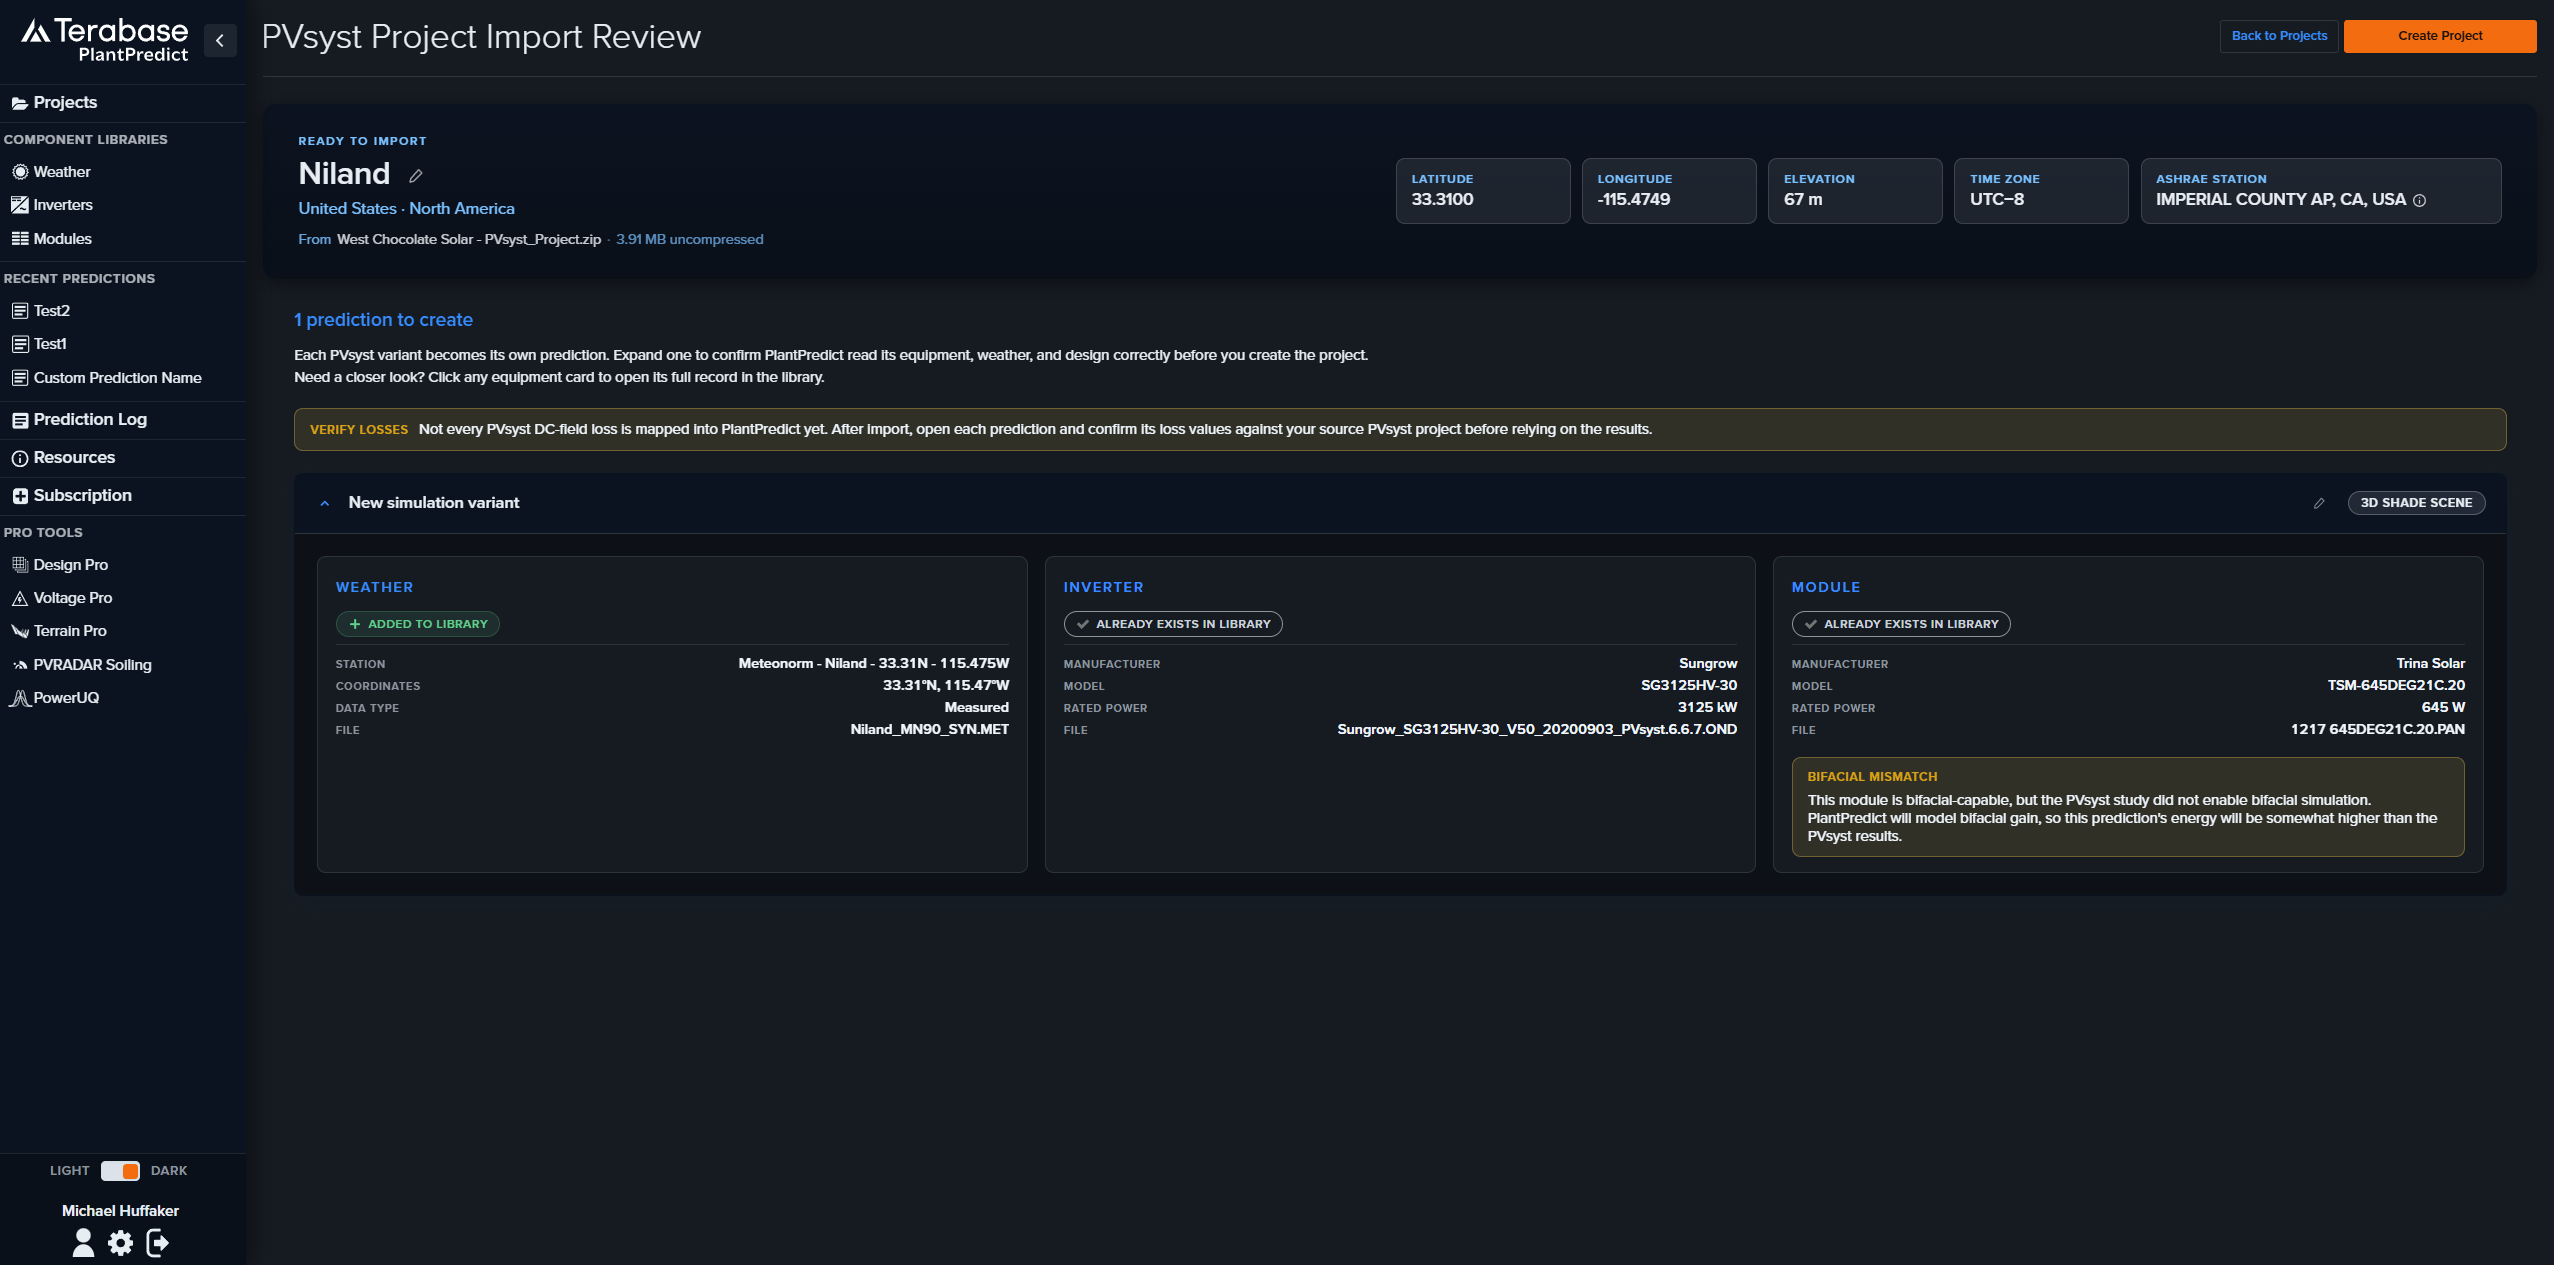 **Verify losses.** Not every PVsyst DC-field loss is mapped into PlantPredict yet, and the review screen shows a **Verify losses** reminder for this reason. After import, open each prediction and confirm its loss values against your source PVsyst project before relying on the results.
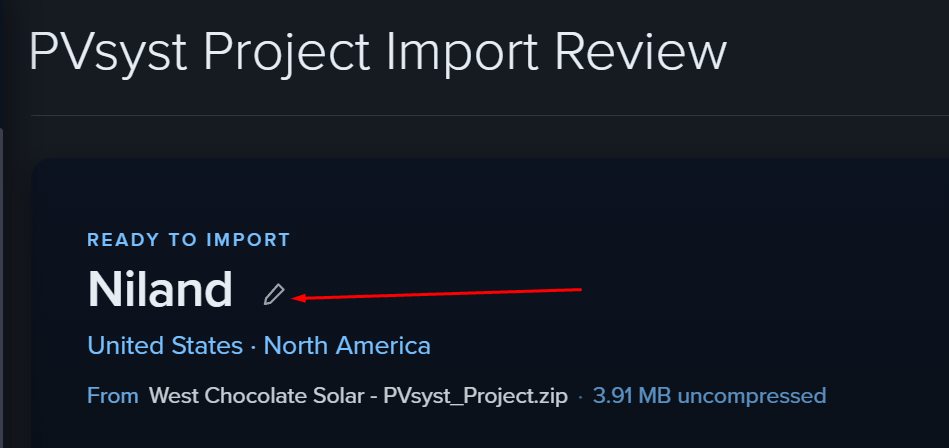
 Before creating anything, you can rename the project and any prediction from the review page. Click the pencil next to a name and type a new one. If you leave a name unchanged or blank, PlantPredict keeps the name from your PVsyst file.
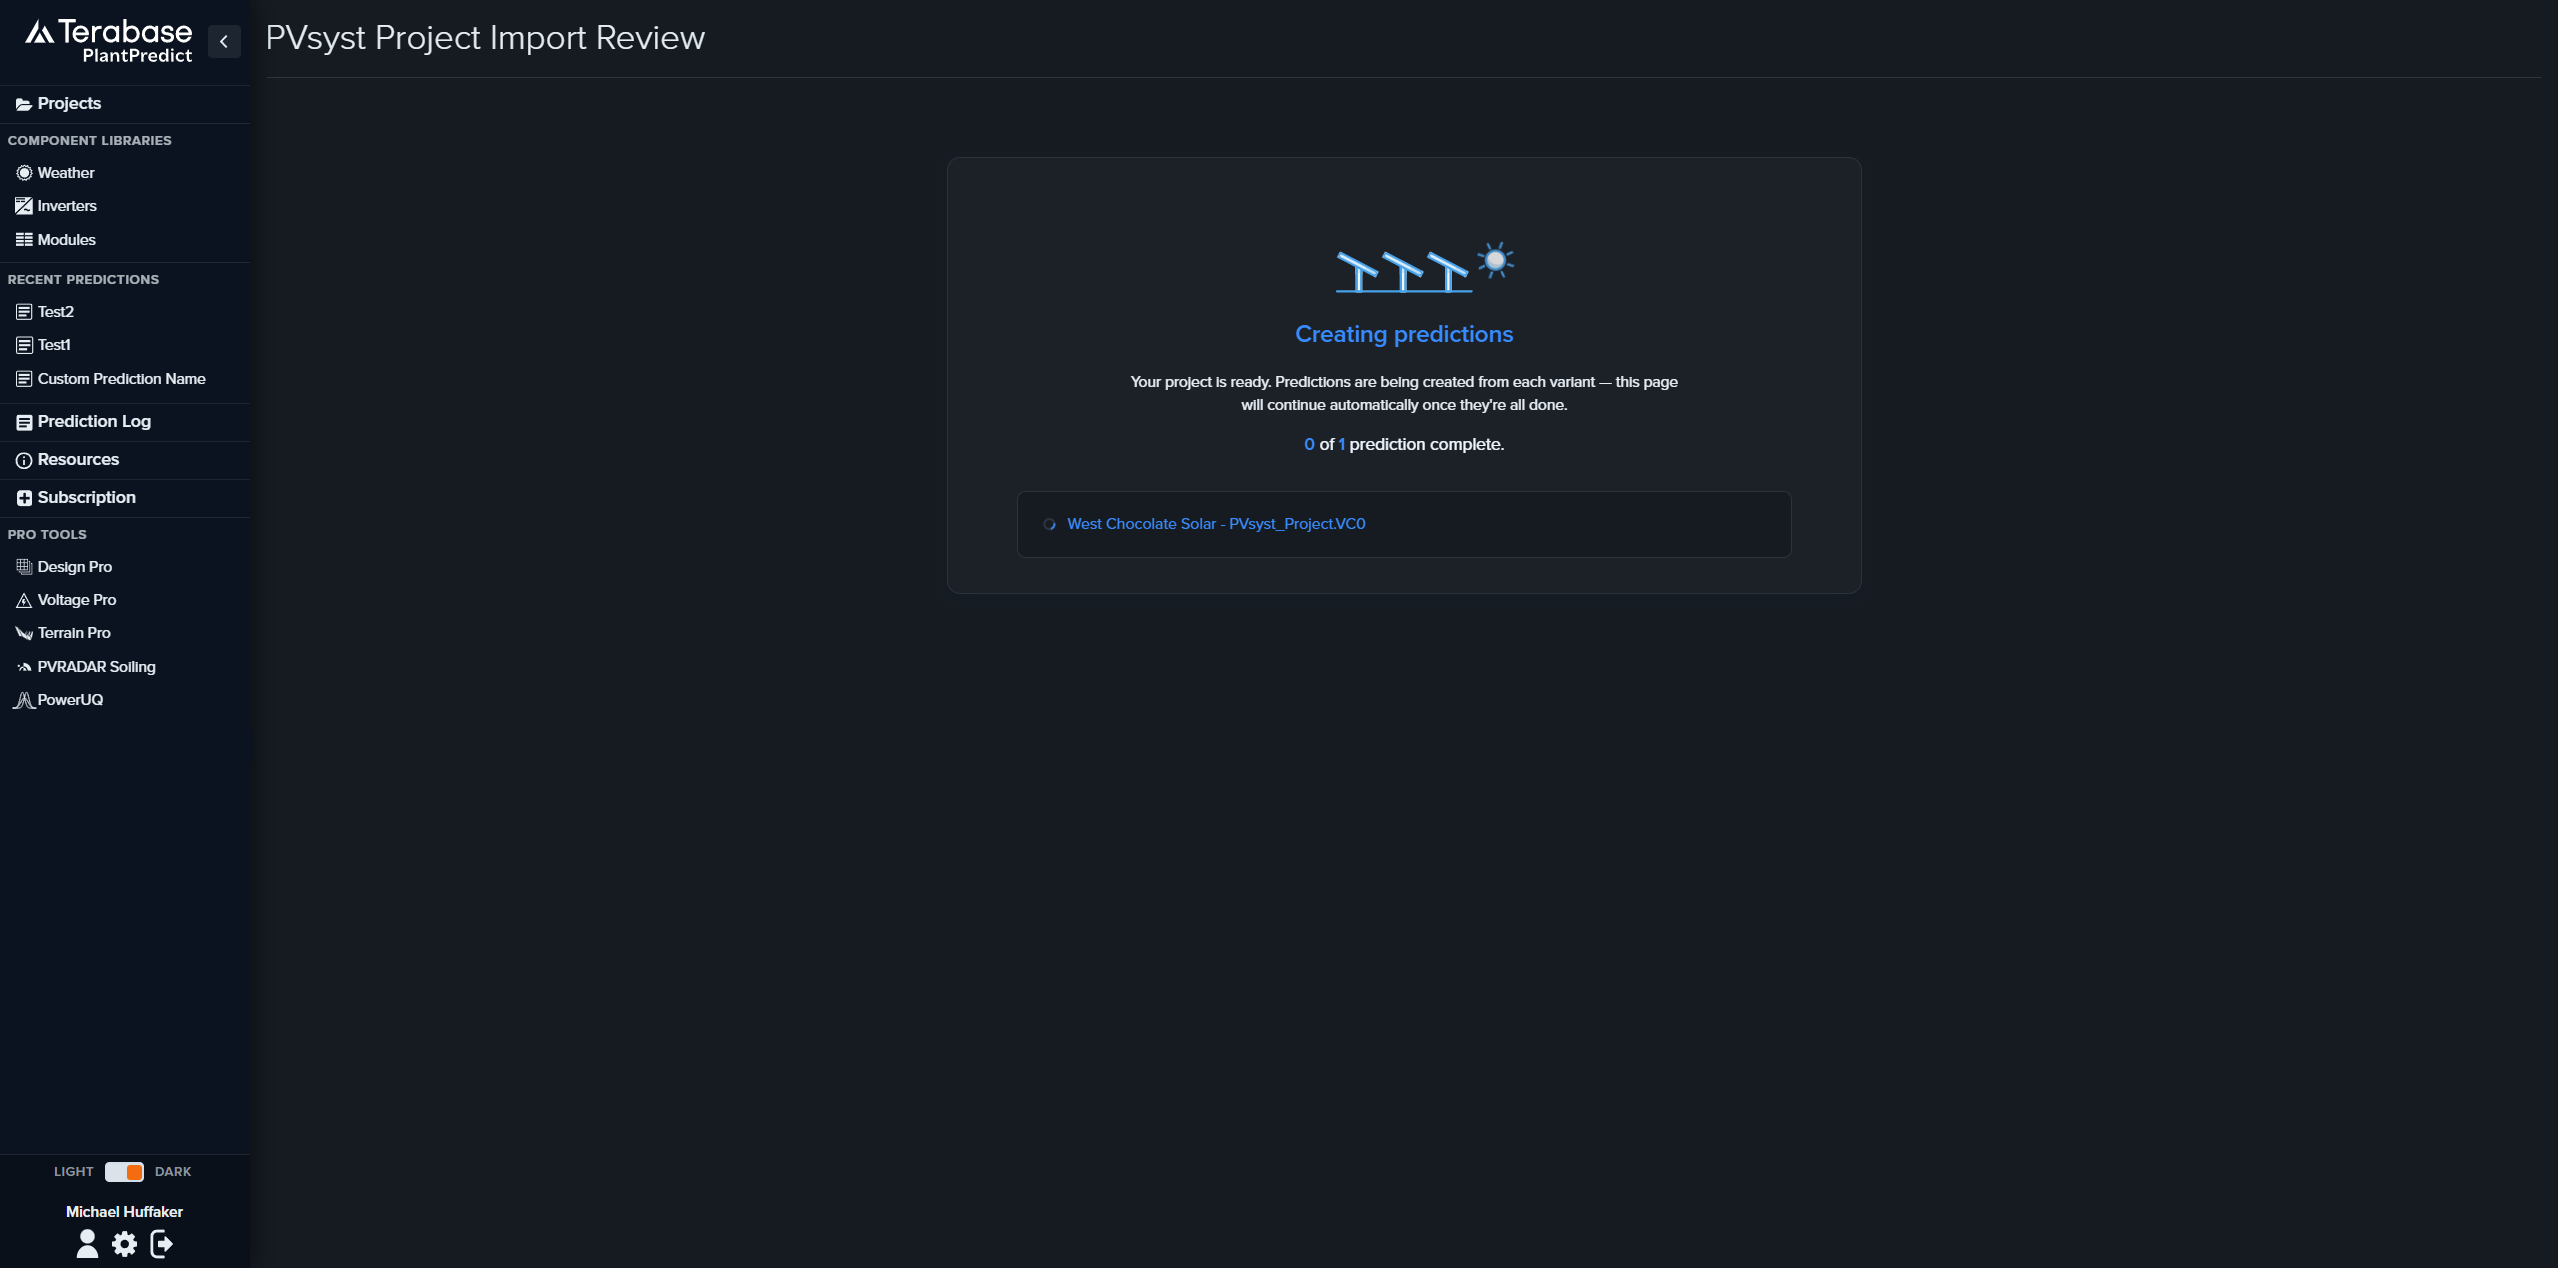
 Click **Create Project**. PlantPredict creates the project immediately and then builds each prediction in the background, showing progress as it goes (for example, **3 of 5 predictions complete**). When it finishes, you are taken to your new project.
If any variant could not be brought over, a note tells you how many and why—the rest of the project still completes.
Click **Create Project**. PlantPredict creates the project immediately and then builds each prediction in the background, showing progress as it goes (for example, **3 of 5 predictions complete**). When it finishes, you are taken to your new project.
If any variant could not be brought over, a note tells you how many and why—the rest of the project still completes.
 Your new project appears in your [Project Library](/user-guide/ui/project-library) with all of its predictions. Importing does not run the simulations for you—open a prediction and run it whenever you are ready, just as you would for any prediction you created by hand. See [Predictions](/user-guide/ui/predictions) for details.
***
## Part 2: Import a Single PVsyst Weather (.MET) File
If you only have a PVsyst weather file—and not a full project—add it straight to your Weather Library without going through the project import.
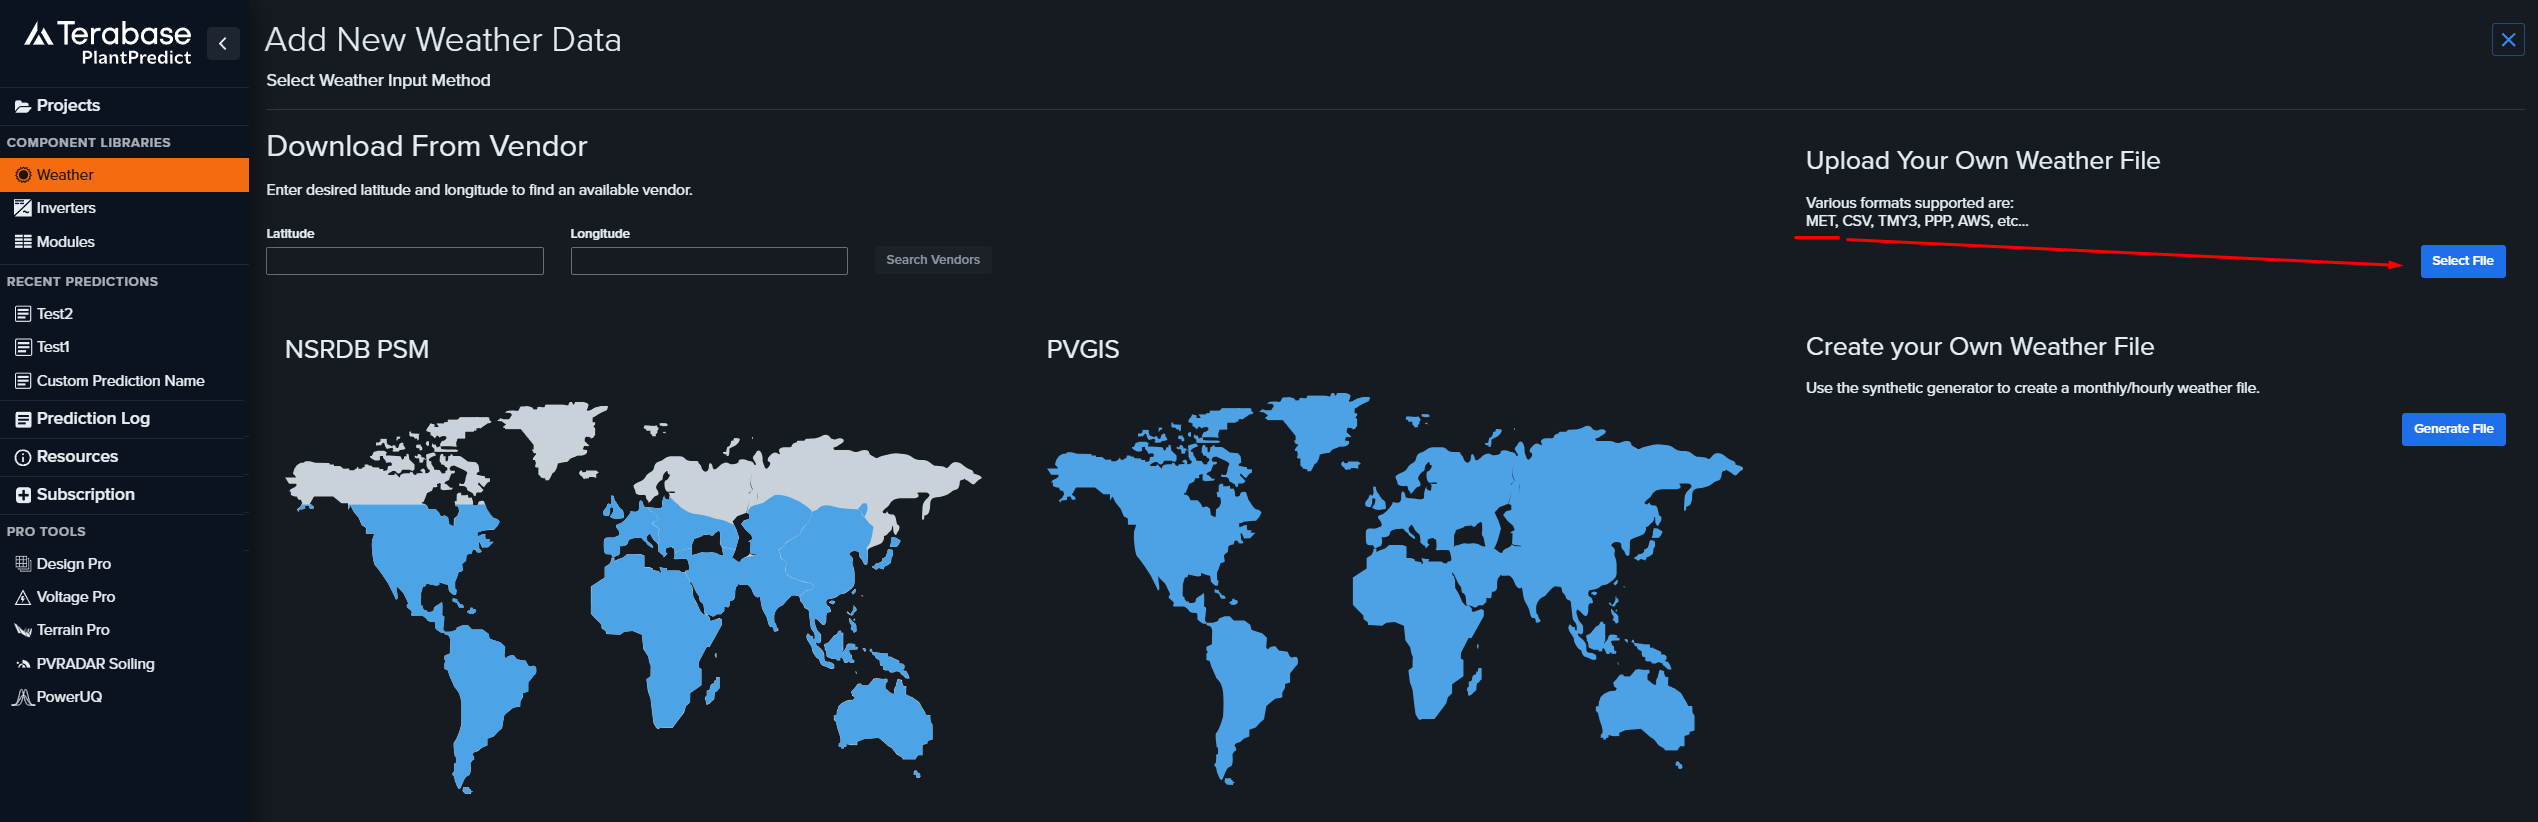
From the [Weather Library](/user-guide/ui/weather-library), click **Add New Weather**. On the **Add New Weather Data** page, find the **Upload Your Own Weather File** card under **Select Weather Input Method**. See [Add New Weather](/user-guide/ui/add-new-weather) for a full description of the options on this page.
Click **Select File** on the **Upload Your Own Weather File** card and choose your PVsyst .MET file.
PVsyst .MET files must be saved by PVsyst **v6.40 or later**. Other weather formats such as CSV, TMY3, PPF, EPW, and AWS continue to work through the same upload path.
Your new project appears in your [Project Library](/user-guide/ui/project-library) with all of its predictions. Importing does not run the simulations for you—open a prediction and run it whenever you are ready, just as you would for any prediction you created by hand. See [Predictions](/user-guide/ui/predictions) for details.
***
## Part 2: Import a Single PVsyst Weather (.MET) File
If you only have a PVsyst weather file—and not a full project—add it straight to your Weather Library without going through the project import.
From the [Weather Library](/user-guide/ui/weather-library), click **Add New Weather**. On the **Add New Weather Data** page, find the **Upload Your Own Weather File** card under **Select Weather Input Method**. See [Add New Weather](/user-guide/ui/add-new-weather) for a full description of the options on this page.
Click **Select File** on the **Upload Your Own Weather File** card and choose your PVsyst .MET file.
PVsyst .MET files must be saved by PVsyst **v6.40 or later**. Other weather formats such as CSV, TMY3, PPF, EPW, and AWS continue to work through the same upload path.
 PlantPredict reads the file, adds it to your Weather Library, and opens the new record. If you have already uploaded the same site before, PlantPredict recognizes it, skips creating a duplicate, and opens the existing record instead. No review step is needed for a single file. See [Weather File](/user-guide/ui/weather-file) for a walkthrough of the imported record.
***
## Verifying Your Import
PlantPredict gives you two chances to confirm the import: on the review screen before you create the project, and on the project itself afterward.
### Before You Create the Project
On the review screen, expand each variant to confirm PlantPredict read its equipment, weather, and design correctly. Click any equipment card to open its full record in your library and check the specifications.
### After You Create the Project
Your project appears in your Project Library with all of its predictions. Open a prediction and confirm that the equipment, weather, tracker or tilt configuration, and electrical sizing match your PVsyst variant before you run it. If a variant card showed a **3D Shade Scene** tag on the review screen, PlantPredict attaches that scene to its prediction—open the [3D Scene](/user-guide/ui/3d-scene-overview) page on the prediction to confirm.
***
## What Gets Imported Automatically
* **Project location**: country, region, time zone, and elevation
* **Each PVsyst variant**, as its own prediction
* **Modules** (.PAN), added to your [Module Library](/user-guide/ui/module-library) if not already there
* **Inverters** (.OND), added to your [Inverter Library](/user-guide/ui/inverter-library) if not already there
* **Weather** (.MET), added to your [Weather Library](/user-guide/ui/weather-library) if not already there
* **Tracker or fixed-tilt geometry**, electrical sizing (modules per string and strings per inverter), soiling losses, and ground albedo
* **A 3D shading scene** for each prediction, when one is present in the PVsyst variant
* **A temperature design (ASHRAE) station**, chosen automatically from the project location
***
## What to Add After Import
A few things are not part of a PVsyst project export, so add them in PlantPredict after importing:
* **Plant transformer and transmission line configuration.** PVsyst does not carry this, so add it in the project's [Power Plant Builder](/user-guide/ui/power-plant-builder-block).
* **Temperature station adjustments (optional).** PlantPredict assigns an ASHRAE station from the project coordinates automatically. Change it in the prediction's [System Details](/user-guide/ui/system-details) if you prefer a different one.
***
## Good to Know
* **Your predictions do not run automatically.** After import, open each prediction and run it when you are ready.
* **Duplicates are handled for you.** If a module, inverter, or weather file already exists in your library, PlantPredict reuses it instead of creating a copy.
* **Shading is best effort.** The 3D scene is attached when it is available. If it cannot be attached for a particular prediction, the prediction is still created (just without the scene) and the rest of the import is unaffected.
* **Azimuth conventions are converted.** PVsyst uses 0° = South (±180°), while PlantPredict uses 0° = North (0°–360°, clockwise). The importer converts values automatically, but re-verify module azimuth and tracker axis azimuth after import. See [Transition from PVsyst → Azimuth convention](/user-guide/knowledge-base/transition-from-pvsyst#azimuth-convention).
* **PAN files are re-solved.** After importing a PAN file, PlantPredict re-solves the single-diode parameters to ensure internal consistency—the resulting values will differ slightly from PVsyst's stored values. See [Transition from PVsyst → PAN file re-solve](/user-guide/knowledge-base/transition-from-pvsyst#pan-file-re-solve).
***
## Troubleshooting
If an import does not work, the message you see usually points straight at the cause. The most common ones:
| What you might see | What it means | What to do |
| ----------------------------------------------------------------------------------------------------------------------------------------- | -------------------------------------------------------------------------------------------------------------- | --------------------------------------------------------------------------------------------------------------------------------------------------- |
| A message that the weather file is not in the PVsyst v6.40+ text format. | Your weather file was saved by a PVsyst version older than 6.40, which uses a format PlantPredict cannot read. | Re-export the weather file from PVsyst 6.40 or later, then upload it again. |
| A variant is skipped because a file it references is missing (for example, a module or inverter file). | Your export did not include every file that variant needs. | In PVsyst, re-export the full project and make sure all referenced module (.PAN), inverter (.OND), and weather (.MET) files are bundled in the ZIP. |
| "ZIP processed but produced no importable variants." | The ZIP did not contain a usable PVsyst project, or required files were missing. | Re-export from PVsyst, confirming the project (.PRJ), at least one variant (.VC#), and the referenced PAN, OND, and MET files are all included. |
| A variant is skipped with a note about its geometry or layout (for example, missing tracker rotation limits, tilt angle, or row spacing). | That variant is missing information PlantPredict needs to build it correctly. | Open the variant in PVsyst, confirm its orientation and layout are fully defined, and re-export. If it still fails, contact support. |
If a project import fails, reach out to [support@plantpredict.com](mailto:support@plantpredict.com) and let us know what happened—we will investigate. You do not need to re-send your file; PlantPredict automatically saves it along with the error details whenever an import fails. For a weather-file upload, or if a project does not look right after importing, contact support the same way and include a screenshot of any message you saw.
***
## Related Documentation
* [Transition from PVsyst to PlantPredict](/user-guide/knowledge-base/transition-from-pvsyst) — Reference guide for PVsyst users covering topology, loss-tree, and modeling differences
* [Create Module from PAN File](/user-guide/workflows/create-module-from-pan-file) — Import a single PVsyst module file
* [Add New Inverter](/user-guide/ui/add-new-inverter) — Import a single PVsyst inverter file (.OND)
* [Add New Weather](/user-guide/ui/add-new-weather) — All weather import options
* [Project Library](/user-guide/ui/project-library) — Manage projects after import
PlantPredict reads the file, adds it to your Weather Library, and opens the new record. If you have already uploaded the same site before, PlantPredict recognizes it, skips creating a duplicate, and opens the existing record instead. No review step is needed for a single file. See [Weather File](/user-guide/ui/weather-file) for a walkthrough of the imported record.
***
## Verifying Your Import
PlantPredict gives you two chances to confirm the import: on the review screen before you create the project, and on the project itself afterward.
### Before You Create the Project
On the review screen, expand each variant to confirm PlantPredict read its equipment, weather, and design correctly. Click any equipment card to open its full record in your library and check the specifications.
### After You Create the Project
Your project appears in your Project Library with all of its predictions. Open a prediction and confirm that the equipment, weather, tracker or tilt configuration, and electrical sizing match your PVsyst variant before you run it. If a variant card showed a **3D Shade Scene** tag on the review screen, PlantPredict attaches that scene to its prediction—open the [3D Scene](/user-guide/ui/3d-scene-overview) page on the prediction to confirm.
***
## What Gets Imported Automatically
* **Project location**: country, region, time zone, and elevation
* **Each PVsyst variant**, as its own prediction
* **Modules** (.PAN), added to your [Module Library](/user-guide/ui/module-library) if not already there
* **Inverters** (.OND), added to your [Inverter Library](/user-guide/ui/inverter-library) if not already there
* **Weather** (.MET), added to your [Weather Library](/user-guide/ui/weather-library) if not already there
* **Tracker or fixed-tilt geometry**, electrical sizing (modules per string and strings per inverter), soiling losses, and ground albedo
* **A 3D shading scene** for each prediction, when one is present in the PVsyst variant
* **A temperature design (ASHRAE) station**, chosen automatically from the project location
***
## What to Add After Import
A few things are not part of a PVsyst project export, so add them in PlantPredict after importing:
* **Plant transformer and transmission line configuration.** PVsyst does not carry this, so add it in the project's [Power Plant Builder](/user-guide/ui/power-plant-builder-block).
* **Temperature station adjustments (optional).** PlantPredict assigns an ASHRAE station from the project coordinates automatically. Change it in the prediction's [System Details](/user-guide/ui/system-details) if you prefer a different one.
***
## Good to Know
* **Your predictions do not run automatically.** After import, open each prediction and run it when you are ready.
* **Duplicates are handled for you.** If a module, inverter, or weather file already exists in your library, PlantPredict reuses it instead of creating a copy.
* **Shading is best effort.** The 3D scene is attached when it is available. If it cannot be attached for a particular prediction, the prediction is still created (just without the scene) and the rest of the import is unaffected.
* **Azimuth conventions are converted.** PVsyst uses 0° = South (±180°), while PlantPredict uses 0° = North (0°–360°, clockwise). The importer converts values automatically, but re-verify module azimuth and tracker axis azimuth after import. See [Transition from PVsyst → Azimuth convention](/user-guide/knowledge-base/transition-from-pvsyst#azimuth-convention).
* **PAN files are re-solved.** After importing a PAN file, PlantPredict re-solves the single-diode parameters to ensure internal consistency—the resulting values will differ slightly from PVsyst's stored values. See [Transition from PVsyst → PAN file re-solve](/user-guide/knowledge-base/transition-from-pvsyst#pan-file-re-solve).
***
## Troubleshooting
If an import does not work, the message you see usually points straight at the cause. The most common ones:
| What you might see | What it means | What to do |
| ----------------------------------------------------------------------------------------------------------------------------------------- | -------------------------------------------------------------------------------------------------------------- | --------------------------------------------------------------------------------------------------------------------------------------------------- |
| A message that the weather file is not in the PVsyst v6.40+ text format. | Your weather file was saved by a PVsyst version older than 6.40, which uses a format PlantPredict cannot read. | Re-export the weather file from PVsyst 6.40 or later, then upload it again. |
| A variant is skipped because a file it references is missing (for example, a module or inverter file). | Your export did not include every file that variant needs. | In PVsyst, re-export the full project and make sure all referenced module (.PAN), inverter (.OND), and weather (.MET) files are bundled in the ZIP. |
| "ZIP processed but produced no importable variants." | The ZIP did not contain a usable PVsyst project, or required files were missing. | Re-export from PVsyst, confirming the project (.PRJ), at least one variant (.VC#), and the referenced PAN, OND, and MET files are all included. |
| A variant is skipped with a note about its geometry or layout (for example, missing tracker rotation limits, tilt angle, or row spacing). | That variant is missing information PlantPredict needs to build it correctly. | Open the variant in PVsyst, confirm its orientation and layout are fully defined, and re-export. If it still fails, contact support. |
If a project import fails, reach out to [support@plantpredict.com](mailto:support@plantpredict.com) and let us know what happened—we will investigate. You do not need to re-send your file; PlantPredict automatically saves it along with the error details whenever an import fails. For a weather-file upload, or if a project does not look right after importing, contact support the same way and include a screenshot of any message you saw.
***
## Related Documentation
* [Transition from PVsyst to PlantPredict](/user-guide/knowledge-base/transition-from-pvsyst) — Reference guide for PVsyst users covering topology, loss-tree, and modeling differences
* [Create Module from PAN File](/user-guide/workflows/create-module-from-pan-file) — Import a single PVsyst module file
* [Add New Inverter](/user-guide/ui/add-new-inverter) — Import a single PVsyst inverter file (.OND)
* [Add New Weather](/user-guide/ui/add-new-weather) — All weather import options
* [Project Library](/user-guide/ui/project-library) — Manage projects after import