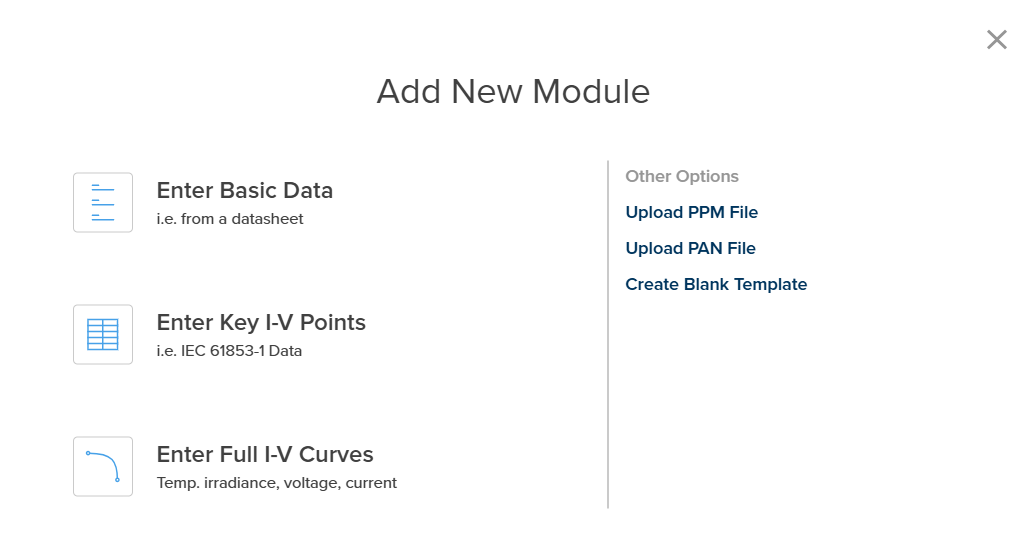
 ## Input Options Overview
| Option | Description | Best For |
| ------------------------- | --------------------------------------------- | ------------------------------------- |
| **Enter Basic Data** | Generate module from datasheet values | Standard module datasheets |
| **Enter Key I-V Points** | Generate from IEC 61853-1 performance data | Lab-tested performance data |
| **Enter Full I-V Curves** | Generate from complete I-V curve measurements | Detailed I-V curve data |
| **Upload PPM File** | Import PlantPredict native module file | Sharing between PlantPredict accounts |
| **Upload PAN File** | Import PVsyst native module file | Migration from PVsyst |
| **Create Blank Template** | Start with empty module file | Advanced users |
***
## 1. Upload PPM File
Upload a PlantPredict native module file (.ppm format). This is a straightforward file import:
1. Click **Upload PPM File**
2. A file explorer opens
3. Navigate to and select your .ppm file
4. The module is imported with all parameters intact
## Input Options Overview
| Option | Description | Best For |
| ------------------------- | --------------------------------------------- | ------------------------------------- |
| **Enter Basic Data** | Generate module from datasheet values | Standard module datasheets |
| **Enter Key I-V Points** | Generate from IEC 61853-1 performance data | Lab-tested performance data |
| **Enter Full I-V Curves** | Generate from complete I-V curve measurements | Detailed I-V curve data |
| **Upload PPM File** | Import PlantPredict native module file | Sharing between PlantPredict accounts |
| **Upload PAN File** | Import PVsyst native module file | Migration from PVsyst |
| **Create Blank Template** | Start with empty module file | Advanced users |
***
## 1. Upload PPM File
Upload a PlantPredict native module file (.ppm format). This is a straightforward file import:
1. Click **Upload PPM File**
2. A file explorer opens
3. Navigate to and select your .ppm file
4. The module is imported with all parameters intact
 ### User Inputs
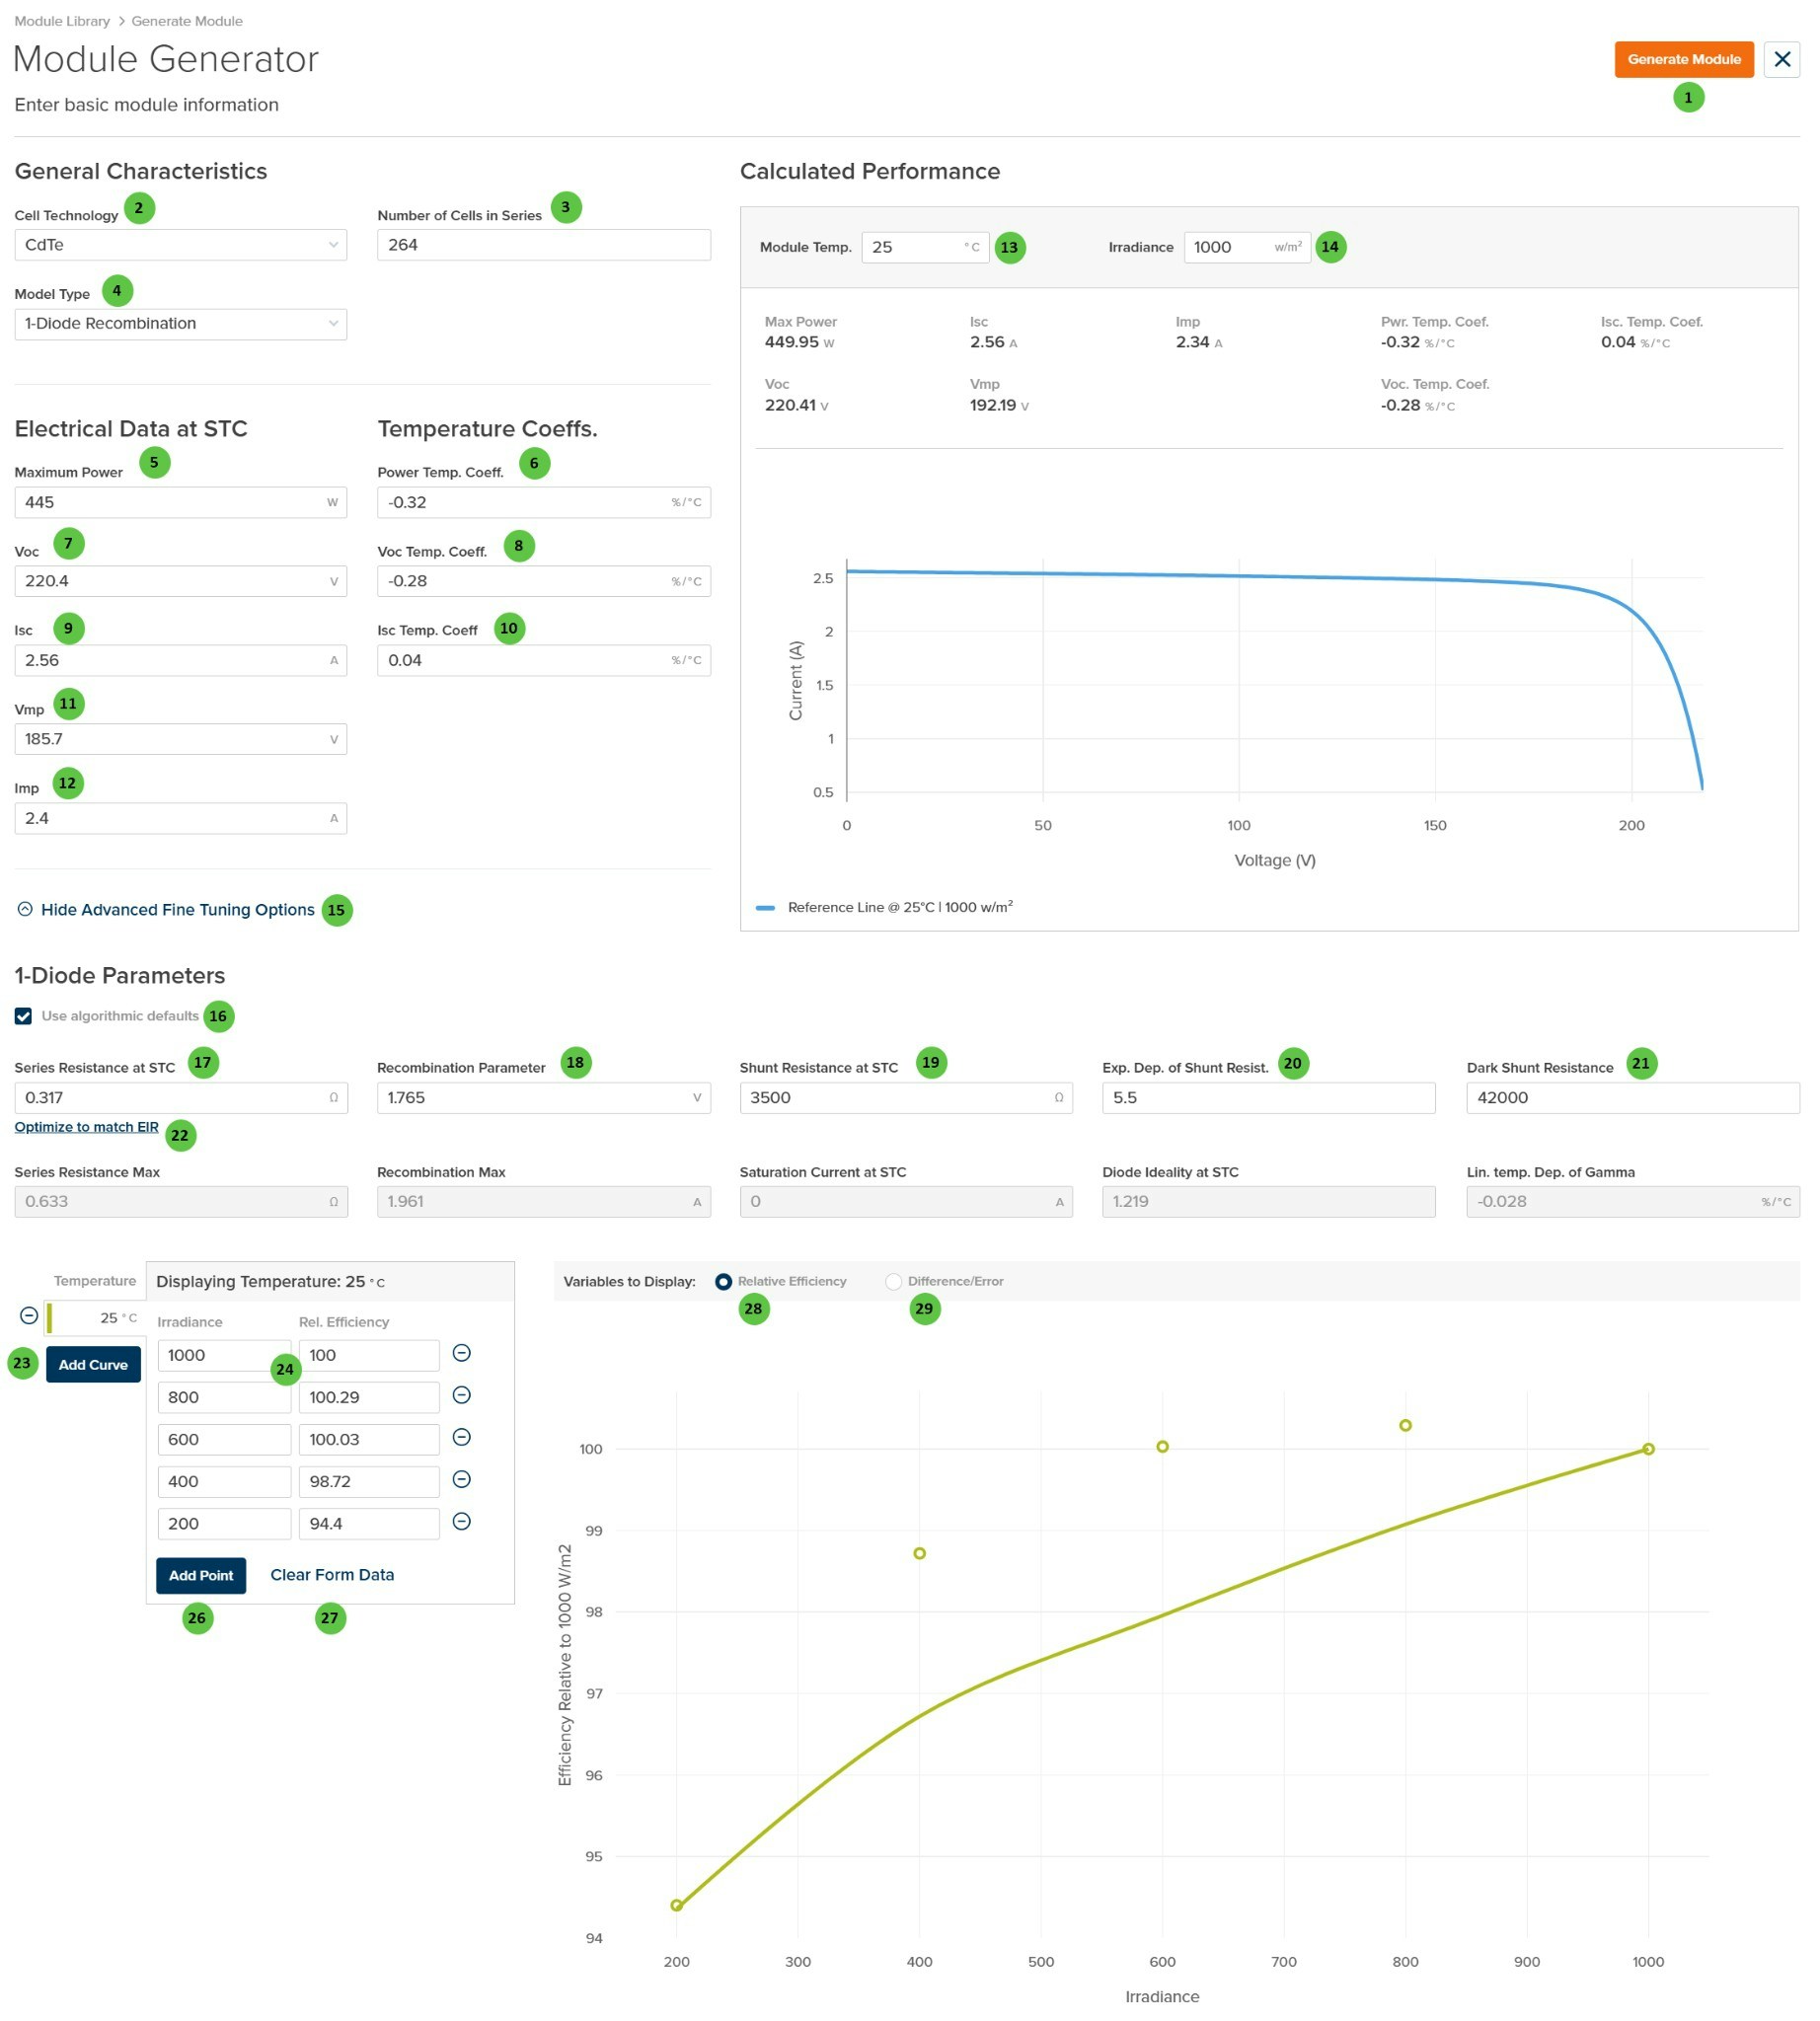
| # | Input | Type | Units | Description | Related Documentation |
|---|---|---|---|---|---|
| **1** | **Generate Module** | Button | — | Generates the complete module file from entered data and opens the module editor for final review and saving. | — |
| **2** | **Cell Technology** | Dropdown | — | Select the cell technology. Options: **n-type mono c-Si**, **p-type mono c-Si PERC**, **p-type mono c-Si BSF**, **poly c-Si PERC**, **poly c-Si BSF**, **CdTe**, **CIGS**, **Mixed**. | — |
| **3** | **Number of Cells in Series** | Numeric | — | Number of cells connected in series within the module. | — |
| **4** | **Model Type** | Dropdown | — | Select the diode model type. Options: **1-Diode**, **1-Diode Recombination**, **1-Diode Recombination Non-Linear**. Use **1-Diode** for crystalline silicon modules; use **1-Diode Recombination** for CdTe modules. | [Single Diode Model](/models/dc-performance/5_parameter_model) |
| **5** | **Maximum Power** | Numeric | W | Rated maximum power at STC (Pmax). | — |
| **6** | **Power Temp. Coeff.** | Numeric | %/°C | Temperature coefficient of power (typically negative). | — |
| **7** | **Voc** | Numeric | V | Open circuit voltage at STC. | — |
| **8** | **Voc Temp. Coeff.** | Numeric | %/°C | Temperature coefficient of open circuit voltage (typically negative). | — |
| **9** | **Isc** | Numeric | A | Short circuit current at STC. | — |
| **10** | **Isc Temp. Coeff.** | Numeric | %/°C | Temperature coefficient of short circuit current (typically positive). | — |
| **11** | **Vmp** | Numeric | V | Voltage at maximum power point at STC. | — |
| **12** | **Imp** | Numeric | A | Current at maximum power point at STC. | — |
| **13** | **Module Temp.** | Numeric | °C / °F | Temperature for calculated performance preview (adjustable). | — |
| **14** | **Irradiance** | Numeric | W/m² | Irradiance for calculated performance preview (adjustable). | — |
| **15** | **Show/Hide Advanced Fine Tuning Options** | Toggle | — | Expands or collapses the 1-Diode Parameters and Effective Irradiance Response (EIR) tuning sections. | — |
| **16** | **Use algorithmic defaults** | Checkbox | — | When checked, 1-diode parameters are calculated automatically. Unchecks automatically when any parameter is manually modified. Re-check to revert to defaults. | — |
| **17** | **Series Resistance at STC** | Numeric | Ω | Series resistance at STC. Key parameter for EIR optimization. | [Single Diode Model](/models/dc-performance/5_parameter_model) |
| **18** | **Recombination Parameter** | Numeric | V | Recombination loss parameter for the diode model. | [Recombination Model](/models/dc-performance/7_parameter_model) |
| **19** | **Shunt Resistance at STC** | Numeric | Ω | Shunt resistance at STC. | [Single Diode Model](/models/dc-performance/5_parameter_model) |
| **20** | **Exp. Dep. of Shunt Resist.** | Numeric | — | Exponential dependence of shunt resistance on irradiance. | — |
| **21** | **Dark Shunt Resistance** | Numeric | Ω | Shunt resistance in the dark (zero irradiance). | — |
| **22** | **Optimize to match EIR** | Button | — | Algorithmically tunes Series Resistance at STC to match the desired Effective Irradiance Response curve. | — |
| **23** | **Add Curve** | Button | — | Add a new temperature curve for the Effective Irradiance Response. Only the 25°C curve is used for EIR optimization. | — |
| **24** | **Irradiance / Rel. Efficiency Table** | Table | W/m², % | Enter desired irradiance-relative efficiency pairs to define target EIR performance. | — |
| **26** | **Add Point** | Button | — | Add a new irradiance-efficiency data point to the EIR table. | — |
| **27** | **Clear Form Data** | Button | — | Clear all EIR data points from the table. | — |
| **28** | **Relative Efficiency** | Radio | — | Display the EIR chart showing relative efficiency vs. irradiance. Solid line = model-calculated; circles = target values. | — |
| **29** | **Difference/Error** | Radio | — | Display the difference between target and model-calculated relative efficiencies at each irradiance point. | — |
 ### Data Entry Format
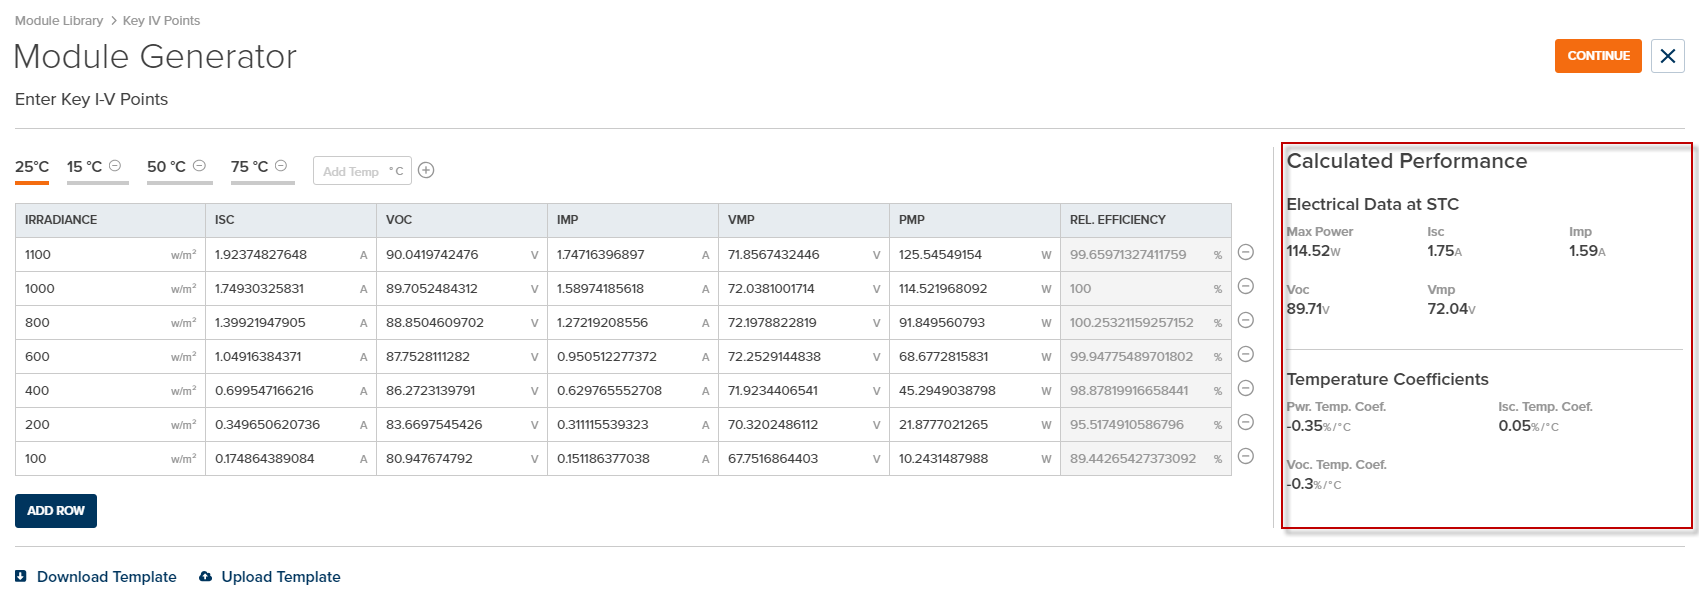
For each temperature and irradiance condition, enter the key electrical characteristics:
| Column | Units | Description |
| ------------------- | ----- | ------------------------------------------------------------------- |
| **Irradiance** | W/m² | Irradiance level for this data point |
| **Isc** | A | Short circuit current |
| **Voc** | V | Open circuit voltage |
| **Imp** | A | Current at maximum power point |
| **Vmp** | V | Voltage at maximum power point |
| **Pmp** | W | Maximum power (can be calculated) |
| **Rel. Efficiency** | % | Relative efficiency (auto-calculated when sufficient data provided) |
### Features
| Element | Description |
| -------------------------- | ---------------------------------------------------------------------- |
| **Temperature Tabs** | Add data at multiple temperatures (25°C, 15°C, 50°C, 75°C, etc.) |
| **Add Row** | Add a new irradiance data point within the current temperature |
| **Add Temp** | Add a new temperature tab |
| **Download Template** | Download an Excel template for offline data entry |
| **Upload Template** | Upload a completed Excel template to populate the grid |
| **Calculated Performance** | Real-time display of extracted STC values and temperature coefficients |
| **Continue** | Proceed to the main module generator with pre-populated values |
### Workflow
1. Click **Enter Key I-V Points** from the Add New Module modal
2. Enter data at 25°C, 1000 W/m² (minimum required)
3. Add additional irradiance rows and temperature tabs as available
4. Review the **Calculated Performance** panel for extracted values
5. Click **Continue** to proceed to the module generator
6. Review and finalize the module, then click **Save Module**
### Data Entry Format
For each temperature and irradiance condition, enter the key electrical characteristics:
| Column | Units | Description |
| ------------------- | ----- | ------------------------------------------------------------------- |
| **Irradiance** | W/m² | Irradiance level for this data point |
| **Isc** | A | Short circuit current |
| **Voc** | V | Open circuit voltage |
| **Imp** | A | Current at maximum power point |
| **Vmp** | V | Voltage at maximum power point |
| **Pmp** | W | Maximum power (can be calculated) |
| **Rel. Efficiency** | % | Relative efficiency (auto-calculated when sufficient data provided) |
### Features
| Element | Description |
| -------------------------- | ---------------------------------------------------------------------- |
| **Temperature Tabs** | Add data at multiple temperatures (25°C, 15°C, 50°C, 75°C, etc.) |
| **Add Row** | Add a new irradiance data point within the current temperature |
| **Add Temp** | Add a new temperature tab |
| **Download Template** | Download an Excel template for offline data entry |
| **Upload Template** | Upload a completed Excel template to populate the grid |
| **Calculated Performance** | Real-time display of extracted STC values and temperature coefficients |
| **Continue** | Proceed to the main module generator with pre-populated values |
### Workflow
1. Click **Enter Key I-V Points** from the Add New Module modal
2. Enter data at 25°C, 1000 W/m² (minimum required)
3. Add additional irradiance rows and temperature tabs as available
4. Review the **Calculated Performance** panel for extracted values
5. Click **Continue** to proceed to the module generator
6. Review and finalize the module, then click **Save Module**
 ### Data Entry Format
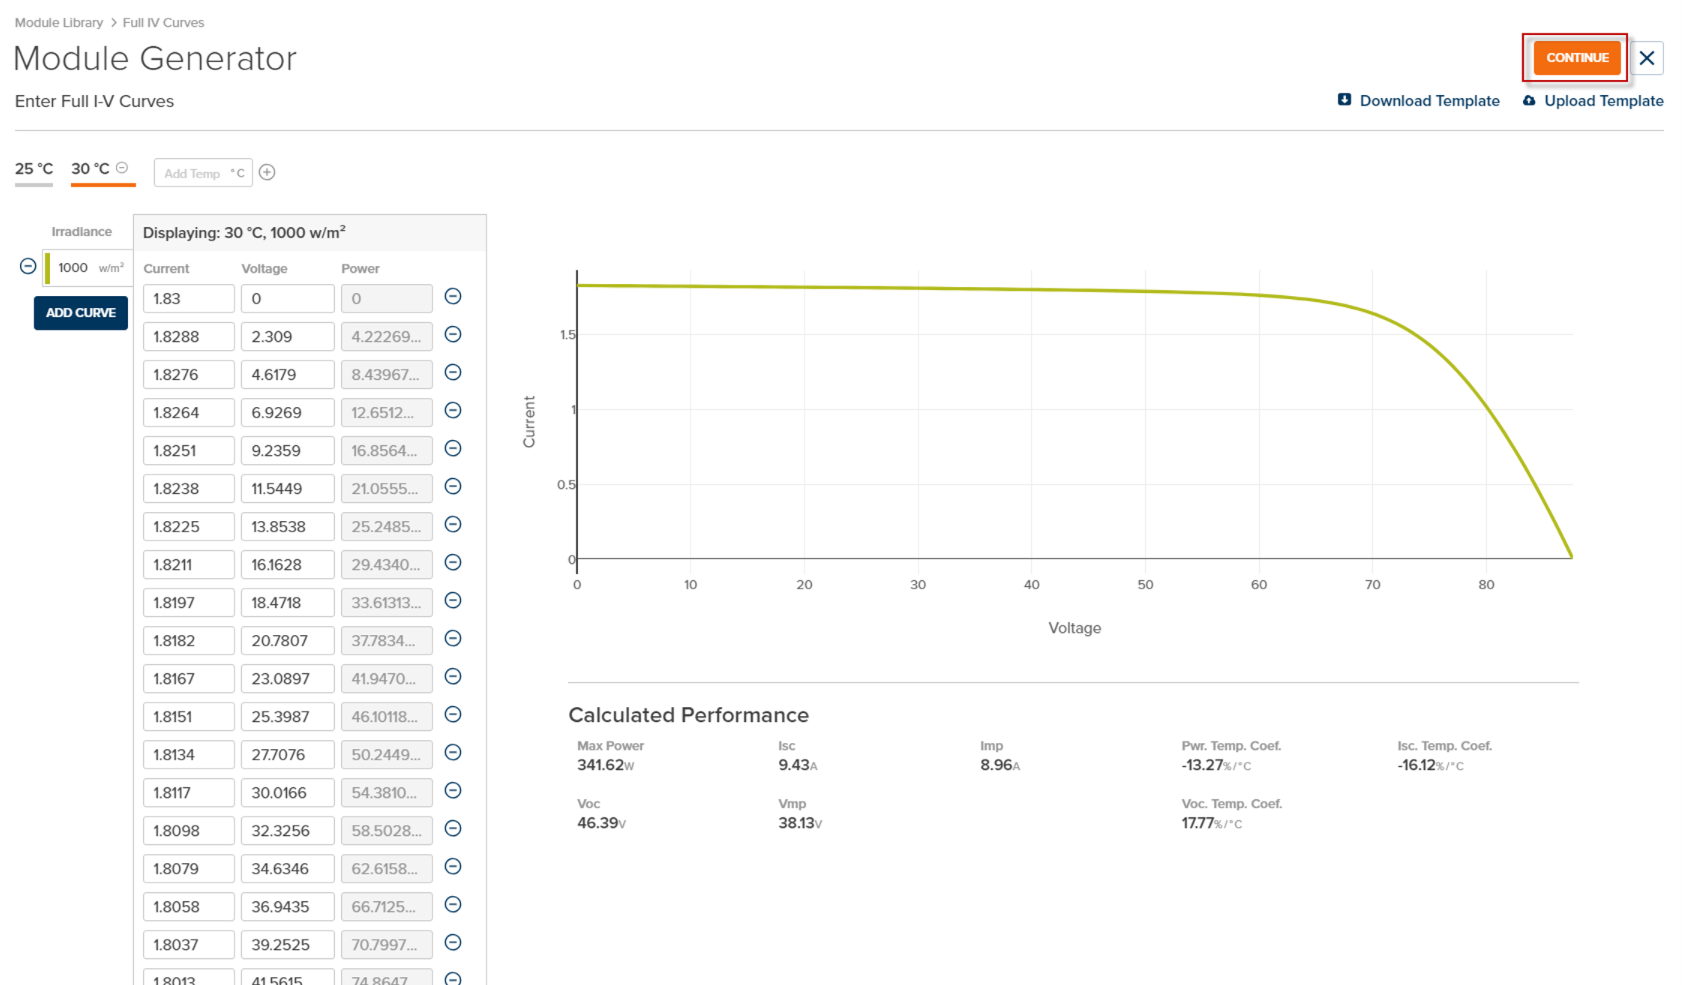
For each I-V curve, enter current-voltage pairs from Isc (V=0) to Voc (I=0):
| Column | Units | Description |
| ----------- | ----- | ------------------------------------------------ |
| **Current** | A | Current at each point on the I-V curve |
| **Voltage** | V | Voltage at each point on the I-V curve |
| **Power** | W | Calculated power at each point (auto-calculated) |
### Features
| Element | Description |
| -------------------------- | ---------------------------------------------------------------------- |
| **Temperature Tabs** | Add curves at multiple temperatures (25°C, 30°C, etc.) |
| **Irradiance Selector** | Select or add irradiance levels for curves |
| **Add Curve** | Add a new I-V curve at a new irradiance within the current temperature |
| **Add Temp** | Add a new temperature tab |
| **I-V Curve Chart** | Real-time visualization of the entered curve |
| **Download Template** | Download an Excel template for offline data entry |
| **Upload Template** | Upload a completed Excel template to populate the grid |
| **Calculated Performance** | Real-time display of extracted STC values and temperature coefficients |
| **Continue** | Proceed to the main module generator with pre-populated values |
### Workflow
1. Click **Enter Full I-V Curves** from the Add New Module modal
2. Enter the I-V curve at 25°C, 1000 W/m² (minimum required)
3. Add additional curves at different irradiances and temperatures as available
4. Review the **Calculated Performance** panel for extracted values
5. Click **Continue** to proceed to the module generator
6. Review and finalize the module, then click **Save Module**
### Data Entry Format
For each I-V curve, enter current-voltage pairs from Isc (V=0) to Voc (I=0):
| Column | Units | Description |
| ----------- | ----- | ------------------------------------------------ |
| **Current** | A | Current at each point on the I-V curve |
| **Voltage** | V | Voltage at each point on the I-V curve |
| **Power** | W | Calculated power at each point (auto-calculated) |
### Features
| Element | Description |
| -------------------------- | ---------------------------------------------------------------------- |
| **Temperature Tabs** | Add curves at multiple temperatures (25°C, 30°C, etc.) |
| **Irradiance Selector** | Select or add irradiance levels for curves |
| **Add Curve** | Add a new I-V curve at a new irradiance within the current temperature |
| **Add Temp** | Add a new temperature tab |
| **I-V Curve Chart** | Real-time visualization of the entered curve |
| **Download Template** | Download an Excel template for offline data entry |
| **Upload Template** | Upload a completed Excel template to populate the grid |
| **Calculated Performance** | Real-time display of extracted STC values and temperature coefficients |
| **Continue** | Proceed to the main module generator with pre-populated values |
### Workflow
1. Click **Enter Full I-V Curves** from the Add New Module modal
2. Enter the I-V curve at 25°C, 1000 W/m² (minimum required)
3. Add additional curves at different irradiances and temperatures as available
4. Review the **Calculated Performance** panel for extracted values
5. Click **Continue** to proceed to the module generator
6. Review and finalize the module, then click **Save Module**