> ## Documentation Index
> Fetch the complete documentation index at: https://docs.plantpredict.com/llms.txt
> Use this file to discover all available pages before exploring further.
# Connecting the PlantPredict MCP Connector
> A step-by-step guide to connecting Claude, ChatGPT, or Cursor to PlantPredict via the MCP connector
The PlantPredict MCP connector lets you work with PlantPredict directly from your AI assistant, in plain language. Once connected, you can ask it to create and run predictions, import weather and shade scenes, browse your projects, and read results — and it acts entirely as you, using your own PlantPredict account and permissions.
Your AI assistant talks to a secure PlantPredict connector, which in turn calls the PlantPredict API on your behalf. You connect once, sign in with your PlantPredict account, and you are ready to go.
This guide covers three AI tools: **Claude**, **ChatGPT**, and **Cursor**. Follow the section for the tool you use. The sections at the end — [What you can do with it](#what-you-can-do-with-it), [Good to know](#good-to-know), [If something goes wrong](#if-something-goes-wrong), and [Need help?](#need-help) — apply to all three.
***
## Before you begin
* **Use a Claude plan that supports custom connectors** — Pro, Max, Team, or Enterprise. (The Free plan cannot add custom connectors.)
* **Make sure your PlantPredict company has connector access.** An administrator must enable "Allow MCP Server Access For API Users," and your company must have an active, qualifying subscription. Without both, Claude will connect but every action returns an "MCP access is not enabled" message.
* **Have your PlantPredict email and password ready** — you sign in once during setup.
* **Use this connector address when Claude asks for it:** `https://mcp.plantpredict.terabase.energy`
* **Use a ChatGPT plan that supports custom connectors.** Custom (MCP) connectors are available on paid plans; on Business and Enterprise workspaces an administrator may need to add or approve the connector first, and on some plans you enable connector or developer settings before the option appears. If you do not see it, check with your ChatGPT workspace administrator.
* **Make sure your PlantPredict company has connector access.** An administrator must enable "Allow MCP Server Access For API Users," and your company must have an active, qualifying subscription. Without both, ChatGPT will connect but every action returns an "MCP access is not enabled" message.
* **Have your PlantPredict email and password ready** — you sign in once during setup.
* **Use this connector address when ChatGPT asks for it:** `https://mcp.plantpredict.terabase.energy`
* **Use a recent version of Cursor.** You can add PlantPredict with a one-click link, or by pasting one short entry into Cursor's MCP configuration — both take under a minute and are shown below. On Business or Enterprise Cursor plans, an administrator may control which MCP servers are allowed, so check with them if the server is blocked.
* **Make sure your PlantPredict company has connector access.** An administrator must enable "Allow MCP Server Access For API Users," and your company must have an active, qualifying subscription. Without both, Cursor will connect but every action returns an "MCP access is not enabled" message.
* **Have your PlantPredict email and password ready** — you sign in once during setup.
* **Use this connector address when Cursor asks for it:** `https://mcp.plantpredict.terabase.energy`
***
## Claude
### Part 1: Connect Claude on the web
Menu names may vary slightly depending on your Claude plan and version, but the flow is the same.
Open [claude.ai](https://claude.ai) in your browser and sign in to your account.
Go to **Customize**, then open the **Connectors** section.
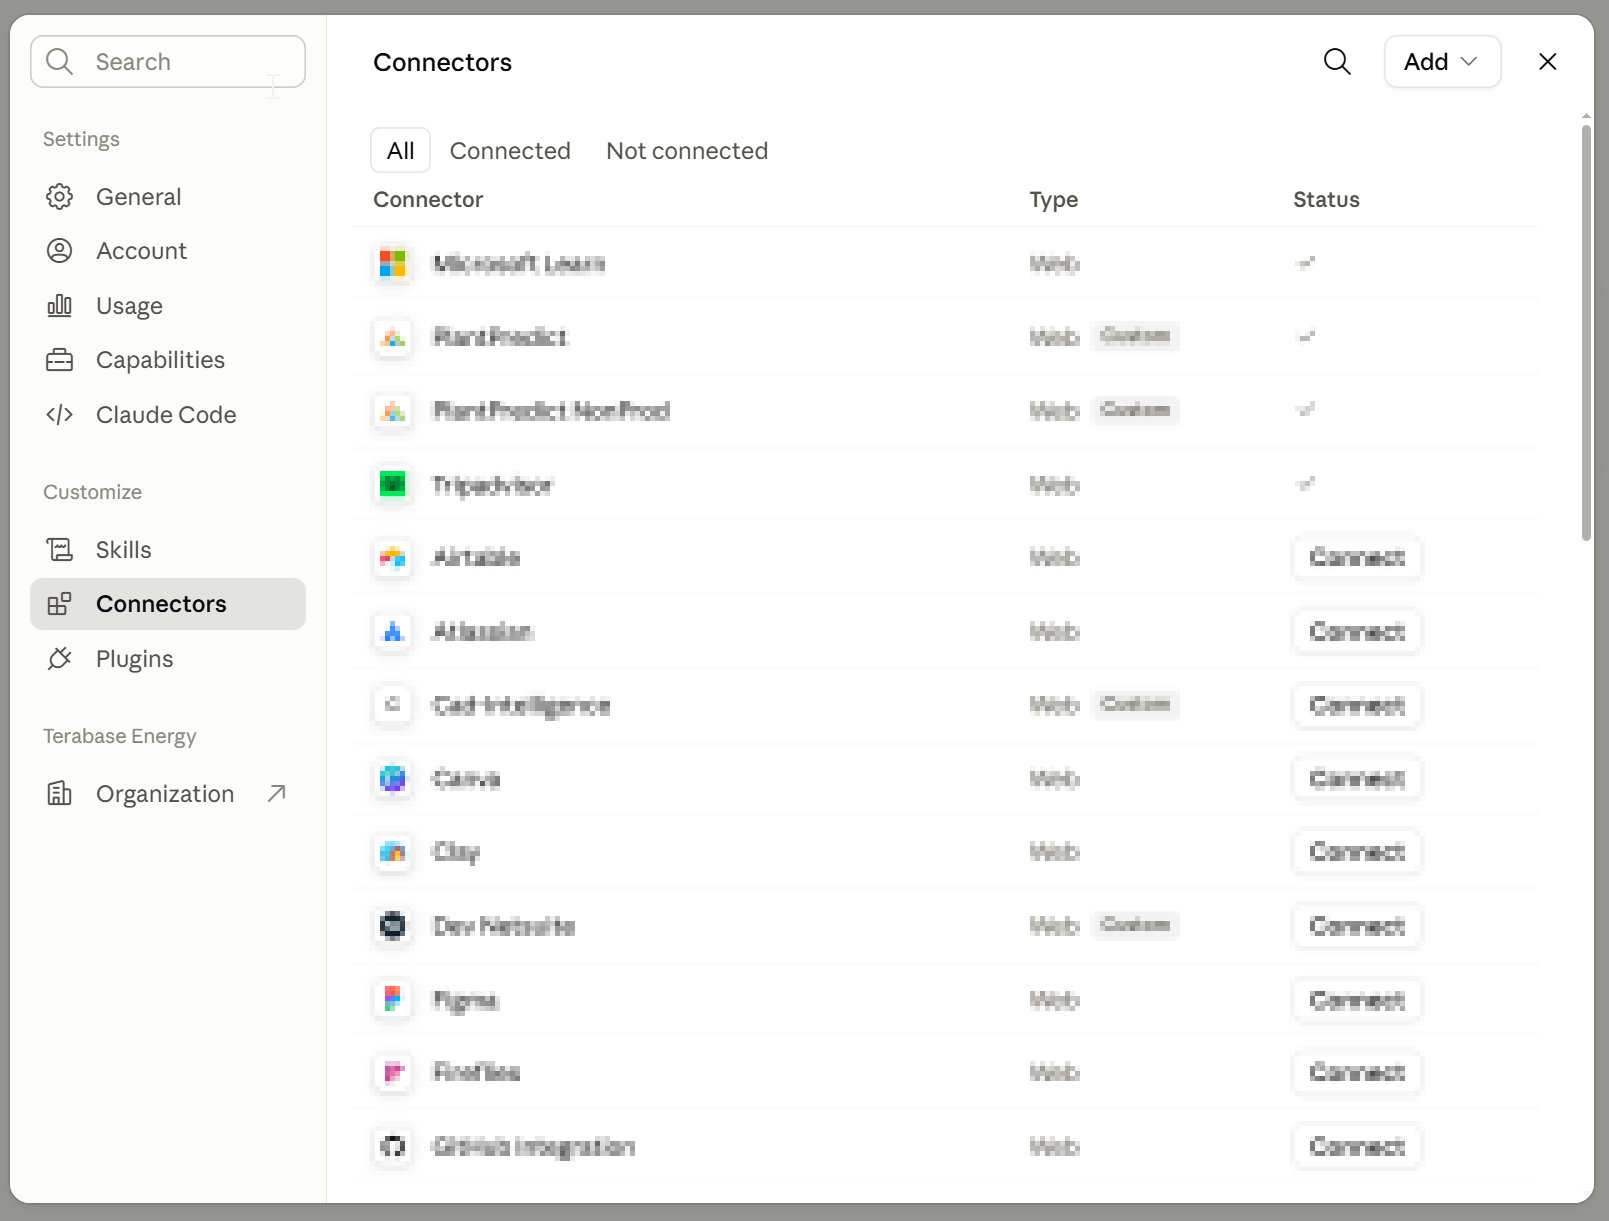 Click **Add custom connector** to start adding PlantPredict.
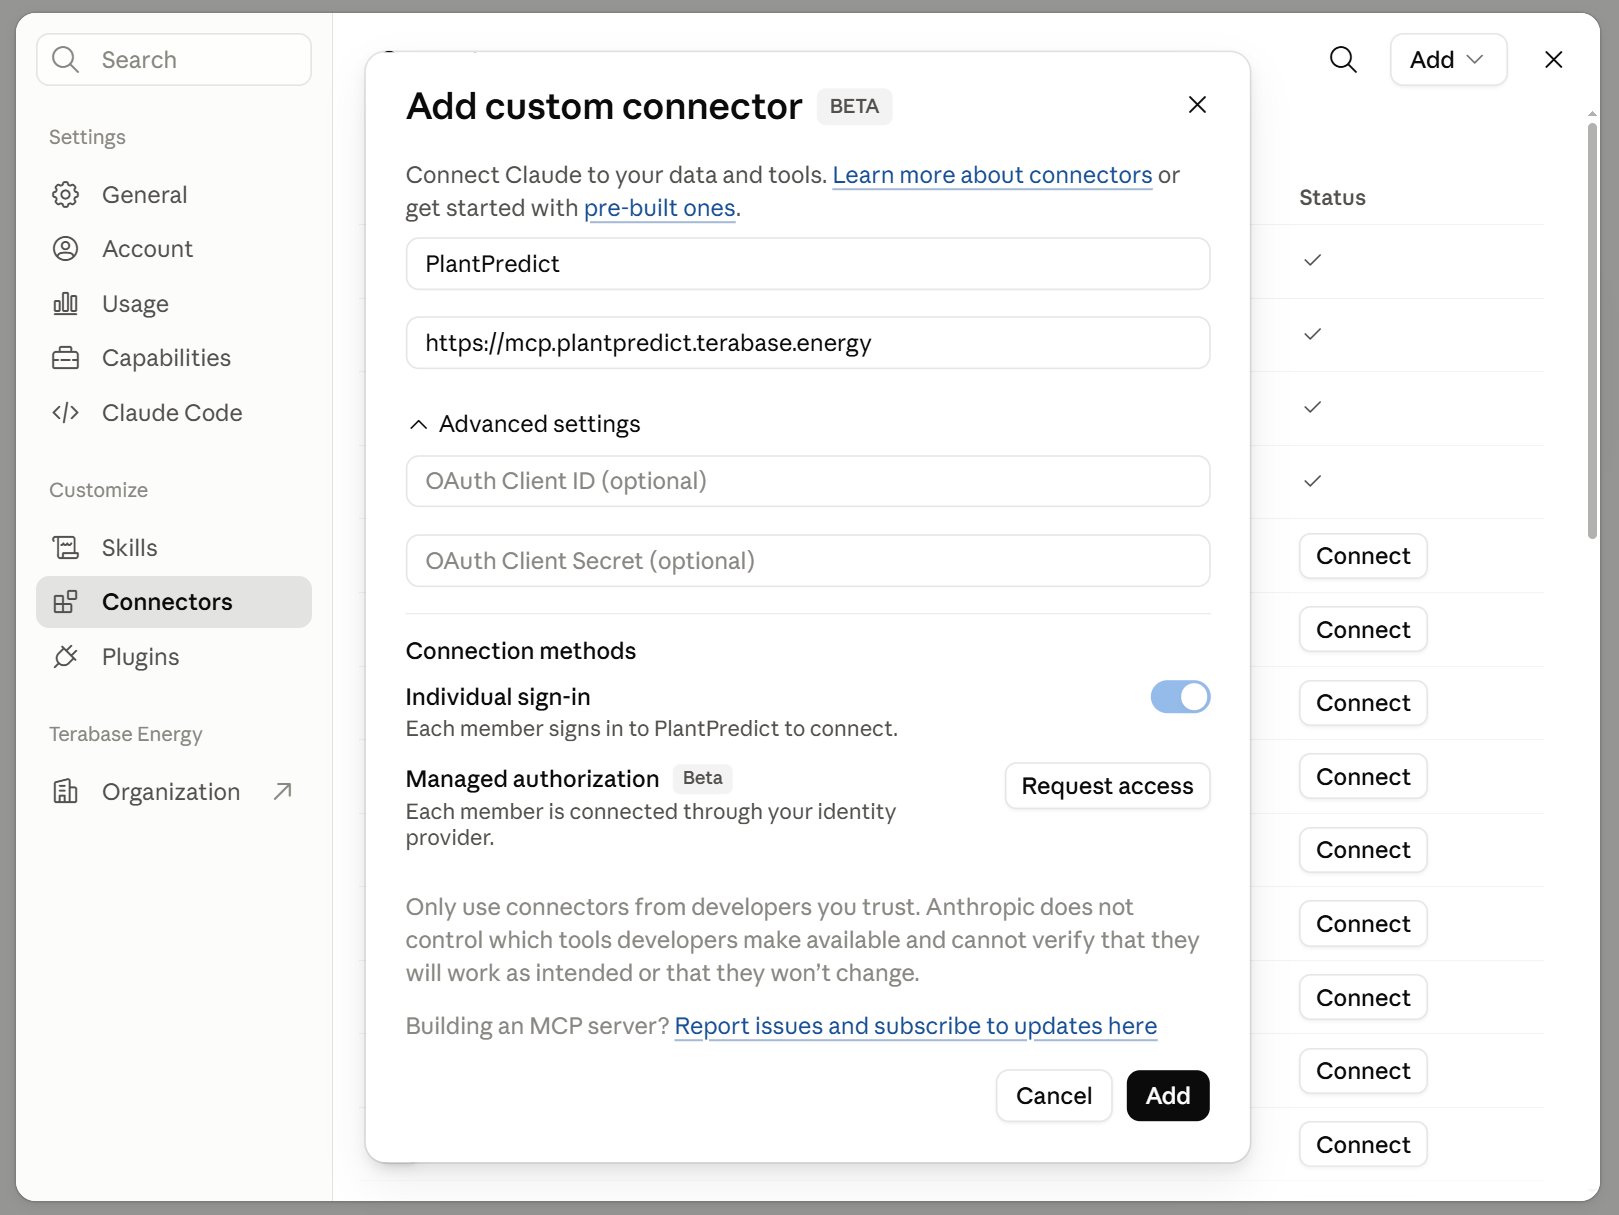
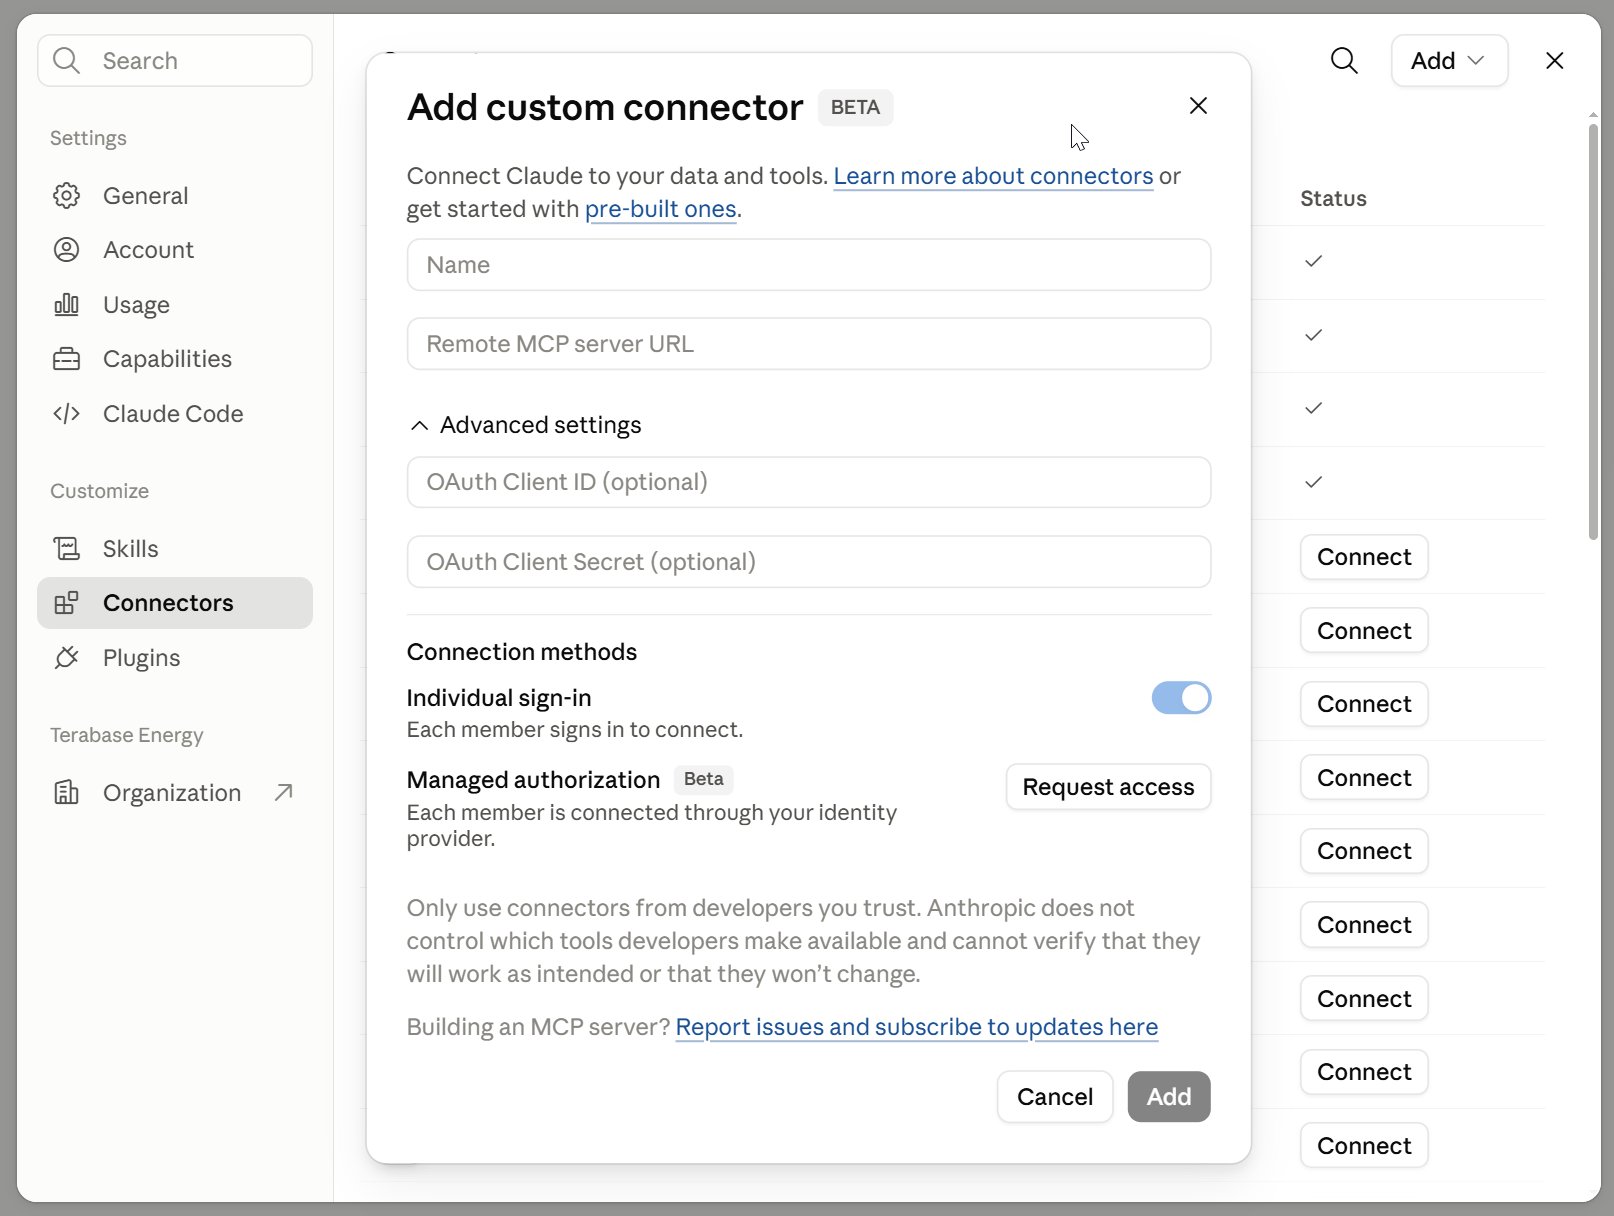 Give it a name you will recognize, such as `PlantPredict`, and paste the connector address into the remote MCP server URL field: `https://mcp.plantpredict.terabase.energy`. Then click **Add**.
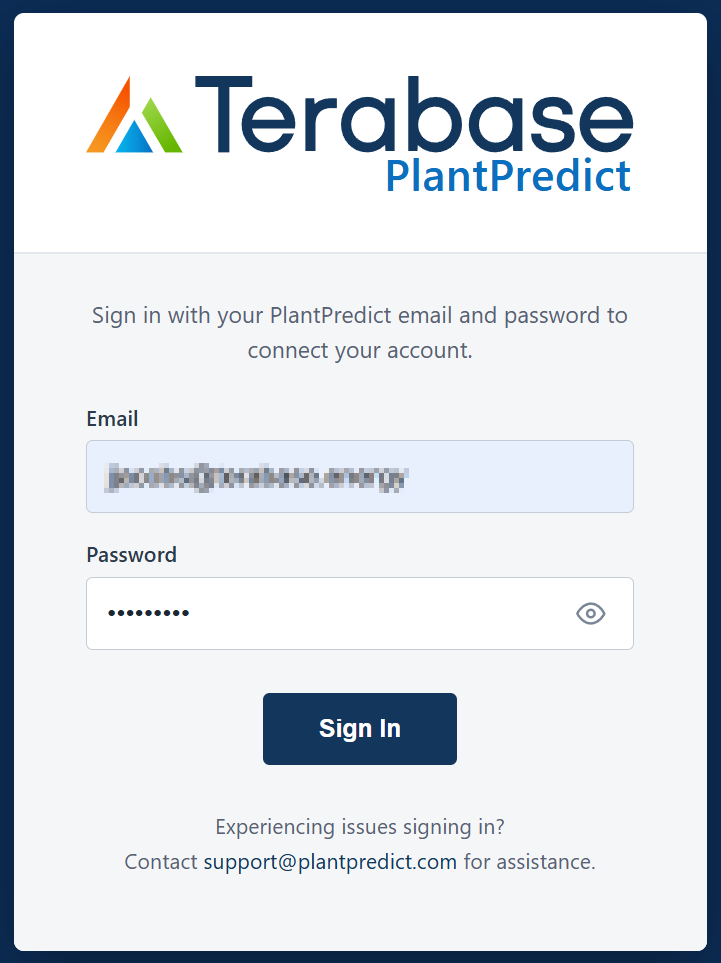
 Claude opens a PlantPredict sign-in window. Enter your PlantPredict email and password and approve access. Your password goes only to PlantPredict — Claude never sees or stores it.
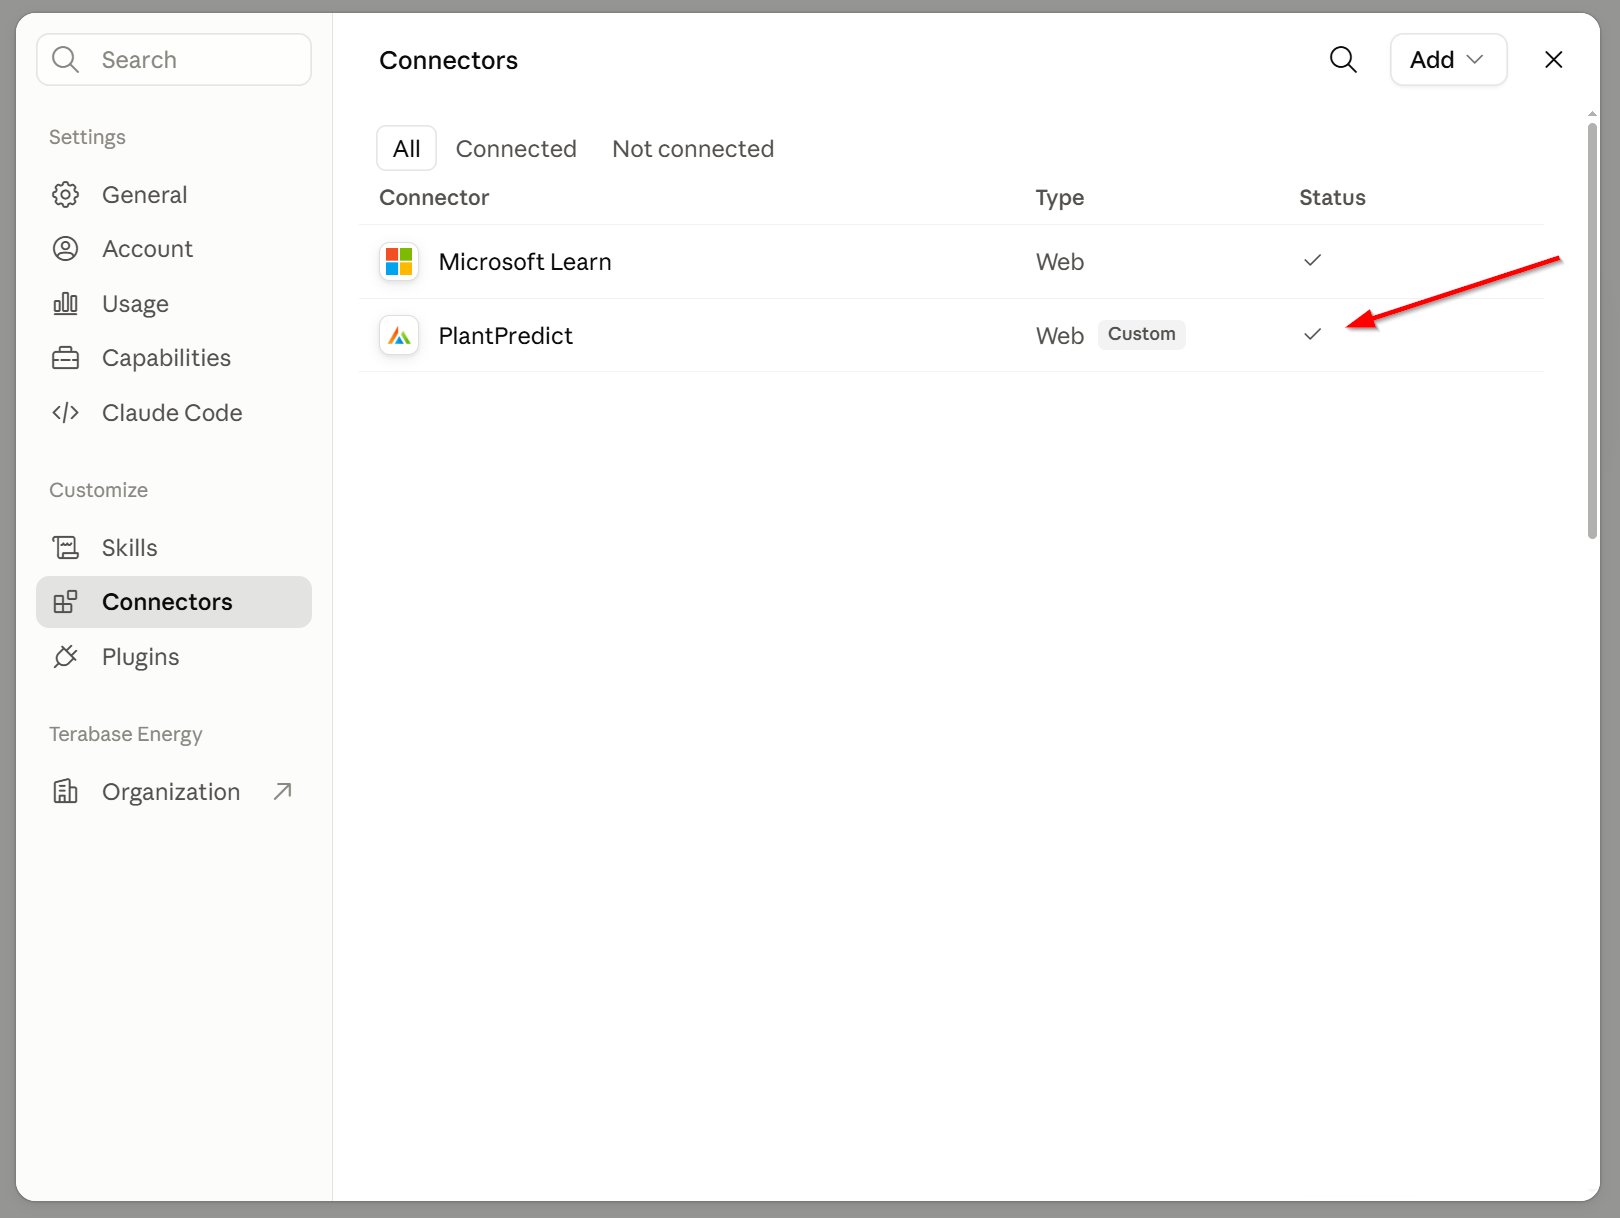
 Once you approve, the connector shows as **Connected** and the PlantPredict tools become available to Claude.
 ### Part 2: Connect the Claude desktop app
The desktop app uses the same steps as the web version:
1. Open the Claude desktop app and go to **Settings**, then **Connectors**.
2. Click **Add custom connector**.
3. Enter a name and the same connector address (`https://mcp.plantpredict.terabase.energy`), then sign in with your PlantPredict account.
### Check that it is working
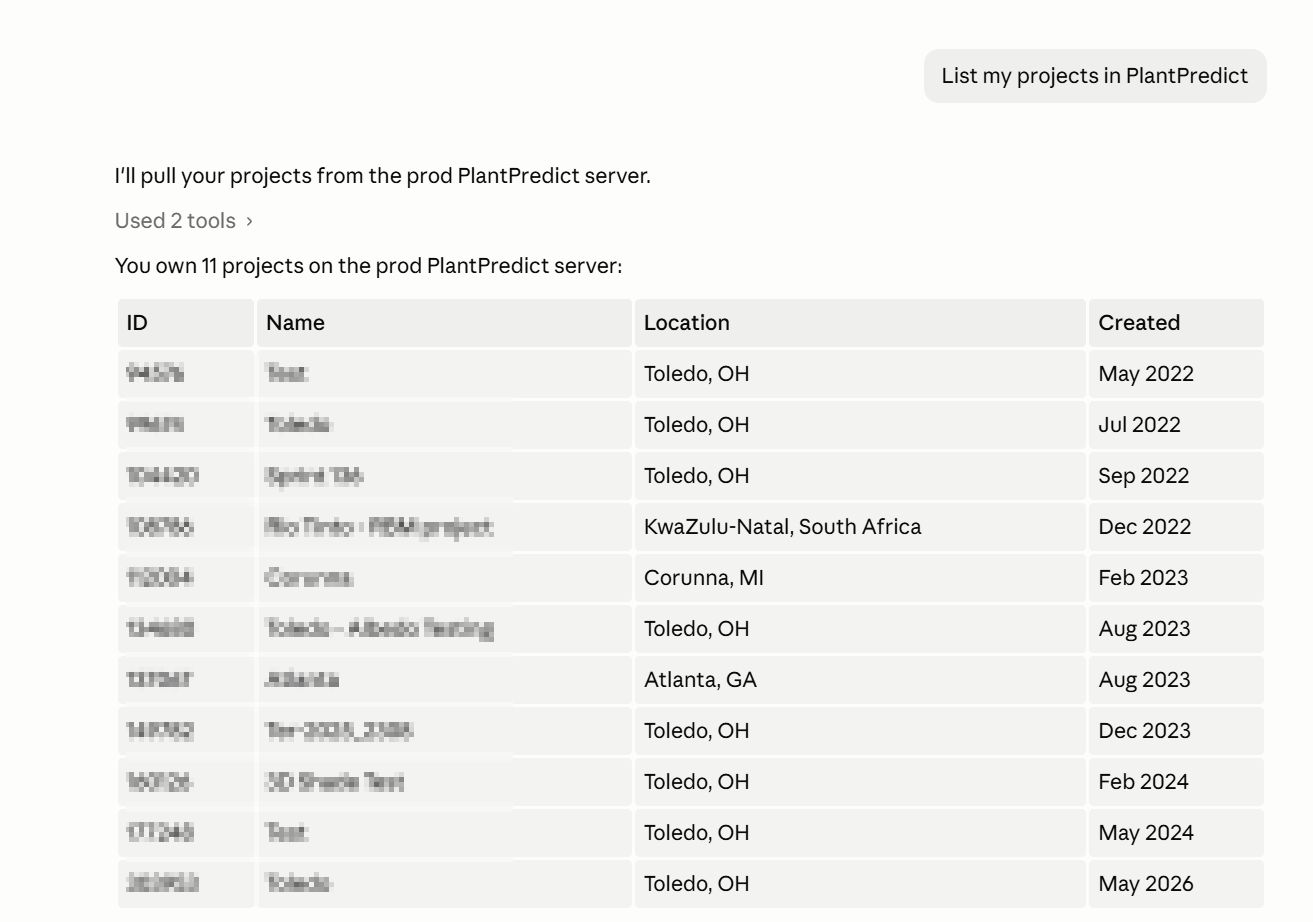
Start a new conversation, make sure the PlantPredict connector is turned on for it, and try a prompt such as:
* "List my PlantPredict projects."
* "Create a new project in Berkeley, CA."
* "Create a 5 MW prediction in project `/` and run it."
* "Show the summary results for prediction `/`."
Claude will use the PlantPredict tools to answer, and you will see the results right in the conversation.
### Part 2: Connect the Claude desktop app
The desktop app uses the same steps as the web version:
1. Open the Claude desktop app and go to **Settings**, then **Connectors**.
2. Click **Add custom connector**.
3. Enter a name and the same connector address (`https://mcp.plantpredict.terabase.energy`), then sign in with your PlantPredict account.
### Check that it is working
Start a new conversation, make sure the PlantPredict connector is turned on for it, and try a prompt such as:
* "List my PlantPredict projects."
* "Create a new project in Berkeley, CA."
* "Create a 5 MW prediction in project `/` and run it."
* "Show the summary results for prediction `/`."
Claude will use the PlantPredict tools to answer, and you will see the results right in the conversation.
 ***
## ChatGPT
### Connect ChatGPT to PlantPredict
Menu names may vary slightly depending on your ChatGPT plan and version, but the flow is the same.
Open [chatgpt.com](https://chatgpt.com) in your browser and sign in to your account.
Go to **Settings**, then open the **Plugins** section. Depending on your plan, connectors may live under a Beta features or Advanced area that you turn on first.
***
## ChatGPT
### Connect ChatGPT to PlantPredict
Menu names may vary slightly depending on your ChatGPT plan and version, but the flow is the same.
Open [chatgpt.com](https://chatgpt.com) in your browser and sign in to your account.
Go to **Settings**, then open the **Plugins** section. Depending on your plan, connectors may live under a Beta features or Advanced area that you turn on first.
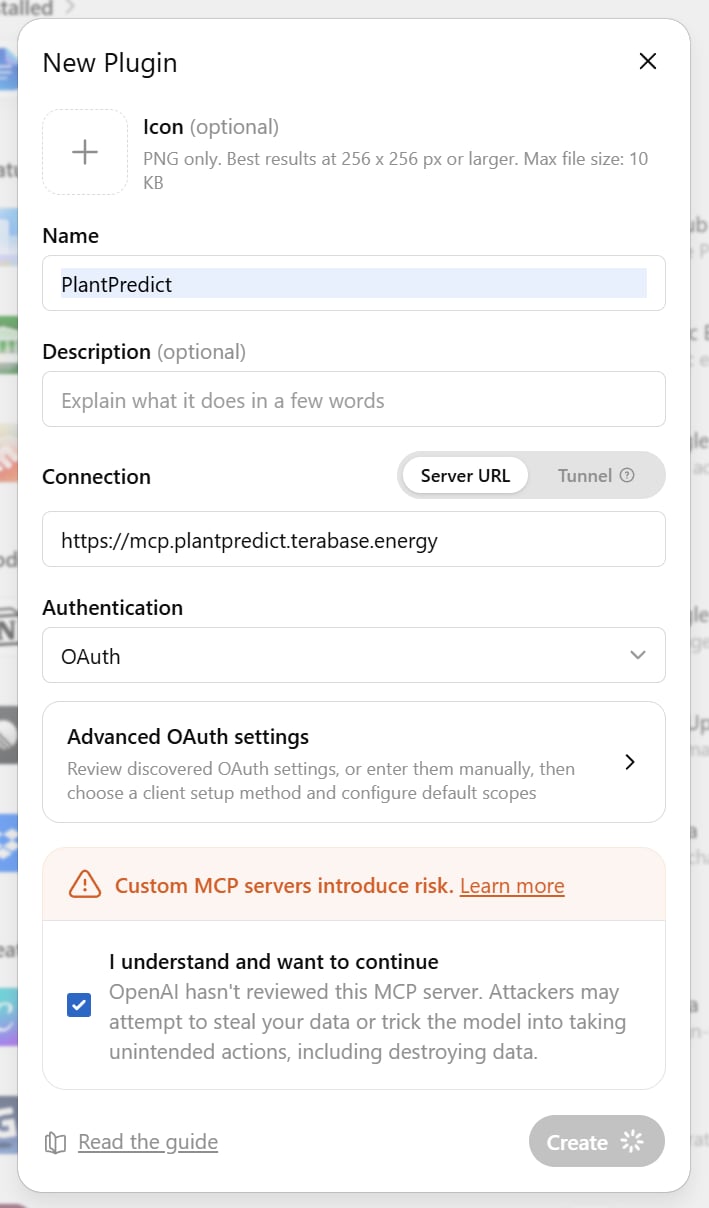
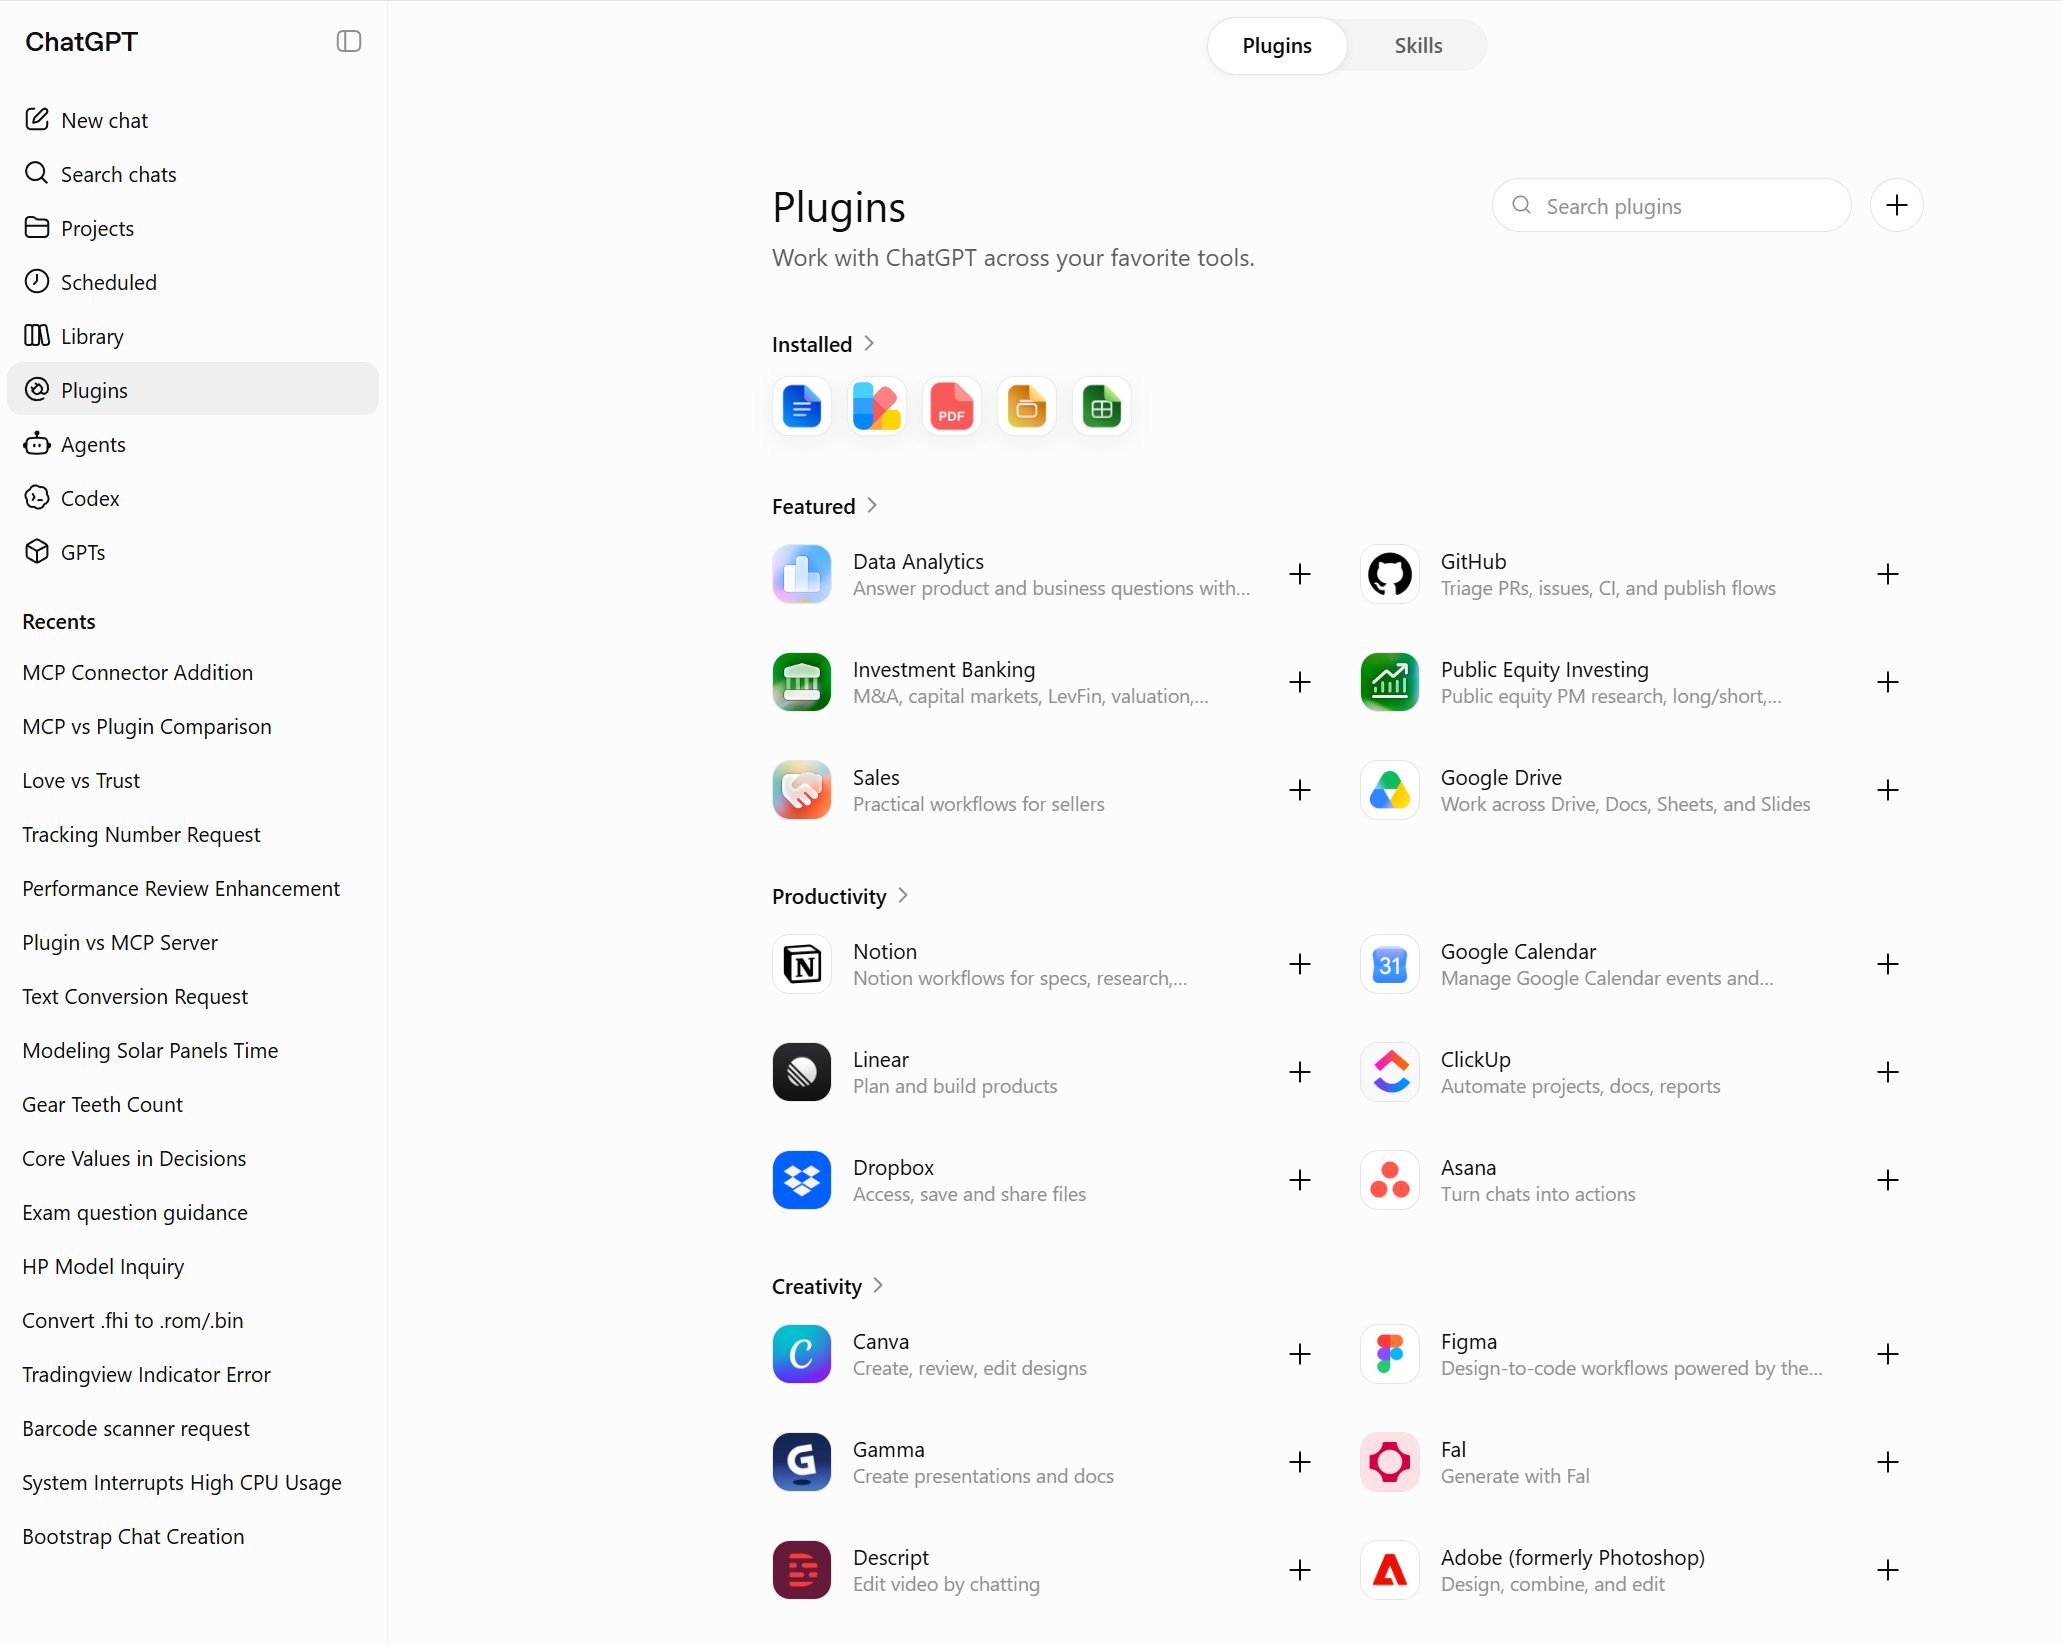 Choose to add or create a custom connector to start adding PlantPredict by clicking the **+** button.
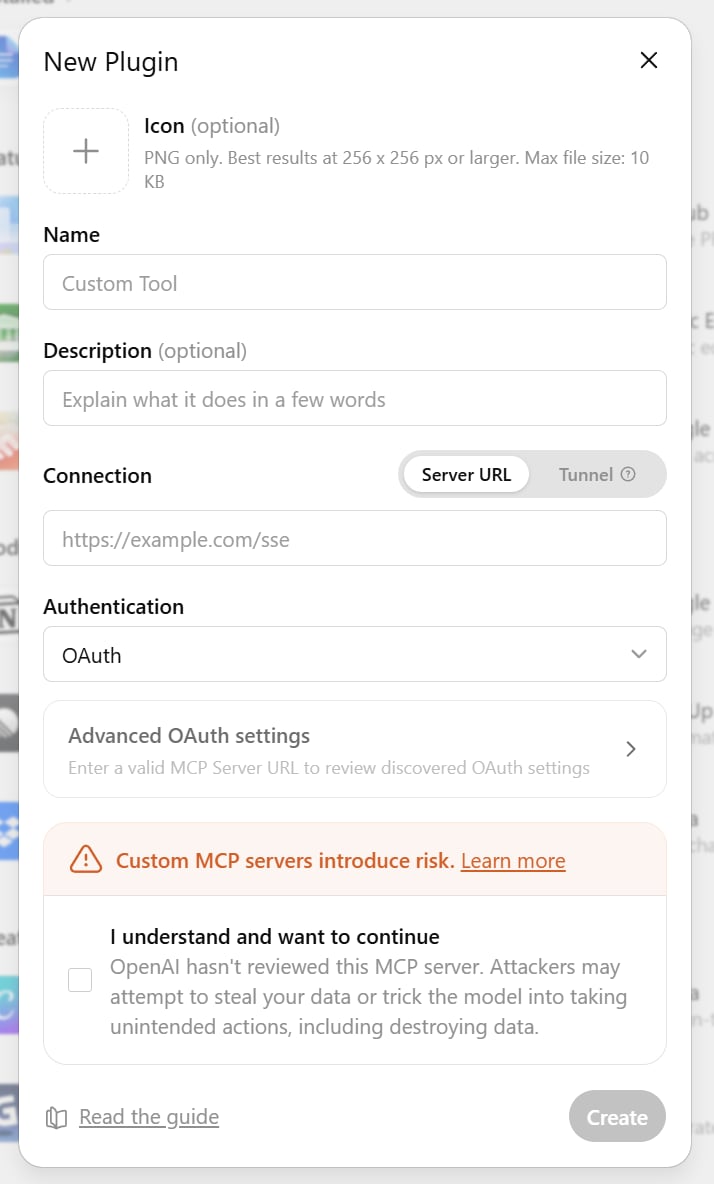 Give it a name you will recognize, such as `PlantPredict`, and paste the connector address into the MCP server URL field: `https://mcp.plantpredict.terabase.energy`. If you are asked how to authenticate, choose **OAuth**. Then create the connector.
 ChatGPT opens a PlantPredict sign-in window. Enter your PlantPredict email and password and approve access. Your password goes only to PlantPredict — ChatGPT never sees or stores it.
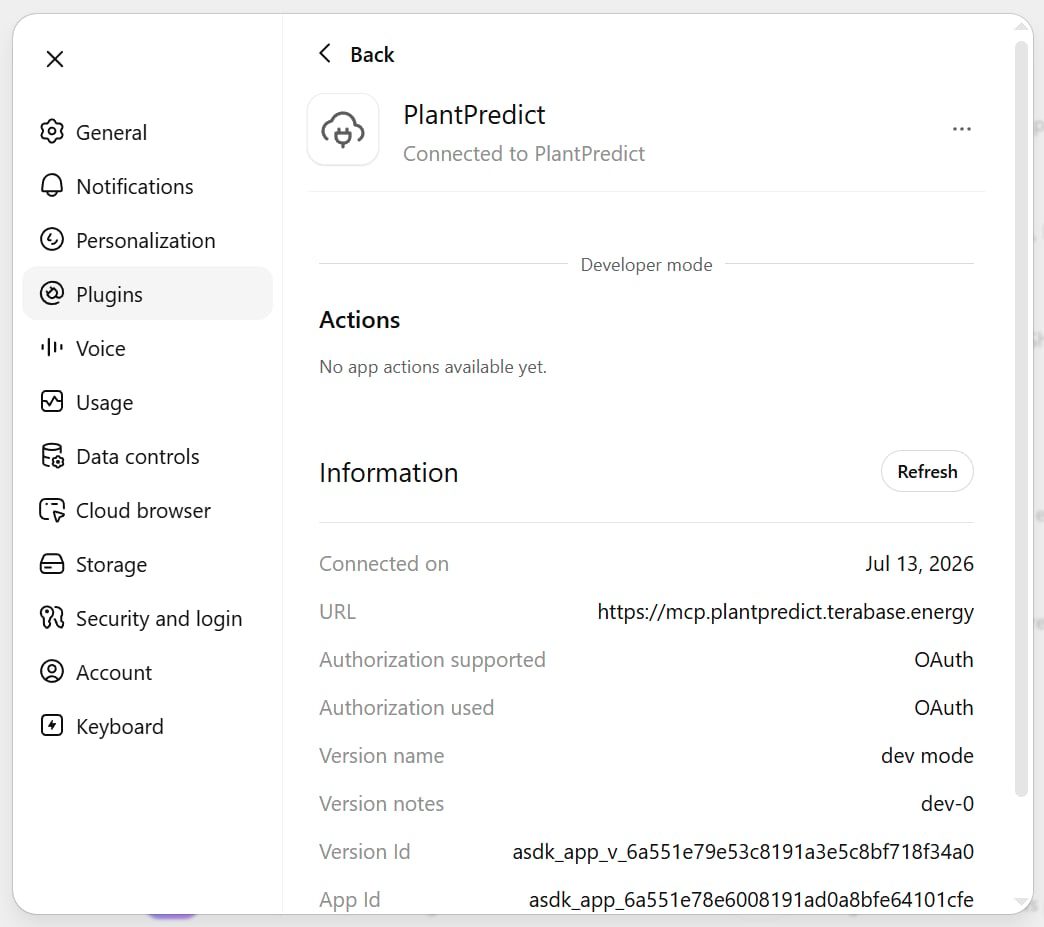
Once you approve, PlantPredict appears in your list of connectors, and its tools become available to ChatGPT.
ChatGPT opens a PlantPredict sign-in window. Enter your PlantPredict email and password and approve access. Your password goes only to PlantPredict — ChatGPT never sees or stores it.
Once you approve, PlantPredict appears in your list of connectors, and its tools become available to ChatGPT.
 ### Check that it is working
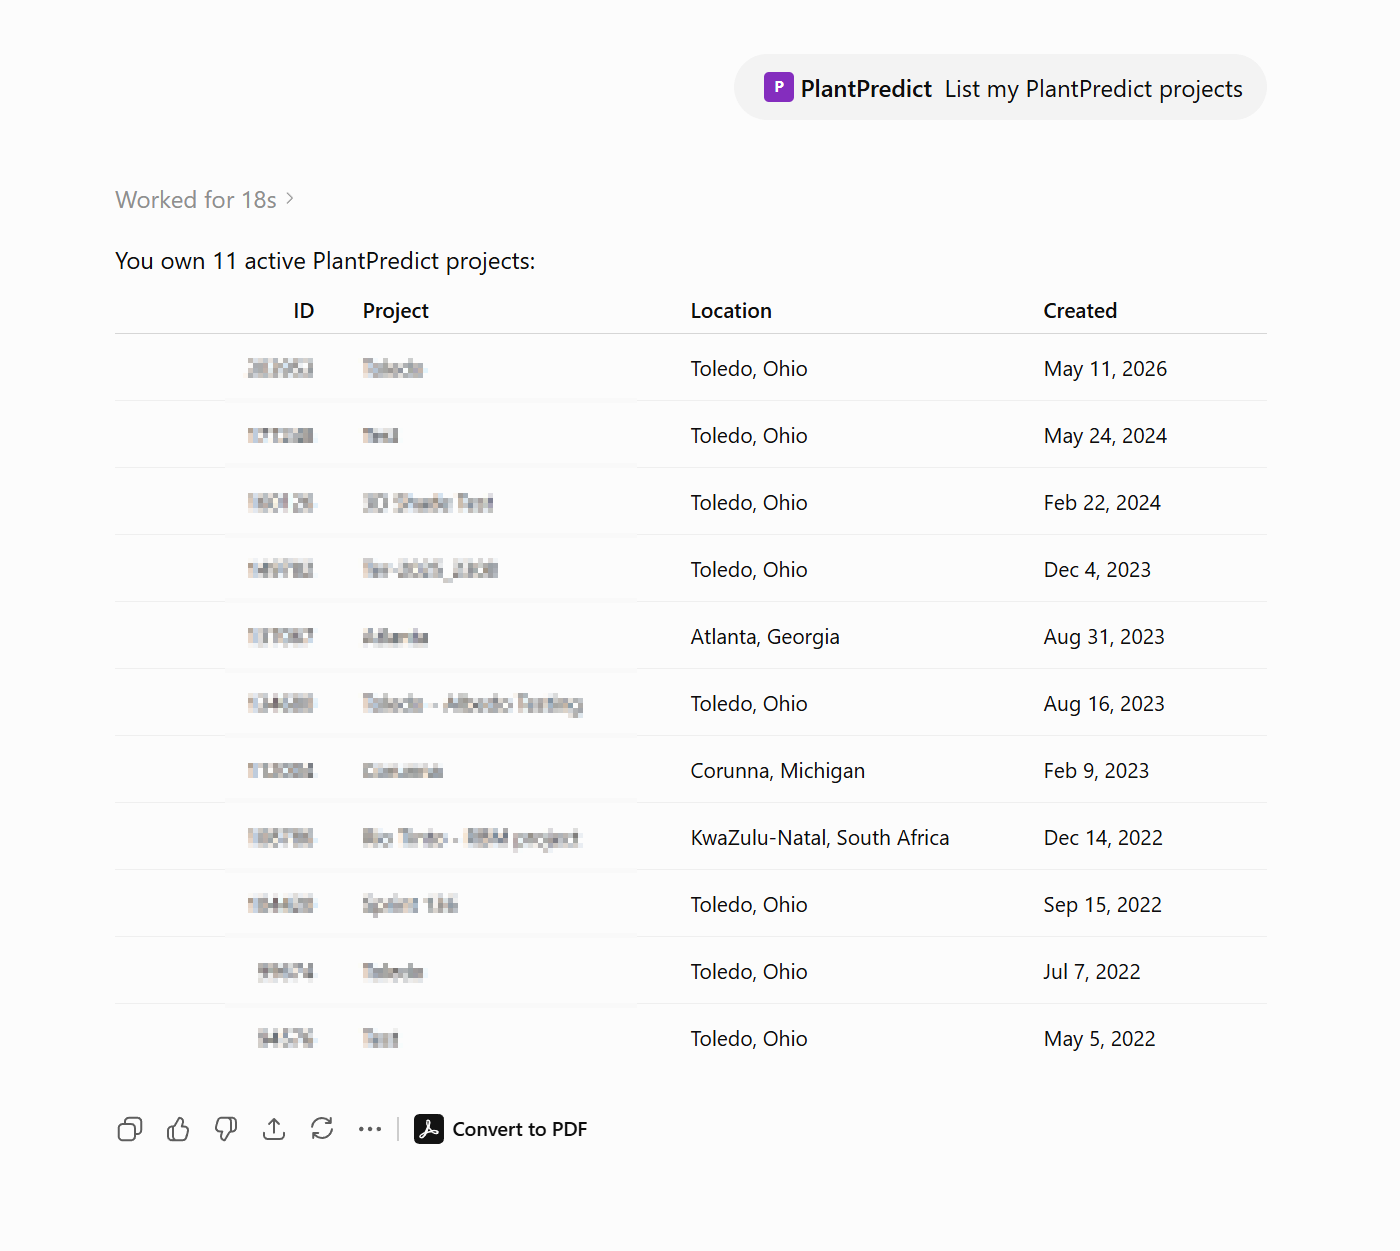
Start a new chat, turn on the PlantPredict connector for that chat (from the Plugins or tools menu), and try a prompt such as:
* "List my PlantPredict projects."
* "Create a new project in Berkeley, CA."
* "Create a 5 MW prediction in project `/` and run it."
* "Show the summary results for prediction `/`."
ChatGPT will use the PlantPredict tools to answer, and you will see the results right in the chat.
### Check that it is working
Start a new chat, turn on the PlantPredict connector for that chat (from the Plugins or tools menu), and try a prompt such as:
* "List my PlantPredict projects."
* "Create a new project in Berkeley, CA."
* "Create a 5 MW prediction in project `/` and run it."
* "Show the summary results for prediction `/`."
ChatGPT will use the PlantPredict tools to answer, and you will see the results right in the chat.
 ***
## Cursor
### Add the PlantPredict server
In Cursor, the **New MCP Server** button opens a configuration file (`mcp.json`) rather than a fill-in form. The quickest way to avoid touching that file is the one-click link in Option A; if you prefer to do it by hand, Option B shows the one entry to paste. Use either — you only need one.
Use the "Add to Cursor" link below to let Cursor add PlantPredict for you — no files to edit. Click the link, then click through the prompts.
```
cursor://anysphere.cursor-deeplink/mcp/install?name=PlantPredict&config=eyJ1cmwiOiAiaHR0cHM6Ly9tY3AucGxhbnRwcmVkaWN0LnRlcmFiYXNlLmVuZXJneSJ9
```
Click the "Add to Cursor" link above, or paste it into your browser's address bar.
If your browser asks whether to open Cursor, choose to open it.
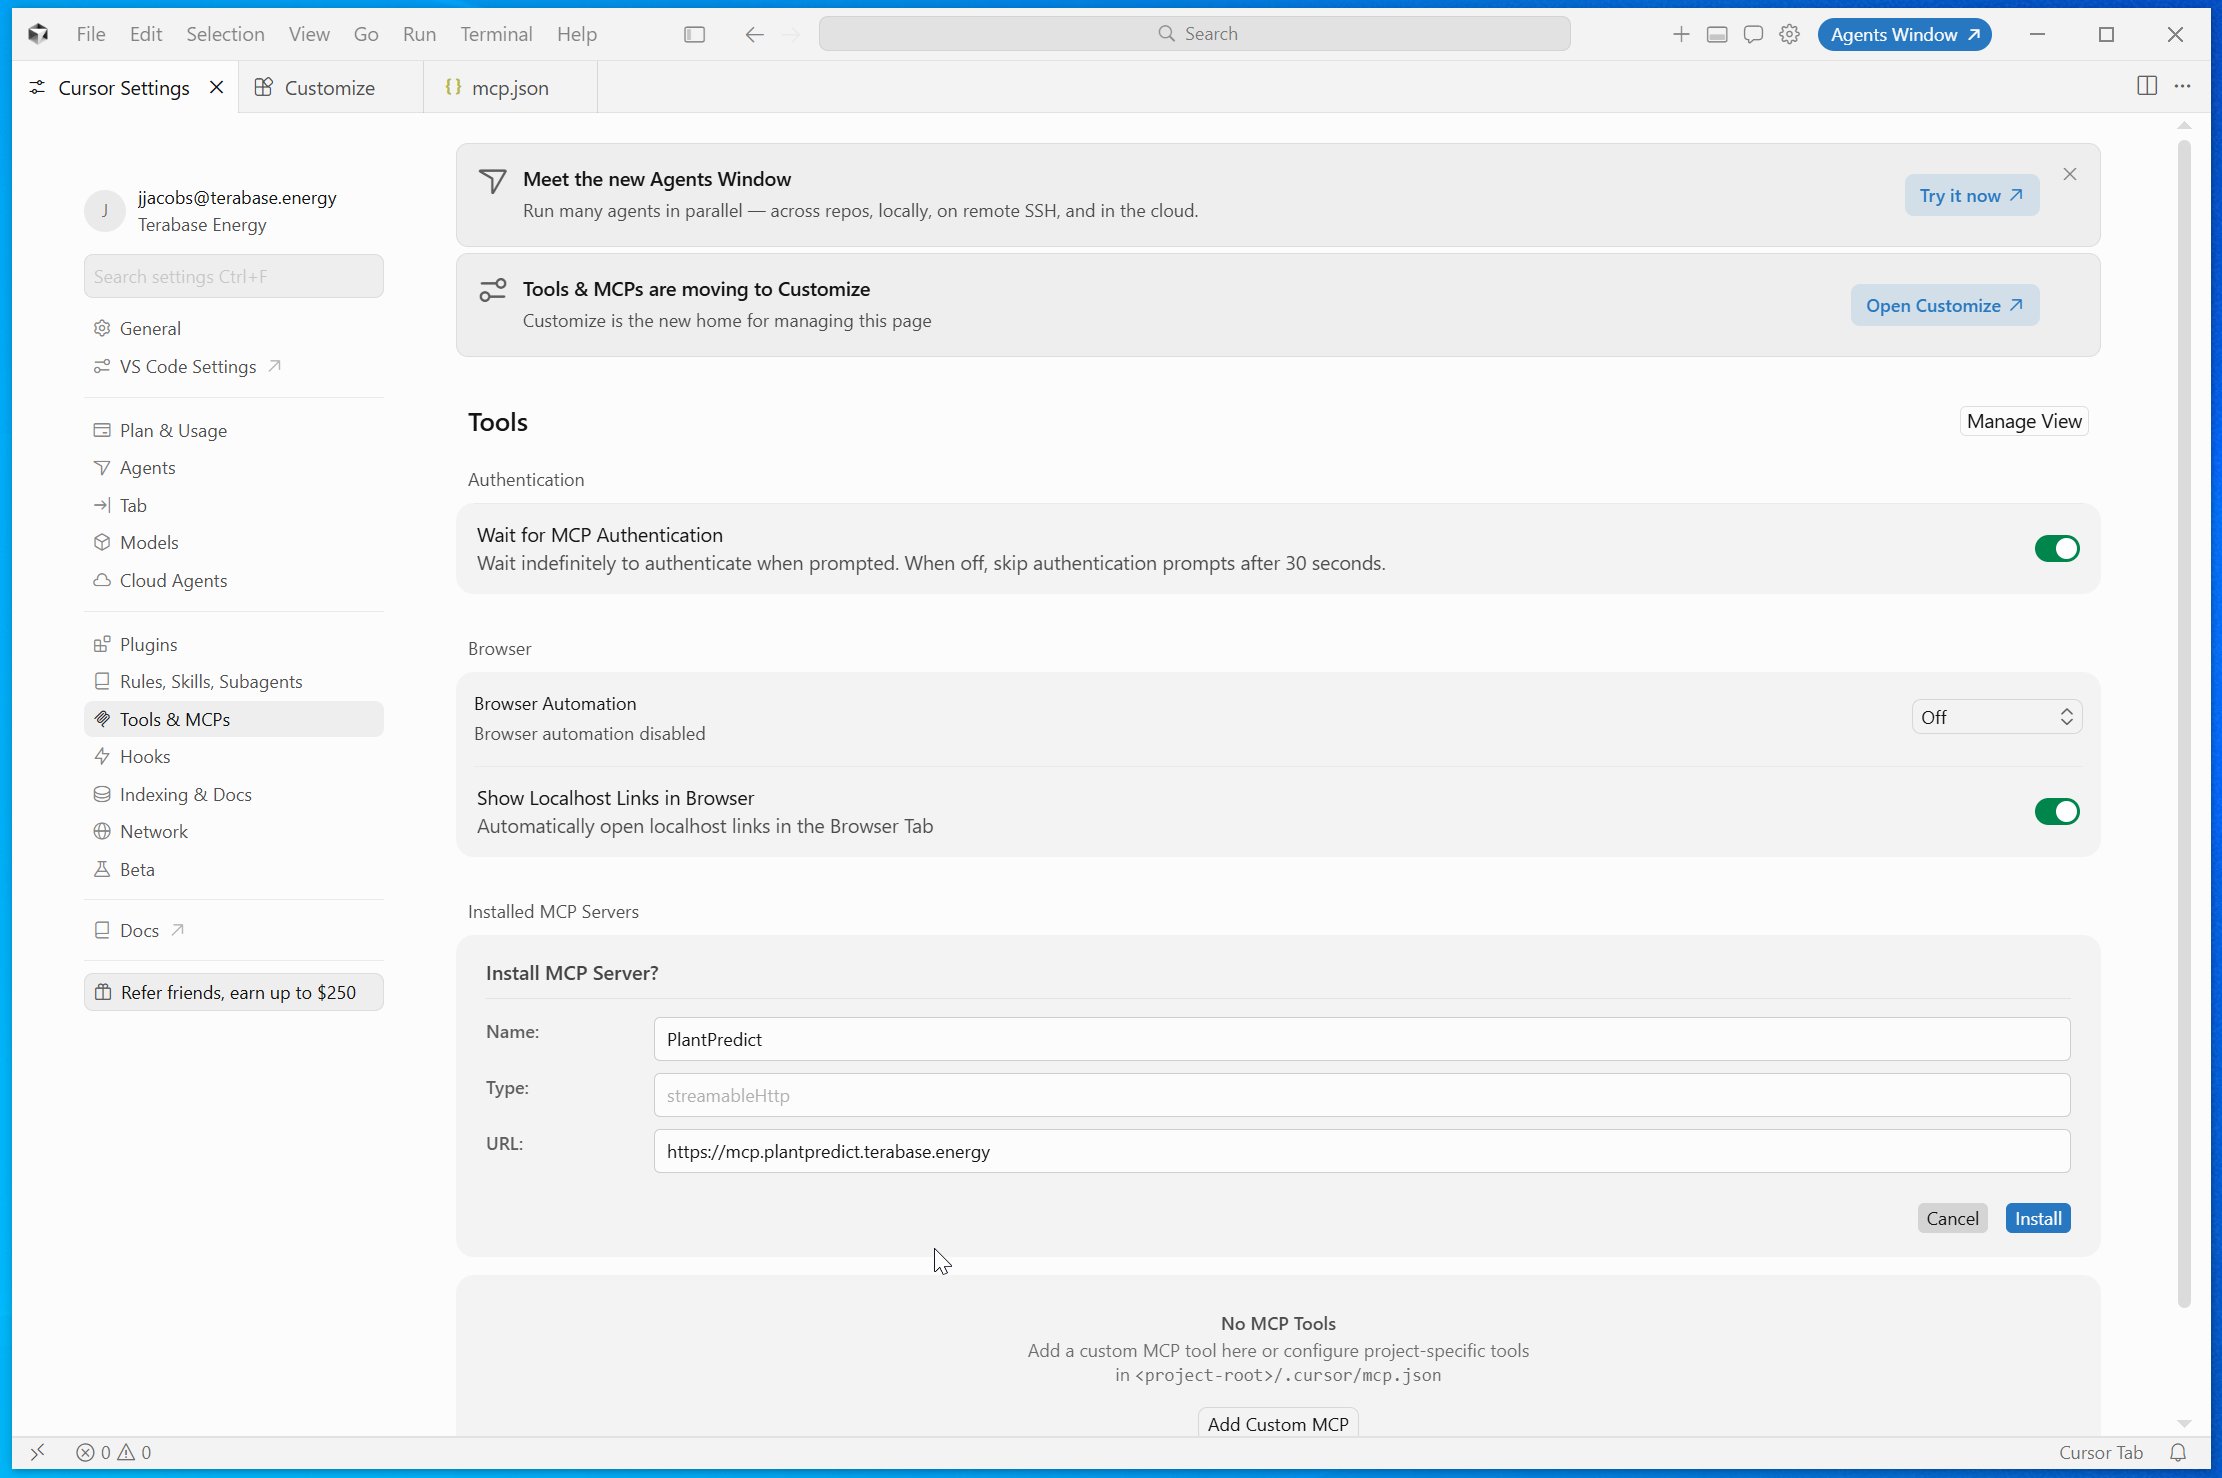
In Cursor, click **Install** to add the PlantPredict server.
***
## Cursor
### Add the PlantPredict server
In Cursor, the **New MCP Server** button opens a configuration file (`mcp.json`) rather than a fill-in form. The quickest way to avoid touching that file is the one-click link in Option A; if you prefer to do it by hand, Option B shows the one entry to paste. Use either — you only need one.
Use the "Add to Cursor" link below to let Cursor add PlantPredict for you — no files to edit. Click the link, then click through the prompts.
```
cursor://anysphere.cursor-deeplink/mcp/install?name=PlantPredict&config=eyJ1cmwiOiAiaHR0cHM6Ly9tY3AucGxhbnRwcmVkaWN0LnRlcmFiYXNlLmVuZXJneSJ9
```
Click the "Add to Cursor" link above, or paste it into your browser's address bar.
If your browser asks whether to open Cursor, choose to open it.
In Cursor, click **Install** to add the PlantPredict server.
 Click **Connect** to start signing in to PlantPredict.
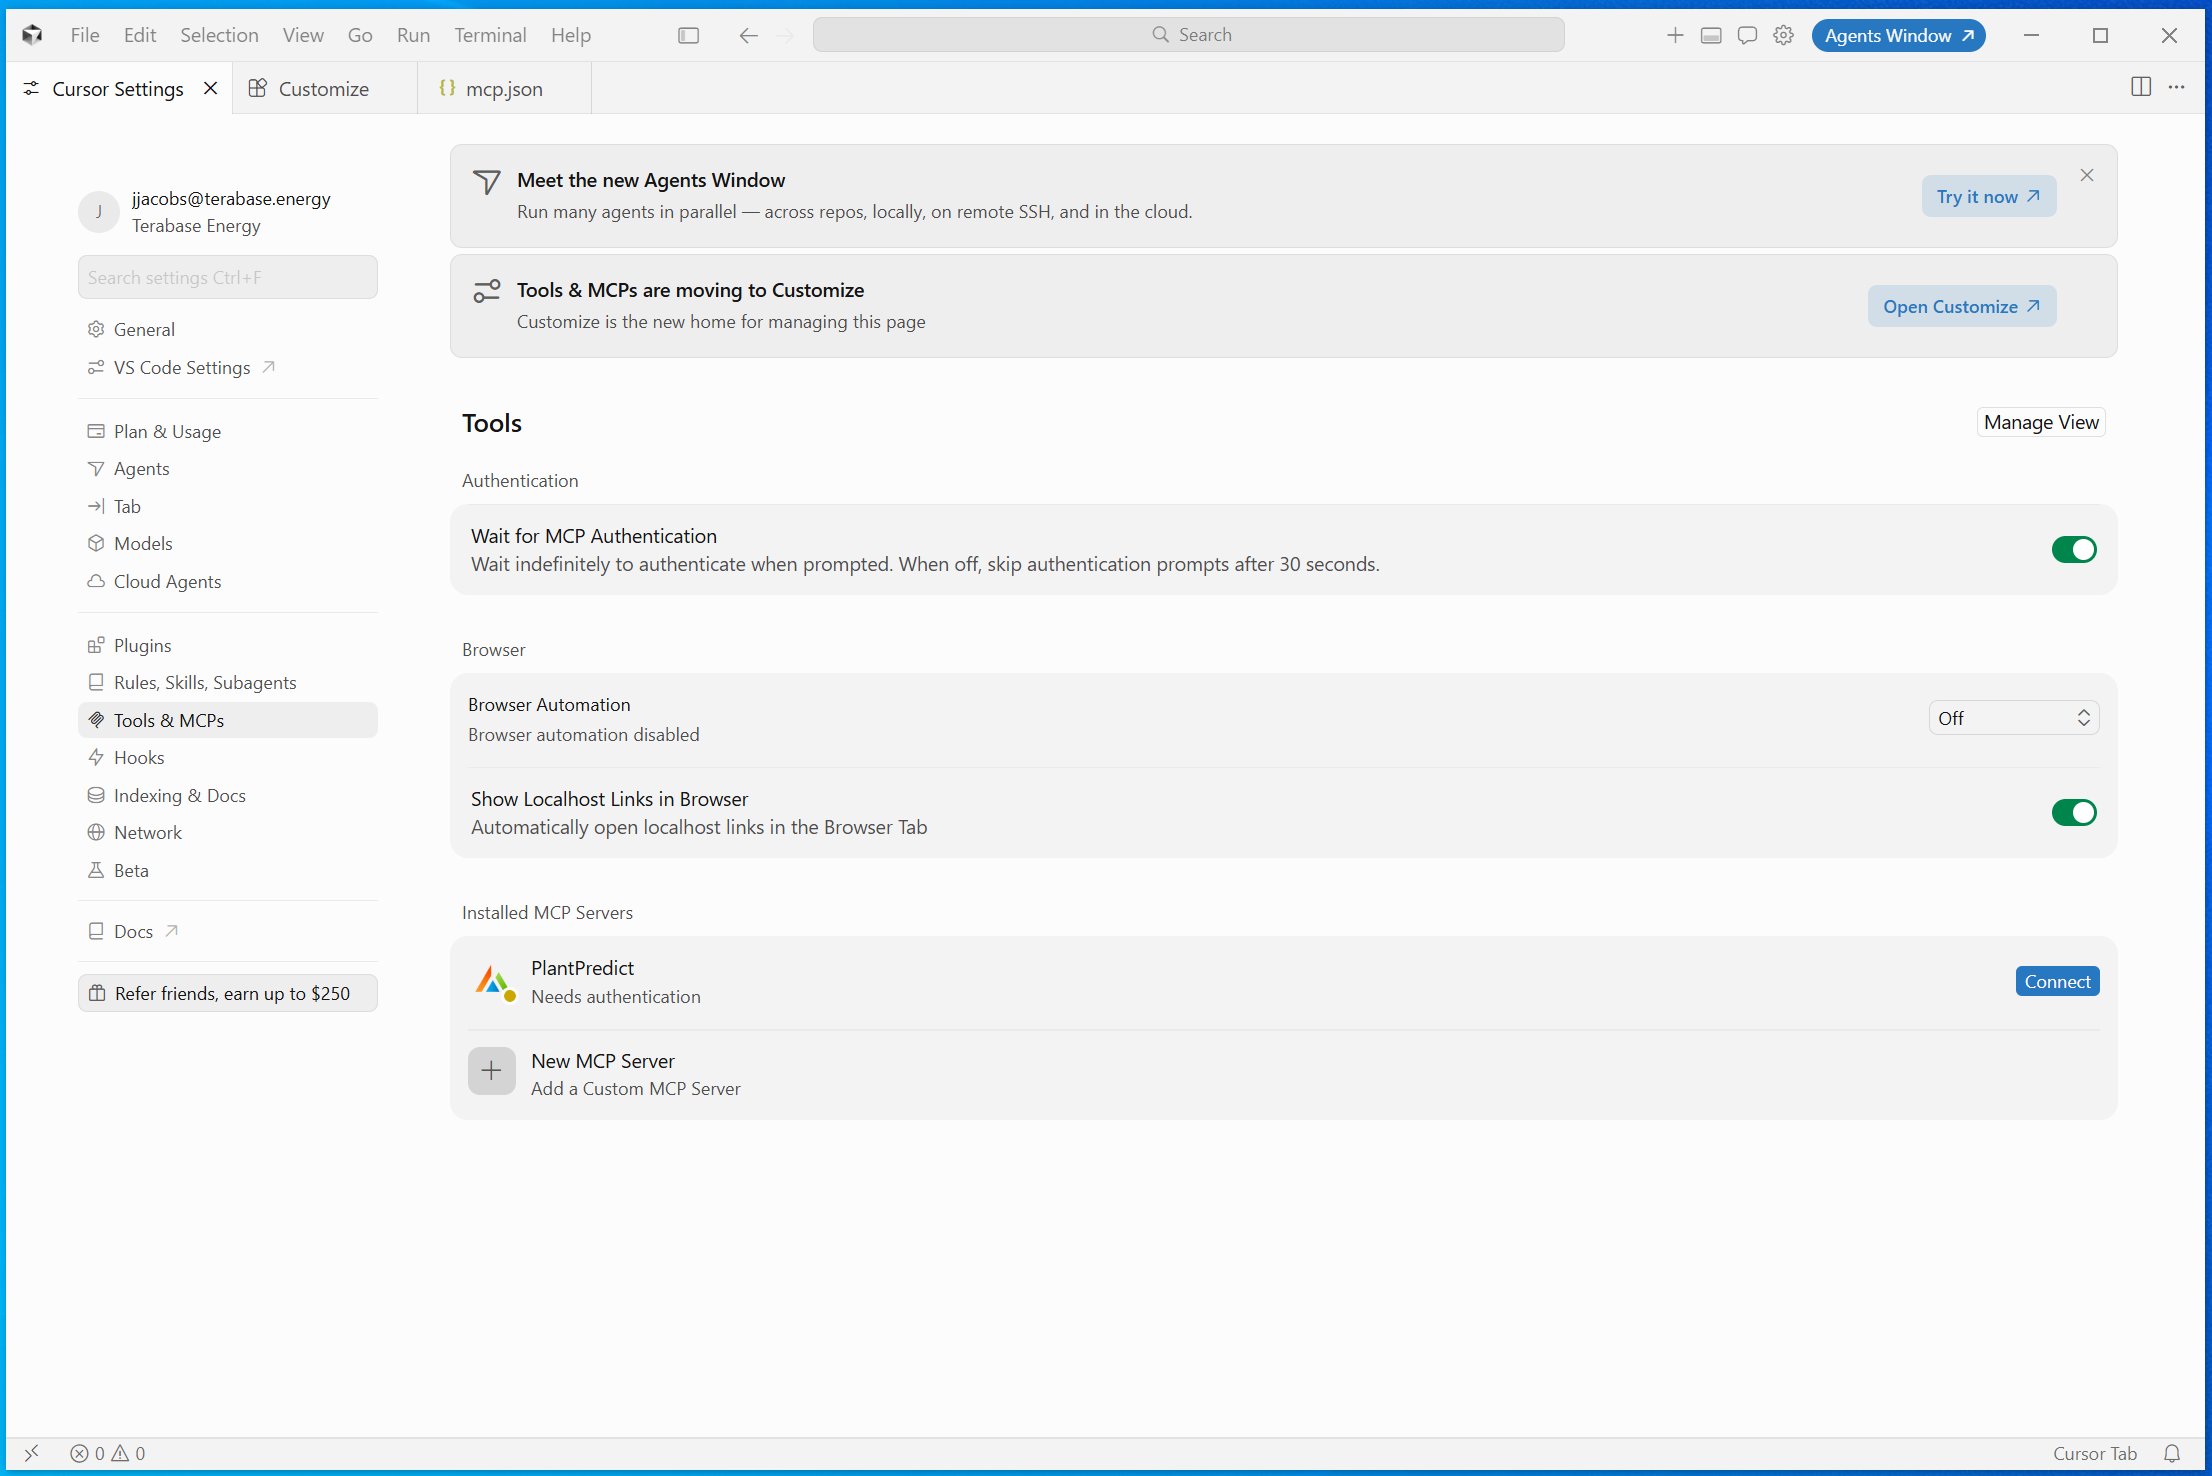 Enter your credentials and click **Sign In**.
Cursor shows a successful connection.
Enter your credentials and click **Sign In**.
Cursor shows a successful connection.
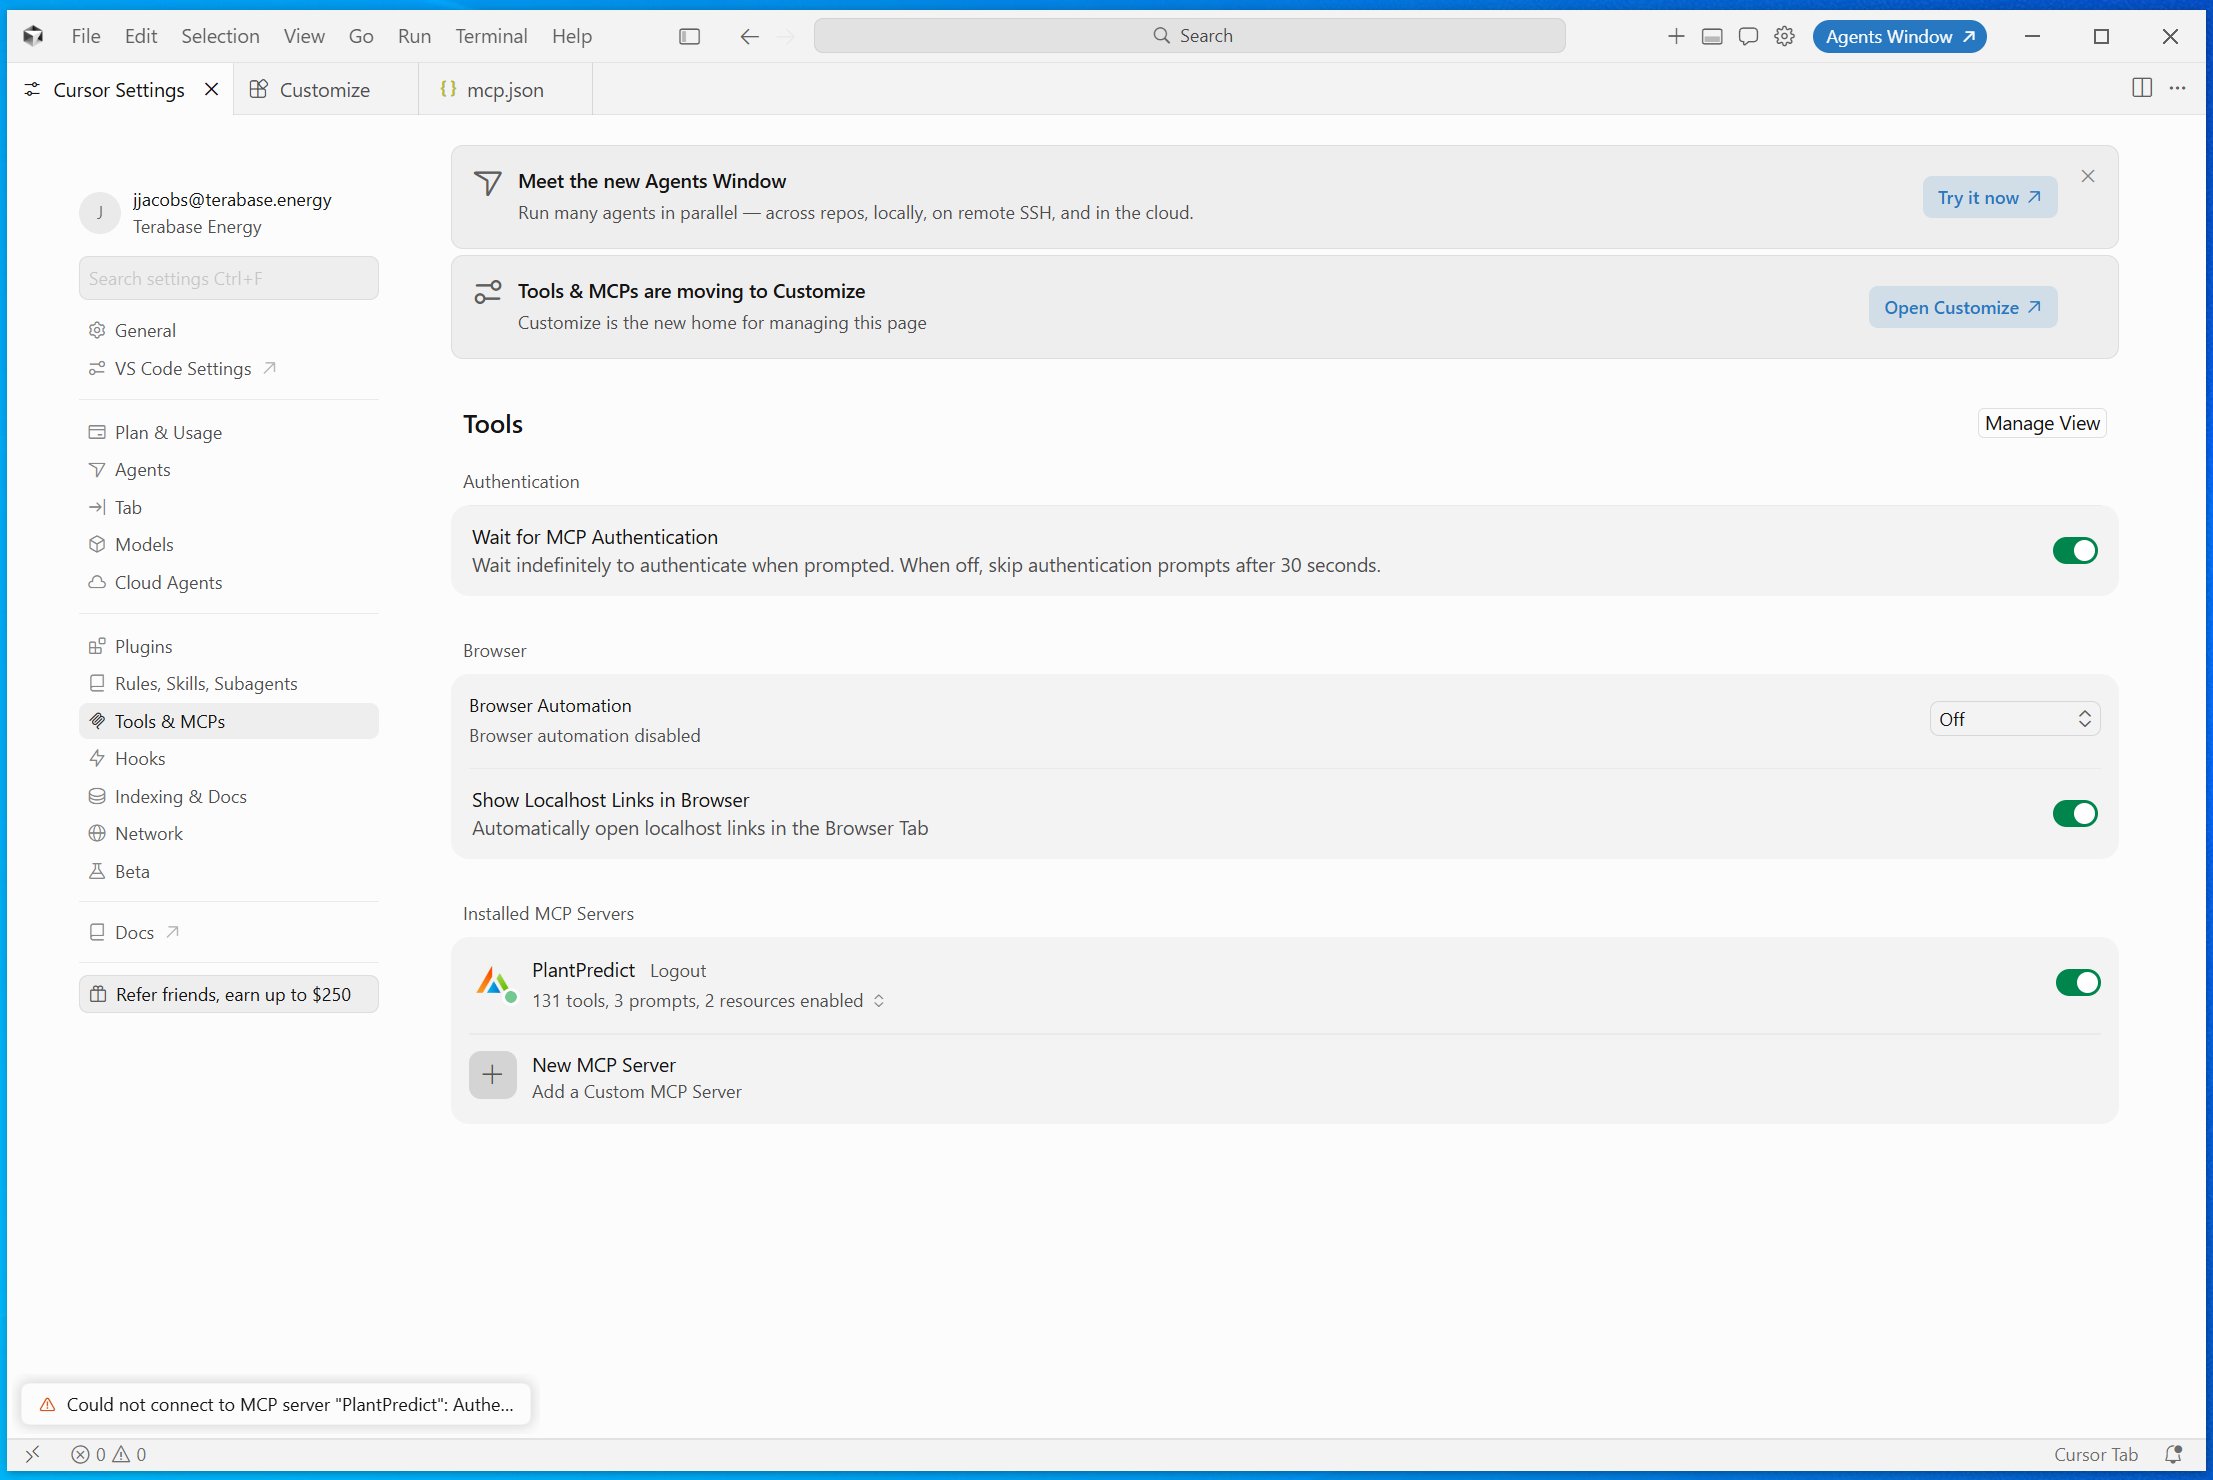 Open **Cursor Settings**, go to **Tools & MCPs**, and click **Add Custom MCP**. Cursor opens the `mcp.json` file. Add the PlantPredict entry inside the `mcpServers` section, then save:
```json theme={null}
{
"mcpServers": {
"PlantPredict": {
"url": "https://mcp.plantpredict.terabase.energy"
}
}
}
```
If the file already has other servers, add PlantPredict as another item inside `mcpServers`. Cursor picks up the change as soon as you save.
The file Cursor opens from Settings is `~/.cursor/mcp.json`, which makes PlantPredict available in every project.
Open **Cursor Settings**, go to **Tools & MCPs**, and click **Add Custom MCP**. Cursor opens the `mcp.json` file. Add the PlantPredict entry inside the `mcpServers` section, then save:
```json theme={null}
{
"mcpServers": {
"PlantPredict": {
"url": "https://mcp.plantpredict.terabase.energy"
}
}
}
```
If the file already has other servers, add PlantPredict as another item inside `mcpServers`. Cursor picks up the change as soon as you save.
The file Cursor opens from Settings is `~/.cursor/mcp.json`, which makes PlantPredict available in every project.
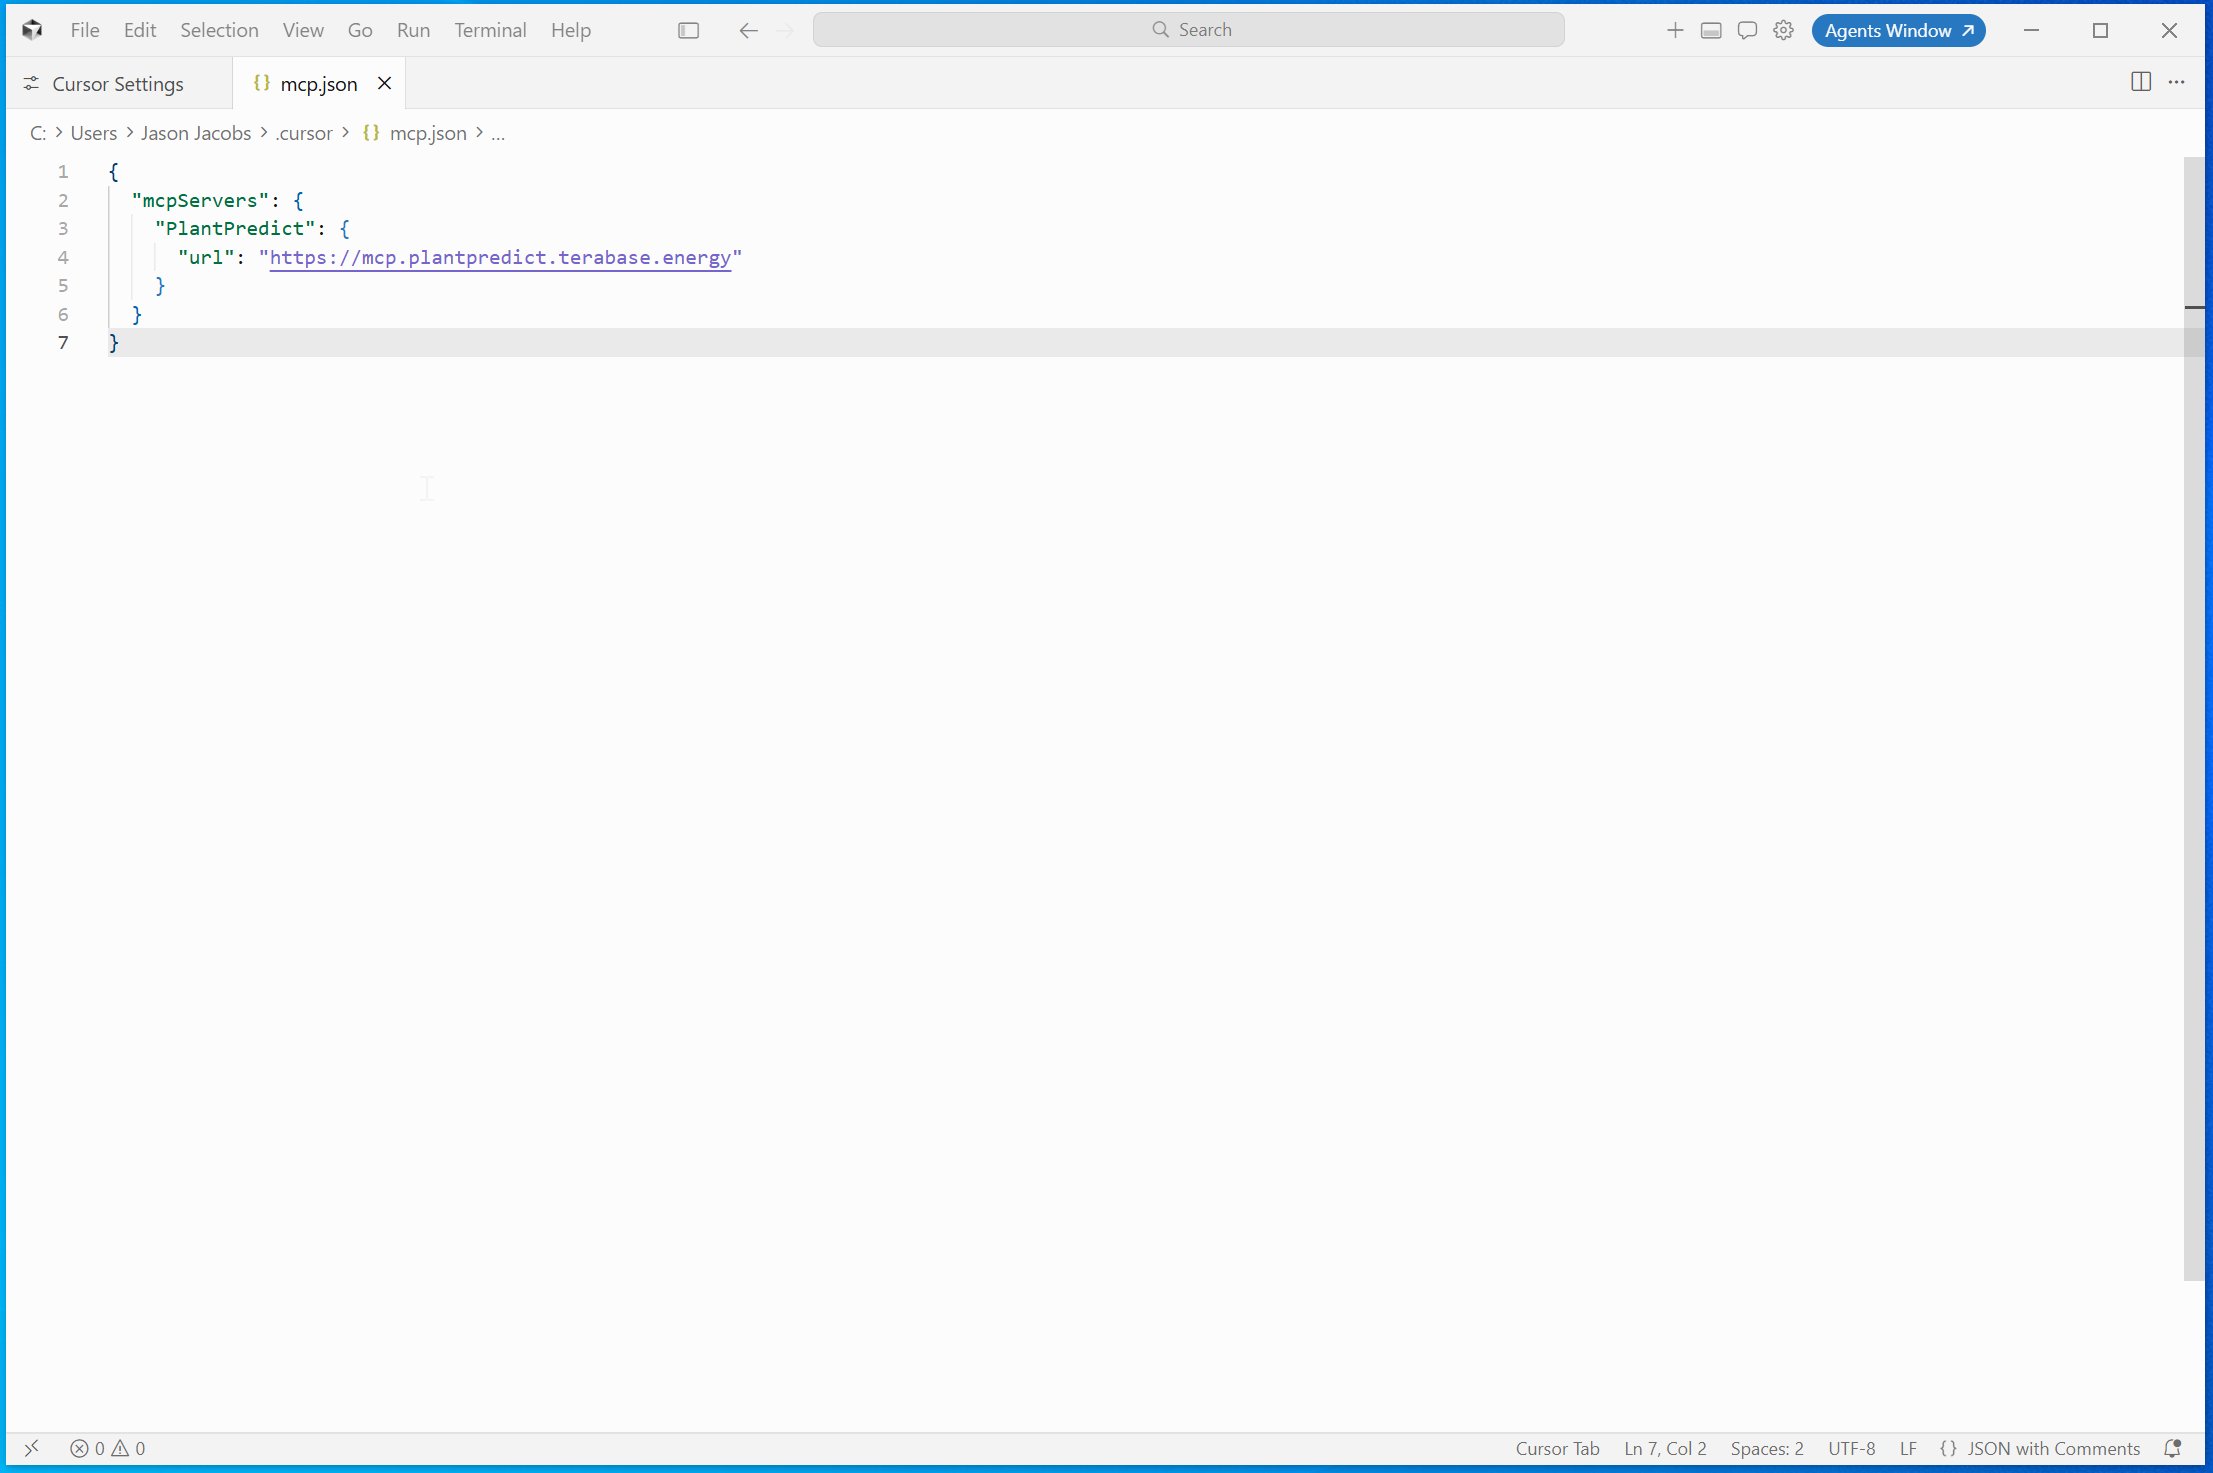 ### Finish connecting
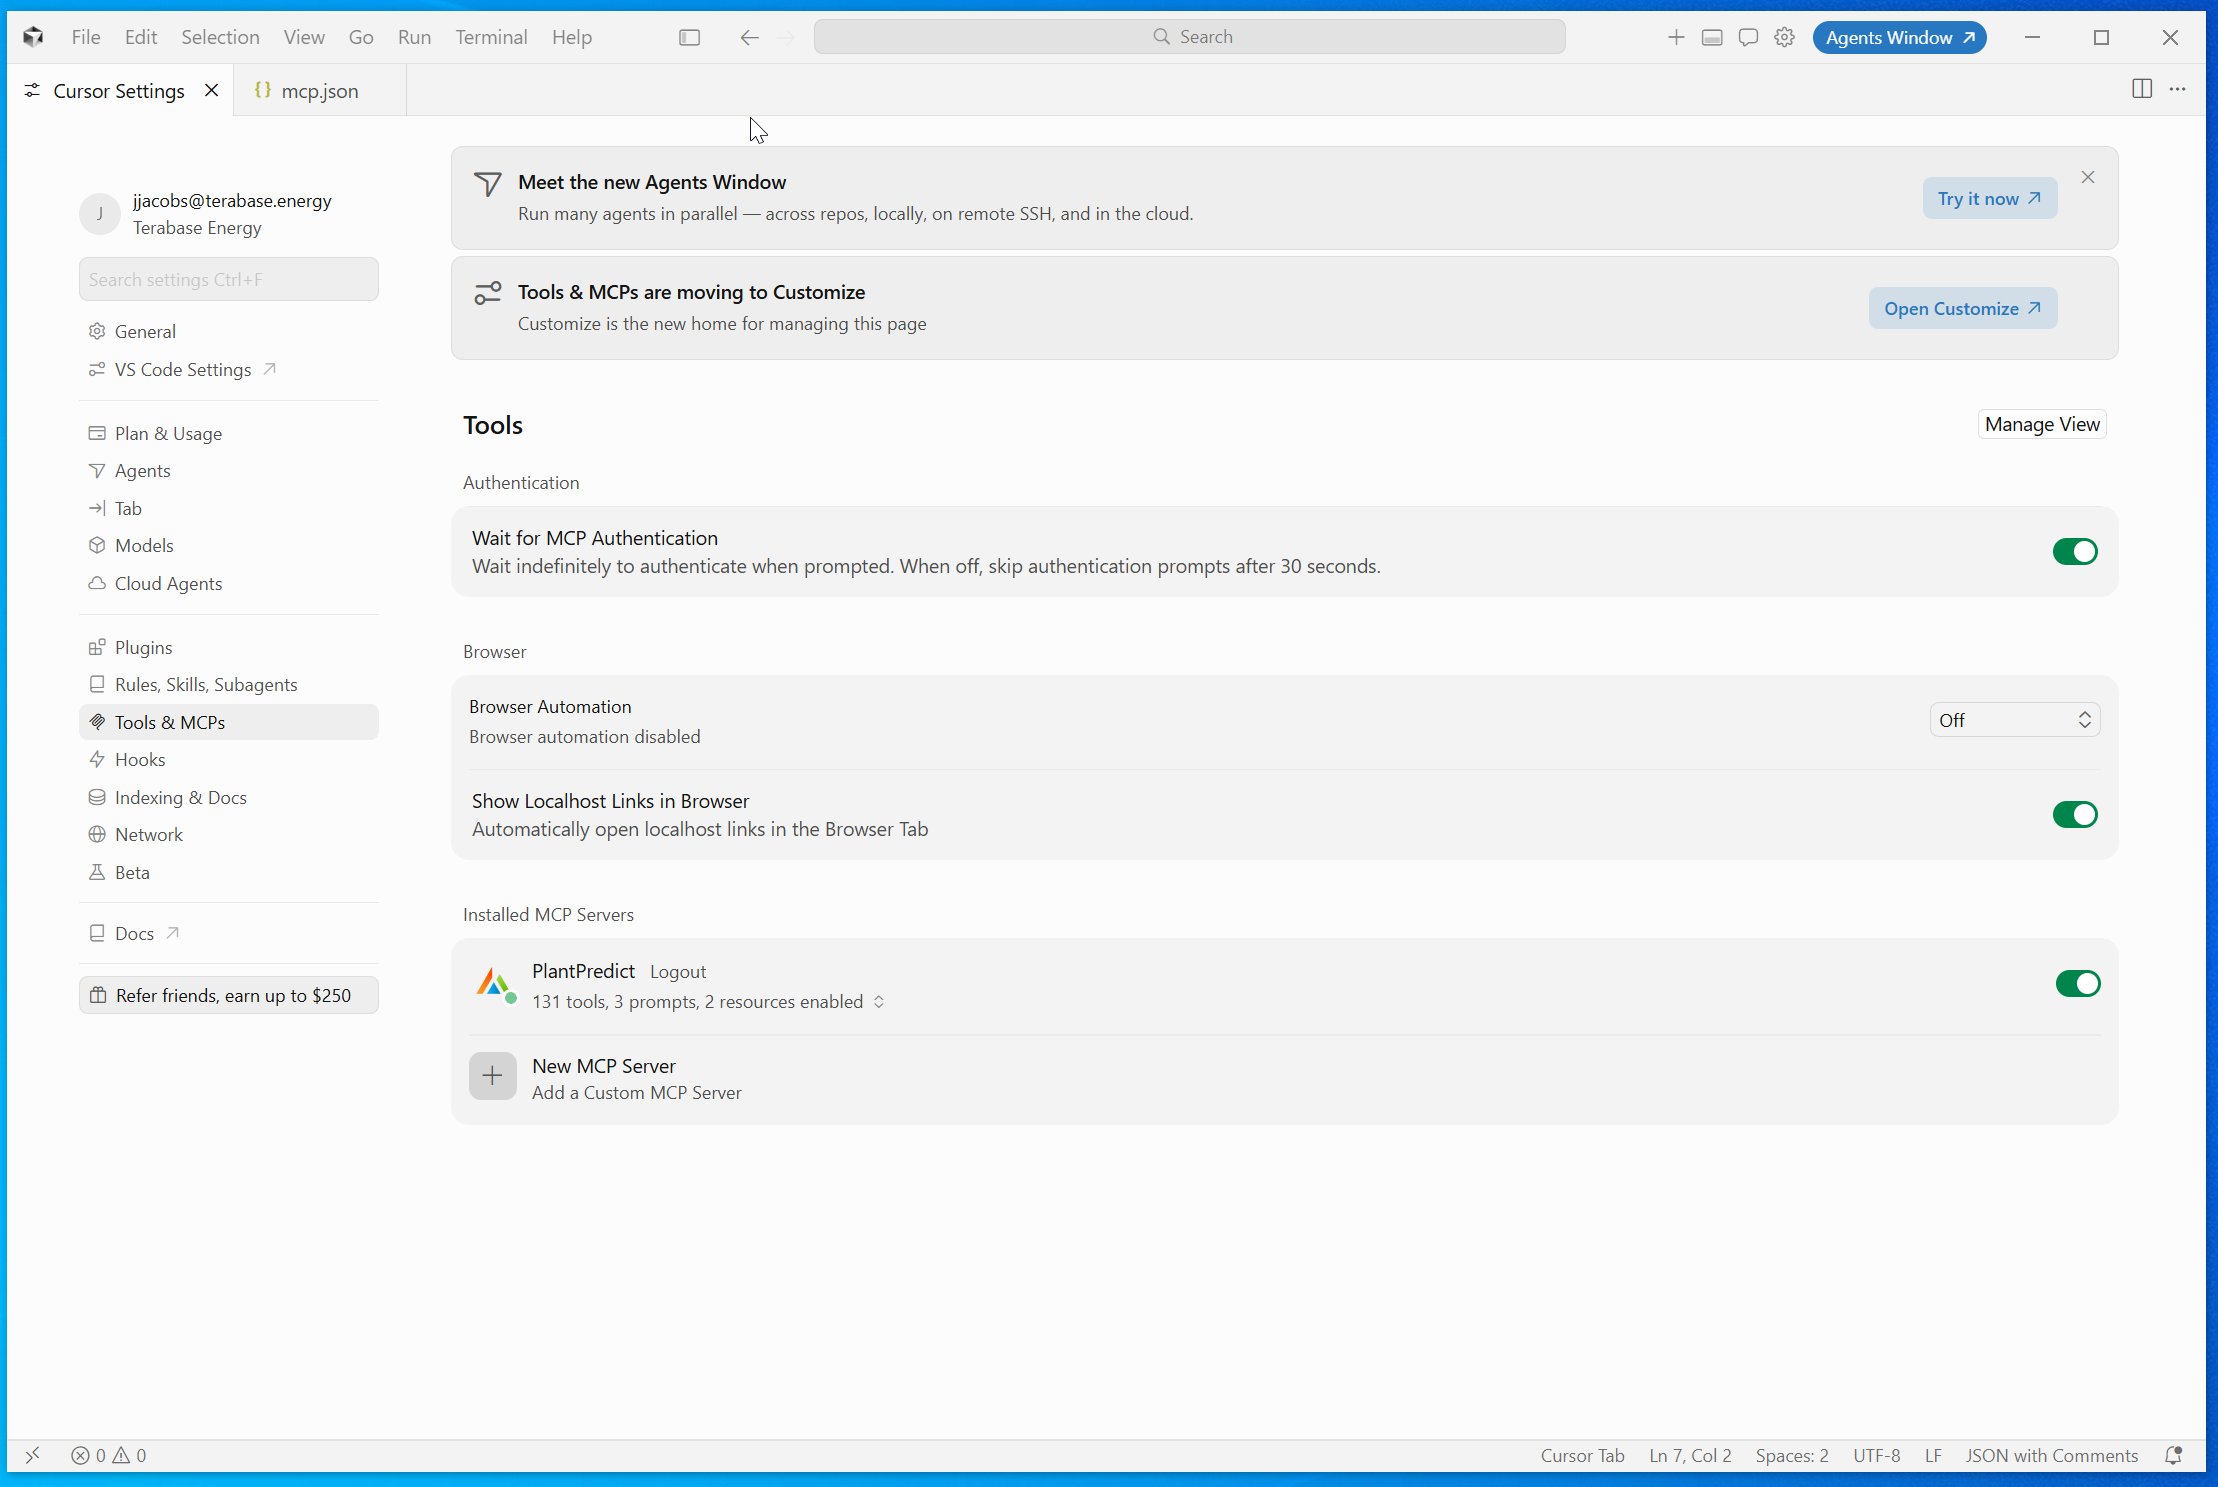
However you added it, PlantPredict requires you to sign in, so Cursor shows the server as needing authentication. Click **Connect**. Cursor opens a PlantPredict sign-in window — enter your PlantPredict email and password and approve access. Your password goes only to PlantPredict; Cursor never sees or stores it.
### Finish connecting
However you added it, PlantPredict requires you to sign in, so Cursor shows the server as needing authentication. Click **Connect**. Cursor opens a PlantPredict sign-in window — enter your PlantPredict email and password and approve access. Your password goes only to PlantPredict; Cursor never sees or stores it.
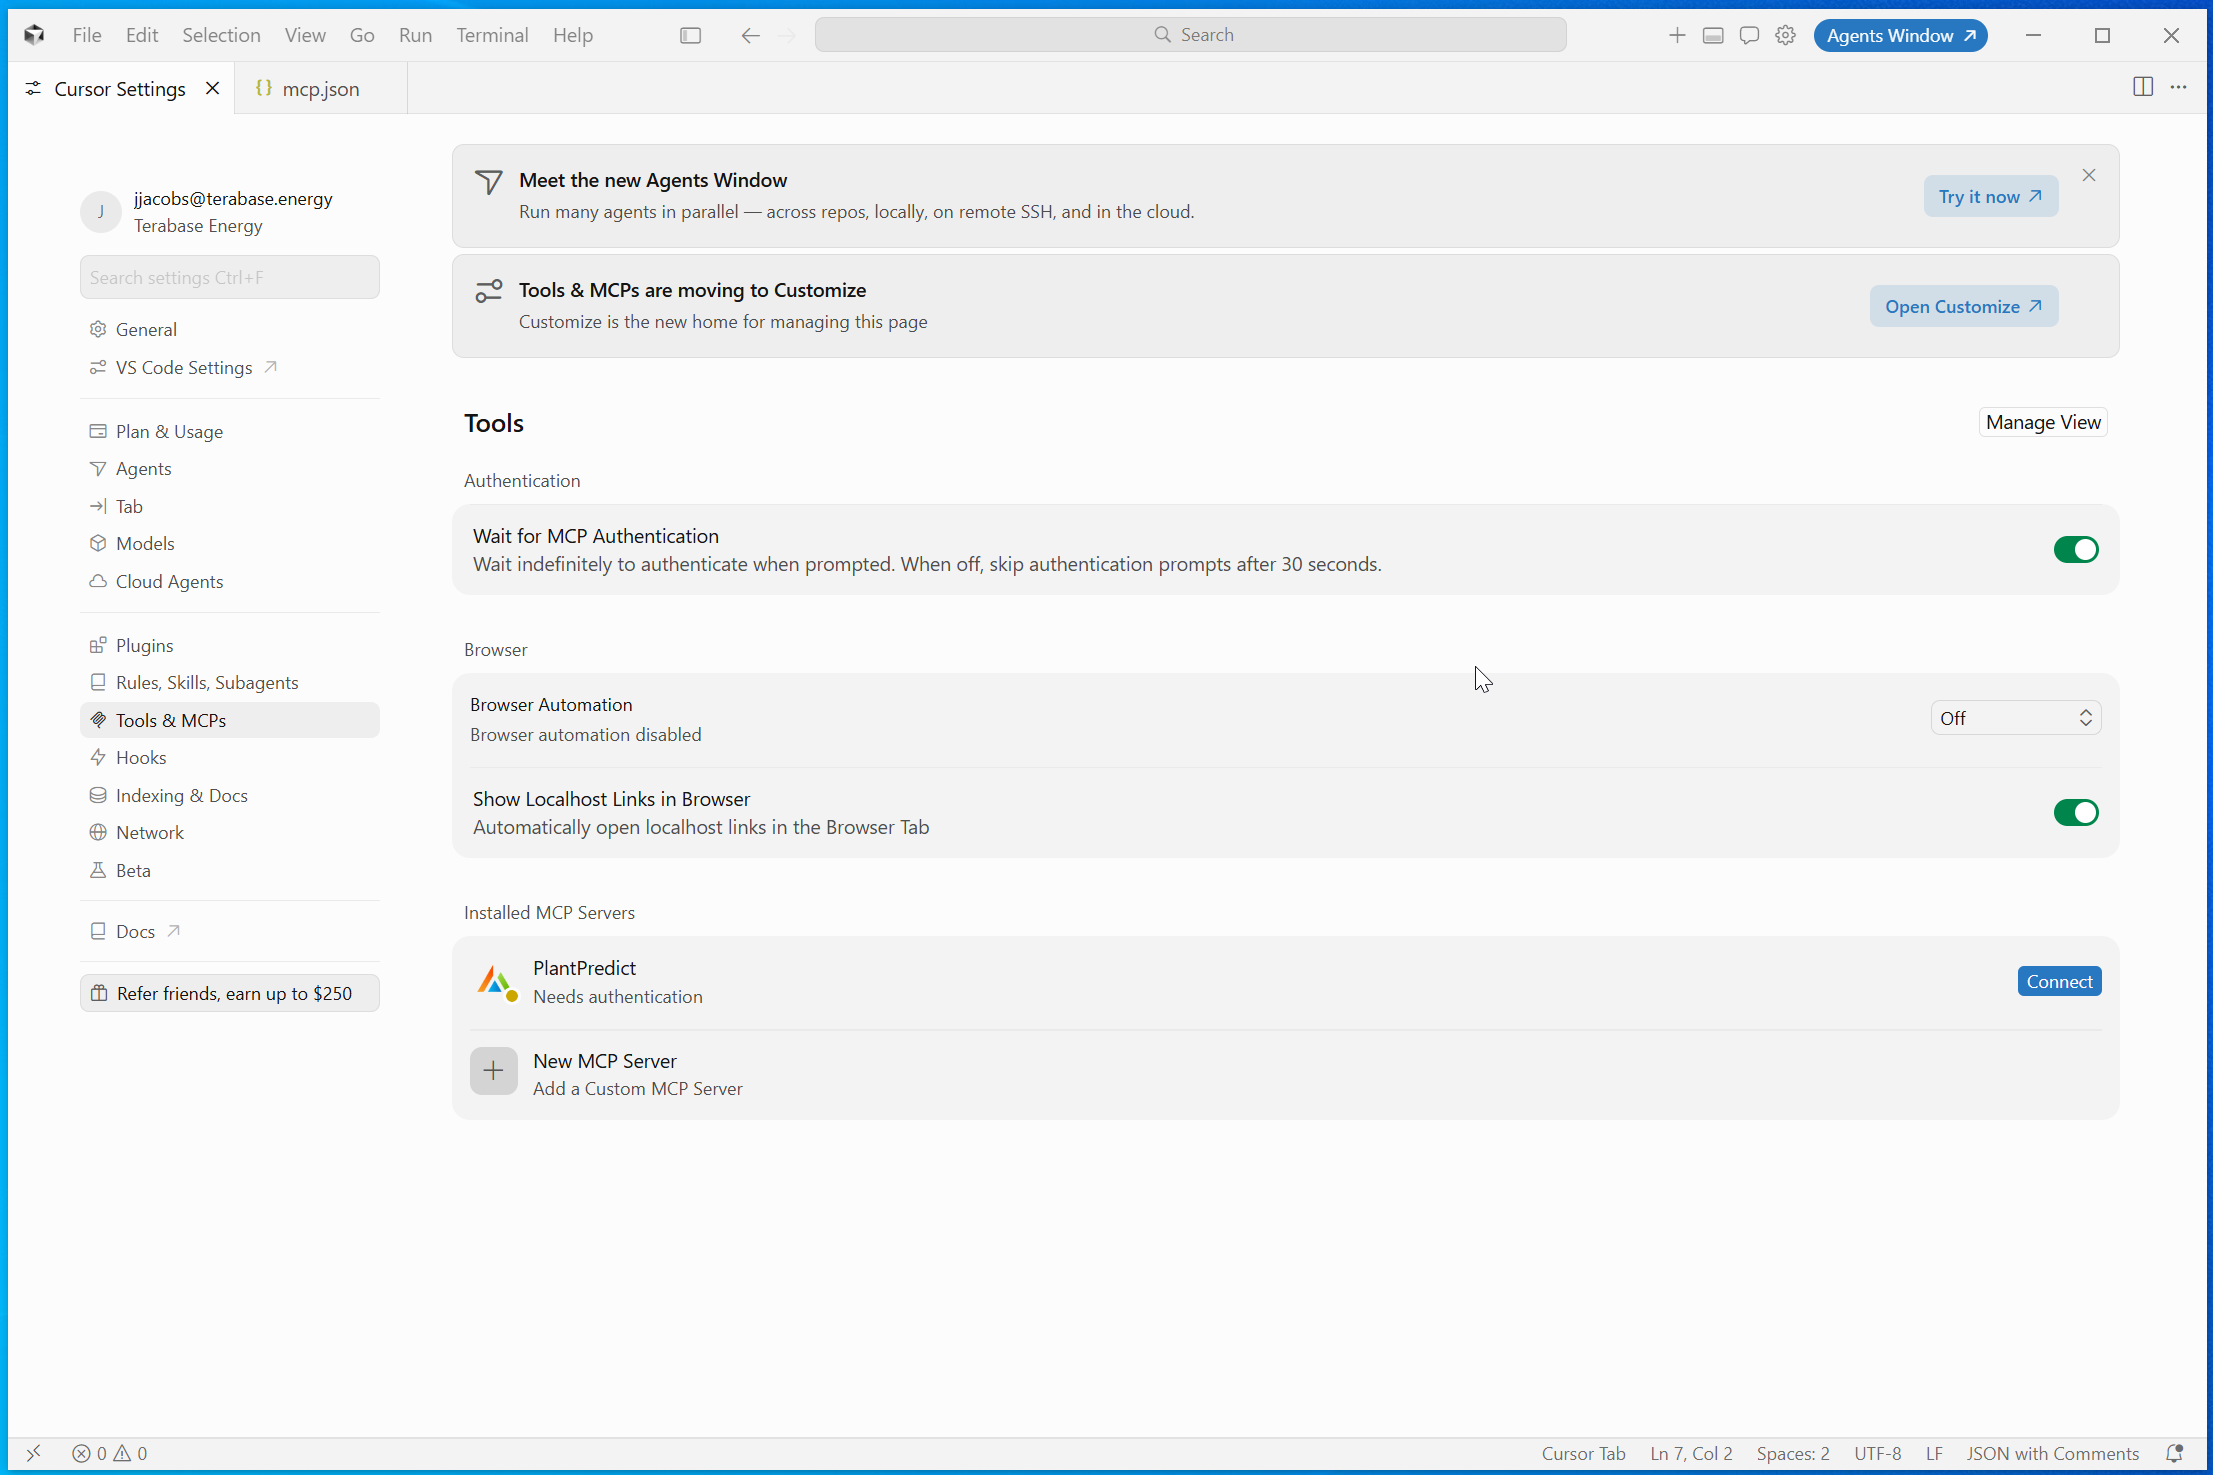 Enter your credentials and click **Sign In**.
Once you approve, the server shows as connected (a green indicator) and the PlantPredict tools appear in its list. Make sure the PlantPredict server's toggle is on.
Enter your credentials and click **Sign In**.
Once you approve, the server shows as connected (a green indicator) and the PlantPredict tools appear in its list. Make sure the PlantPredict server's toggle is on.
 ### Check that it is working
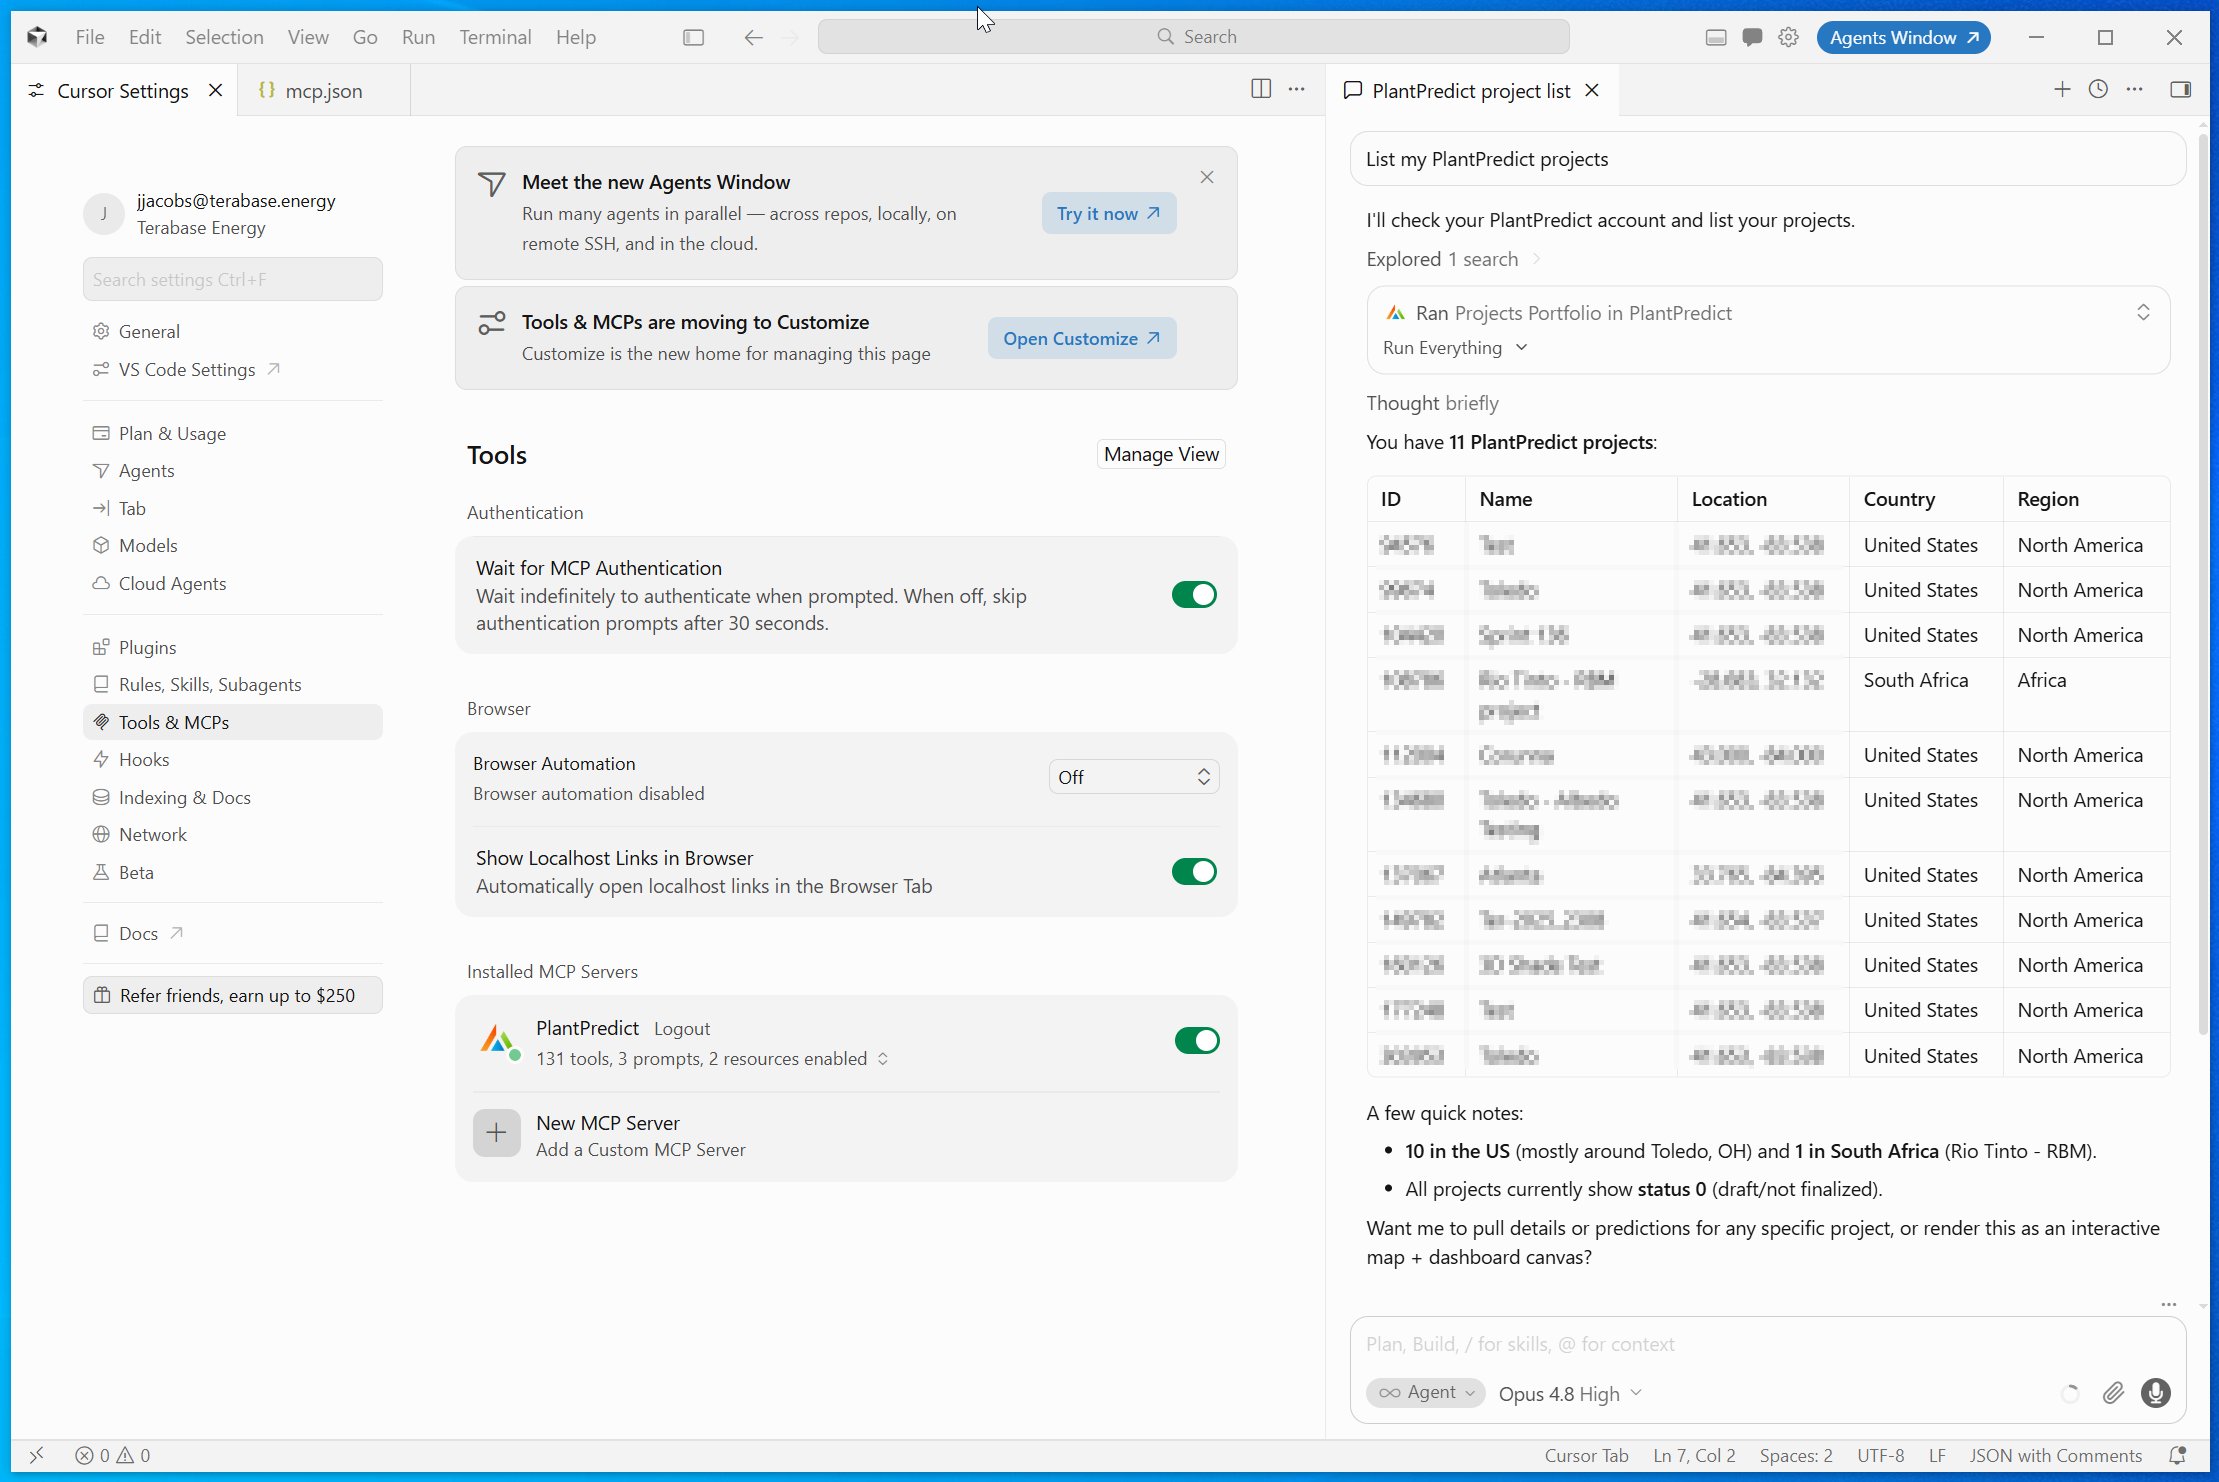
Open Cursor's Agent (the chat in Agent mode), make sure PlantPredict is enabled, and try a prompt such as:
* "List my PlantPredict projects."
* "Create a new project in Berkeley, CA."
* "Create a 5 MW prediction in project `/` and run it."
* "Show the summary results for prediction `/`."
Cursor's Agent will call the PlantPredict tools to answer — you may be asked to approve each tool run — and you will see the results right in the chat.
### Check that it is working
Open Cursor's Agent (the chat in Agent mode), make sure PlantPredict is enabled, and try a prompt such as:
* "List my PlantPredict projects."
* "Create a new project in Berkeley, CA."
* "Create a 5 MW prediction in project `/` and run it."
* "Show the summary results for prediction `/`."
Cursor's Agent will call the PlantPredict tools to answer — you may be asked to approve each tool run — and you will see the results right in the chat.
 ***
## What you can do with it
These sections apply to Claude, ChatGPT, and Cursor alike.
Once connected, you can ask your AI assistant to help with tasks such as:
* Browse your projects and predictions, and read their results.
* Create, size, and run predictions.
* Import weather files and 3D shade scenes.
* Generate and download reports.
* Look up modules, inverters, and other library items.
## Good to know
* **It acts as you.** Everything your AI assistant does runs under your PlantPredict account and permissions — nothing you could not do yourself.
* **Your password is never stored.** Only short-lived access tokens are used after you sign in.
* **You may need to sign in again occasionally.** If prompted, simply reconnect — this is expected.
* **Access is limited by region.** Connections from US-sanctioned countries are intentionally blocked.
* **Claude — new tools appear in a new conversation.** If you just connected and do not see PlantPredict tools, start a fresh conversation.
* **ChatGPT — turn the connector on in each chat.** In a new chat, enable PlantPredict from the connectors or tools menu so ChatGPT can use it.
* **Cursor — use Agent mode.** PlantPredict tools are available to Cursor's Agent; a plain chat without the Agent will not call them.
* **Cursor — you may be asked to approve tool runs.** Cursor can prompt before running a tool — approve to continue, or turn on auto-run in settings if you prefer.
## If something goes wrong
Most issues have a quick fix:
Your company does not yet have connector access. Ask a PlantPredict administrator to enable "Allow MCP Server Access For API Users" and confirm your subscription is active.
In Claude or ChatGPT, disconnect and reconnect the PlantPredict connector — it will sign you in again and refresh automatically. In Cursor, open Tools & Integrations settings and click **Login** again (or turn the PlantPredict server off and back on).
Start a new conversation or chat with the connector turned on. In Cursor, make sure the PlantPredict server is turned on in settings and that you are using the Agent.
Your plan or workspace may not have custom connectors enabled — check with your ChatGPT workspace administrator.
Use Option B instead — click **New MCP Server** and paste the entry into `mcp.json`.
Check that the URL in `mcp.json` is exactly the connector address above, and that you completed the Login step for a green, connected status.
The connection is coming from a region where access is not permitted.
## Need help?
If you cannot connect or an action keeps failing, contact your PlantPredict administrator or [PlantPredict support](mailto:support@plantpredict.com), and let us know what you were doing and the exact message you saw. We will look into it.
***
## What you can do with it
These sections apply to Claude, ChatGPT, and Cursor alike.
Once connected, you can ask your AI assistant to help with tasks such as:
* Browse your projects and predictions, and read their results.
* Create, size, and run predictions.
* Import weather files and 3D shade scenes.
* Generate and download reports.
* Look up modules, inverters, and other library items.
## Good to know
* **It acts as you.** Everything your AI assistant does runs under your PlantPredict account and permissions — nothing you could not do yourself.
* **Your password is never stored.** Only short-lived access tokens are used after you sign in.
* **You may need to sign in again occasionally.** If prompted, simply reconnect — this is expected.
* **Access is limited by region.** Connections from US-sanctioned countries are intentionally blocked.
* **Claude — new tools appear in a new conversation.** If you just connected and do not see PlantPredict tools, start a fresh conversation.
* **ChatGPT — turn the connector on in each chat.** In a new chat, enable PlantPredict from the connectors or tools menu so ChatGPT can use it.
* **Cursor — use Agent mode.** PlantPredict tools are available to Cursor's Agent; a plain chat without the Agent will not call them.
* **Cursor — you may be asked to approve tool runs.** Cursor can prompt before running a tool — approve to continue, or turn on auto-run in settings if you prefer.
## If something goes wrong
Most issues have a quick fix:
Your company does not yet have connector access. Ask a PlantPredict administrator to enable "Allow MCP Server Access For API Users" and confirm your subscription is active.
In Claude or ChatGPT, disconnect and reconnect the PlantPredict connector — it will sign you in again and refresh automatically. In Cursor, open Tools & Integrations settings and click **Login** again (or turn the PlantPredict server off and back on).
Start a new conversation or chat with the connector turned on. In Cursor, make sure the PlantPredict server is turned on in settings and that you are using the Agent.
Your plan or workspace may not have custom connectors enabled — check with your ChatGPT workspace administrator.
Use Option B instead — click **New MCP Server** and paste the entry into `mcp.json`.
Check that the URL in `mcp.json` is exactly the connector address above, and that you completed the Login step for a green, connected status.
The connection is coming from a region where access is not permitted.
## Need help?
If you cannot connect or an action keeps failing, contact your PlantPredict administrator or [PlantPredict support](mailto:support@plantpredict.com), and let us know what you were doing and the exact message you saw. We will look into it.