> ## Documentation Index
> Fetch the complete documentation index at: https://docs.plantpredict.com/llms.txt
> Use this file to discover all available pages before exploring further.
# PlantPredict Performance API - Quick Start Guide
Note: The PlantPredict Performance API requires an active PlantPredict license plus the Performance API extension. API access is granted on a company-wide basis and API credentials are unique to each user account.
## Step 1: Get your API credentials
Once you’ve logged into PlantPredict, if you can see the gear icon at the bottom left corner of the page, you are an Admin user capable of generating your own API credentials (as well as other team member credentials) and should proceed to **Step 1a**. If you cannot see the gear icon, proceed to **Step 1b**.
 ## Step 1a: Generate API credentials yourself
Click the gear icon to open your Company Account Management page. Search for the user’s name that you want to create API credentials for and click that name. Click the **Generate API Credentials** button in the upper right corner of page and click **Continue** at the Warning prompt.
## Step 1a: Generate API credentials yourself
Click the gear icon to open your Company Account Management page. Search for the user’s name that you want to create API credentials for and click that name. Click the **Generate API Credentials** button in the upper right corner of page and click **Continue** at the Warning prompt.
 ## Step 1b: Request API credentials from your PlantPredict company admin
You’ll need to request API credentials from your Company Admin. Ask them to follow **Step 1a** to generate credentials on your behalf.
## Step 2: Open an API client
It is helpful to work with an API Client application to interact with the PlantPredict API. If you don’t already have a preferred API Client, we recommend Postman. Create a free Postman account here: [https://www.postman.com/](https://www.postman.com/).
## Step 3: Create a new Workspace within Postman
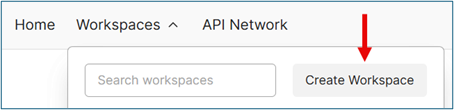
We recommend creating a new Workspace to hold the PlantPredict API collection of requests. To do this, click on Workspaces in the upper left corner of page, click **Create Workspace**, select**Blank Workspace** , enter a name for your Workspace, select **Internal**, and click **Create**. Now you have a destination Workspace to import the PlantPredict API collection.
## Step 1b: Request API credentials from your PlantPredict company admin
You’ll need to request API credentials from your Company Admin. Ask them to follow **Step 1a** to generate credentials on your behalf.
## Step 2: Open an API client
It is helpful to work with an API Client application to interact with the PlantPredict API. If you don’t already have a preferred API Client, we recommend Postman. Create a free Postman account here: [https://www.postman.com/](https://www.postman.com/).
## Step 3: Create a new Workspace within Postman
We recommend creating a new Workspace to hold the PlantPredict API collection of requests. To do this, click on Workspaces in the upper left corner of page, click **Create Workspace**, select**Blank Workspace** , enter a name for your Workspace, select **Internal**, and click **Create**. Now you have a destination Workspace to import the PlantPredict API collection.
 ## Step 4: Access the PlantPredict API documentation
Open the API documentation here: [https://documenter.getpostman.com/view/3855302/UVsHUoHa](https://documenter.getpostman.com/view/3855302/UVsHUoHa). This contains general information about the API, documentation on each request type and example requests and responses
## Step 5: Import the PlantPredict API Collection into Postman
With the documentation open, click \*\*Run in Postman \*\*in the upper right corner of page. Select \*\*Postman for Web \*\*(unless you are using the desktop version of Postman). Select the Workspace you created in Step 5 and click **Import**. You now have the complete PlantPredict API collection of requests and documentation within your Postman Workspace.
## Step 4: Access the PlantPredict API documentation
Open the API documentation here: [https://documenter.getpostman.com/view/3855302/UVsHUoHa](https://documenter.getpostman.com/view/3855302/UVsHUoHa). This contains general information about the API, documentation on each request type and example requests and responses
## Step 5: Import the PlantPredict API Collection into Postman
With the documentation open, click \*\*Run in Postman \*\*in the upper right corner of page. Select \*\*Postman for Web \*\*(unless you are using the desktop version of Postman). Select the Workspace you created in Step 5 and click **Import**. You now have the complete PlantPredict API collection of requests and documentation within your Postman Workspace.
 ## Step 6: Generate your access token
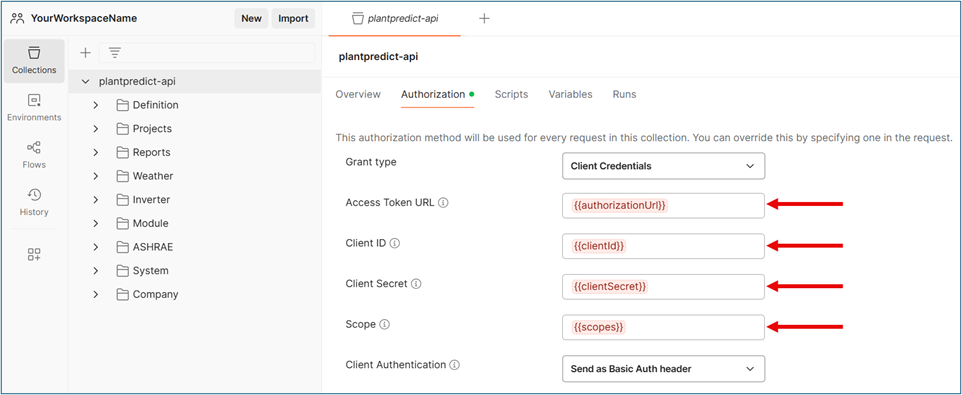
Navigate to the Authorization page of the plantpredict-api collection and complete the following fields:
* **Access Token URL:** [https://terabase-prd.auth.us-west-2.amazoncognito.com/oauth2/token](https://terabase-prd.auth.us-west-2.amazoncognito.com/oauth2/token)
* **Client ID:** \
* **Client Secret:** \
* **Scope:** transactions/post transactions/get
## Step 6: Generate your access token
Navigate to the Authorization page of the plantpredict-api collection and complete the following fields:
* **Access Token URL:** [https://terabase-prd.auth.us-west-2.amazoncognito.com/oauth2/token](https://terabase-prd.auth.us-west-2.amazoncognito.com/oauth2/token)
* **Client ID:** \
* **Client Secret:** \
* **Scope:** transactions/post transactions/get
 Scroll to the bottom of Authorization page, click **Get New Access Token**, then click **Proceed** and finally click **Use Token**. You should now have a valid API access token saved.
## Step 7: Enter the base URL for the API Collection
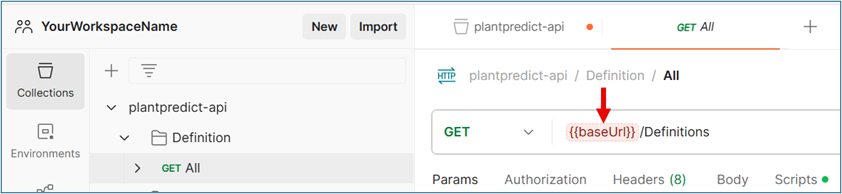
Within your Postman Workspace, click on any of the requests within the plantpredict-api collection folders and enter the Base URL as: [https://api.plantpredict.terabase.energy](https://api.plantpredict.terabase.energy). This step automatically updates the Base URL throughout the entire collection.
Scroll to the bottom of Authorization page, click **Get New Access Token**, then click **Proceed** and finally click **Use Token**. You should now have a valid API access token saved.
## Step 7: Enter the base URL for the API Collection
Within your Postman Workspace, click on any of the requests within the plantpredict-api collection folders and enter the Base URL as: [https://api.plantpredict.terabase.energy](https://api.plantpredict.terabase.energy). This step automatically updates the Base URL throughout the entire collection.
 ## Step 8: Test your API connection:
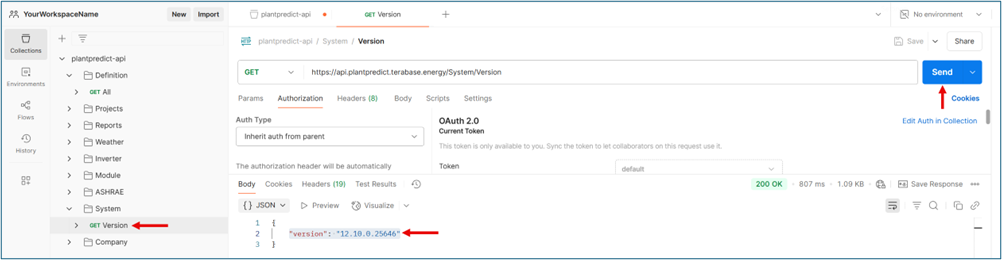
Navigate to the **System -> GET Version** request and click on it. Click the **Send** button and verify you receive a valid response (such as: *"version": "12.10.0.25646"*).
## Step 8: Test your API connection:
Navigate to the **System -> GET Version** request and click on it. Click the **Send** button and verify you receive a valid response (such as: *"version": "12.10.0.25646"*).
 You now have full access to send/receive data via the PlantPredict API using any of the GET, POST, PUT or DEL requests within the plantpredict-api collection!